Sample Configurations
The following subsections present three situations that build on each other as the network and the needs of the enterprise change. Each type of authentication is demonstrated.
A User Authentication Example
The Situation
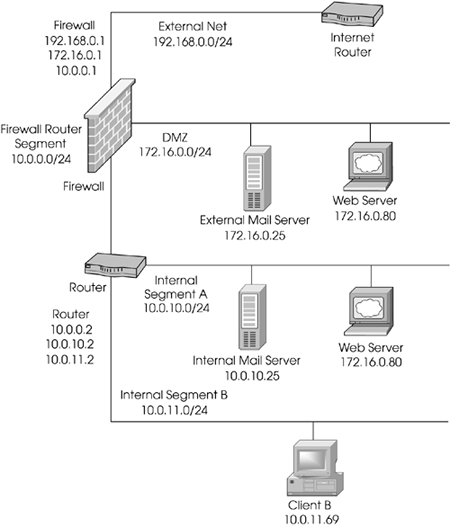
Consider the situation pictured in Figure 8.54. Assuming that all IPs used are routable (i.e., no NAT is necessary), let's implement the security policy listed below.
Figure 8.54. Network for sample configurations
The Goals
The Web server in the DMZ will be accessible via HTTP from anywhere.
The e-mail server in the DMZ will be accessible via SMTP from anywhere and via POP-3 from the internal networks.
Users bob and dan can FTP or Telnet from the internal network to any host on the DMZ segment provided they authenticate.
Users bob, dan, doug, and joe can access the Intranet Web server from anywhere via HTTP provided they authenticate.
Internal users on Segment A and B (dubbed "Internal") can access hosts on the Internet via HTTP, FTP, and HTTPS.
All other traffic should be denied.
Authentication timeouts should be enabled for at least 30 minutes.
All users will authenticate with S/Key and have a chain length of at least 1000.
The Checklist
Create the necessary network objects.
Create the necessary users and groups required for authentication, and install the user database.
Ensure that the appropriate Security Servers are enabled in $FWDIR/conf/ fwauthd.conf.
Create the appropriate rule(s) in the rulebase.
Configure the User Authentication action properties.
Configure the Rulebase Properties Authentication frame.
Verify and install the policy.
The Implementation
After creating all the network objects that represent your network, create the users bob, dan, doug, and joe. Make sure the expiration date for each user is set far enough in the future. Next, create the group WebAdmins and add bob and dan to this group.
In this situation, the Security Servers you will be using are for Telnet, FTP, and HTTP. As such, you should verify in $FWDIR/conf/fwauthd.conf that these servers are enabled:
21      fwssd     in.aftpd        wait    0
80      fwssd     in.ahttpd       wait    0
23      fwssd     in.atelnetd     wait    0
If you see the preceding lines without a comment character (#) in front of them, the servers are enabled. If the lines are missing or commented out, add them or uncomment them, and bounce FireWall-1 (cprestart).
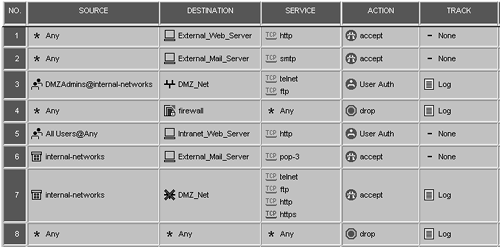
As for the rulebase, you need to make sure that the rules do not allow more than they should. These rules should allow authenticated access to the appropriate hosts without permitting nonauthenticated access. The proper rulebase is shown in Figure 8.55.
Figure 8.55. Rulebase for the User Authentication sample configuration
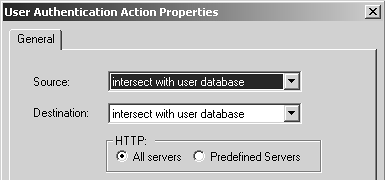
Next, you need to configure the User Authentication action properties for both rules that use User Authentication. For each rule, right-click User Auth (in the Action part of the rule). Figure 8.56 shows the screen that appears for each rule.
Figure 8.56. User Authentication Action Properties, General tab
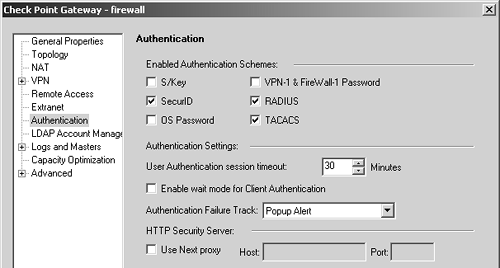
You also need to configure the Authentication section of the firewall object so that the User Authentication timeout is 30 minutes, as shown in Figure 8.57.
Figure 8.57. Gateway Properties, Authentication frame
Once this configuration is set up, verify and install the security policy.
A Session Authentication Example
The Situation
The same network as in the previous example is used in this situation except a new server has been added to the DMZ (172.16.0.42). This server needs to be administered via a program called VNC, which uses TCP port 5900. VNC does not provide strong enough authentication, so it was decided to use Session Authentication to authenticate this service. A new user (michael) will be the only user permitted to access this service on the internal network. This user will also be able to use FTP or Telnet from the internal network to any host on the DMZ segment provided he authenticates.
The Goals
Create new user michael.
Create a new group for michael called VNCAdmins.
Add michael to the groups VNCAdmins and WebAdmins.
Permit michael to use VNC to access the new machine via Session Authentication.
The Checklist
Create the necessary network objects.
Create the necessary users and groups.
Create the appropriate rule(s) in the rulebase.
Configure the Session Authentication action properties.
Verify and install the policy.
The Implementation
Create a new workstation object for 172.16.0.42. Create the group VNCAdmins. Create user michael. Add michael to group VNCAdmins and WebAdmins. The service VNC needs to be created as a TCP service on port 5900.
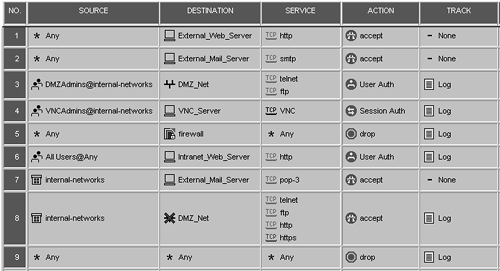
Only one new rule needs to be added. The modified rulebase is shown in Figure 8.58.
Figure 8.58. Rulebase for the Session Authentication sample configuration
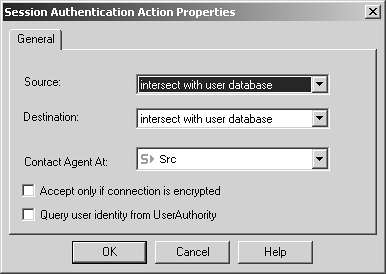
The Session Authentication action properties should be the defaults, as shown in Figure 8.59.
Figure 8.59. Session Authentication Action Properties, General tab
Verify and install the security policy.
A Client Authentication Example
The Situation
Once again, the same basic network shown in Figure 8.54 is used in this situation. Due to a recent change in company policy, all outbound Internet access must be authenticated. Because of the way User Authentication works with HTTP and because it is not desirable to set the proxy in the browser, Client Authentication seems the most appropriate choice. It is also desirable to switch the existing User Authentication rules to Client Authentication. Users should reauthenticate after 30 minutes of inactivity. Also, user michael would like to be authenticated to use VNC as a result of authenticating for HTTP as well as via the Session Authentication agent.
The Goals
Change Rules 3 and 6 from the previous situation (see Figure 8.58) to Client Authentication.
Allow both Client and Session Authentication for VNC.
The Checklist
Change the actions of Rules 3 and 6 to Client Authentication.
Add a new rule allowing VNC to be authenticated by Client Authentication.
Configure Client Authentication action properties for each of these rules.
Verify and install the policy.
The Implementation
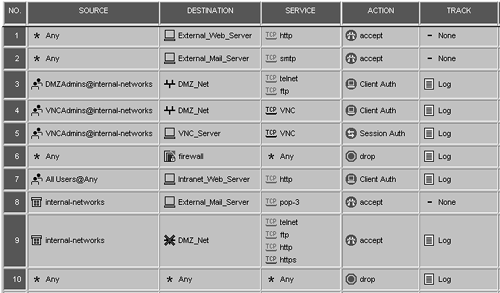
After changing the action of the rules, your rulebase should look like the one shown in Figure 8.60.
Figure 8.60. Sample rulebase for the Client Authentication sample configuration
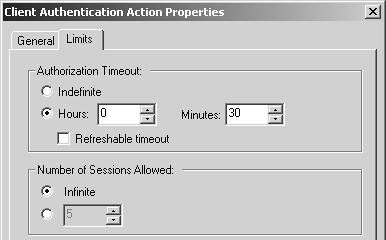
Each of the Client Authentication actions should have the properties set as shown in Figures 8.61 and 8.62.
Figure 8.61. Client Authentication Action Properties, General tab
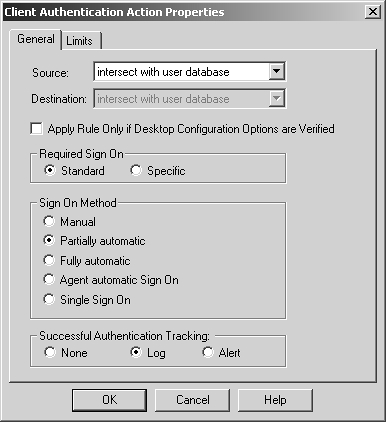
Figure 8.62. Client Authentication Action Properties, Limits tab
Verify and install the policy.
Notes
The Client Authentication rule is listed before the Session Authentication rule because there is no reason to ask for Session Authentication if user michael is already authenticated via Client Authentication.


