3.3 Application Architecture
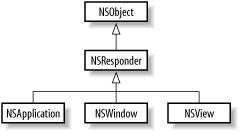
The Application Kit's basic architecture is primarily implemented in three classes: NSApplication, NSWindow, and NSView. Figure 3-3 shows the class hierarchy for these classes. Individually, these three classes provide the means for an application to interface with the operating system (and ultimately, the user) via connections to Quartz, the window server, and underlying Unix libraries through Core Foundation. Taken as a whole, these classes form the backbone of the Application Kit's event-handling infrastructure.
Figure 3-3. The hierarchical relationship between NSApplication, NSWindow, and NSView; these three classes all have a common parent in NSResponder

3.3.1 The Application
Fundamental to every Cocoa application is a singleton instance of NSApplication (accessible by using the class method sharedApplication or the global variable, NSApp). NSApplication provides a link to the window server and other essential operating system services. One of its most important responsibilities is management of the application's run loop and event handling. Run loops have the job of managing input from sources such as the mouse and keyboard (through the window server), ports, and timers. As the owner of the application's main run loop, NSApplication is the first stop for event processing in an application. Through a direct connection to the window server, NSApplication accepts events, packages them as Cocoa objects (instances of NSEvent), and dispatches them to the appropriate responder. NSApplication is also responsible for managing autorelease pools.
NSApplication is also concerned with other details, such as managing the main menu of an application, managing an application's Dock menu and icon, opening windows and sheets in modal run loops, hiding and unhiding the application, and application activation and deactivation. NSApplication also enables an application to connect to Mac OS X system services found in its Services menu.
3.3.1.1 NSApplicationMain
Every application begins with the same function, named main, that every C program starts execution at. Project Builder places this function in the file main.m by default, and it has the following very simple implementation:
int main(int argc, const char *argv[])
{
    return NSApplicationMain(argc, argv);
}
The NSApplicationMain function is responsible for bootstrapping an application and getting it running; it performs three tasks:
Instantiates the shared instance of NSApplication.
Loads the application's main nib file (specified in the application bundle's Info.plist under the key NSMainNibFile).
Starts the main run loop by invoking NSApplication's run method.
3.3.1.2 The application delegate
Like many Cocoa classes, NSApplication can take a delegate object that allows customization of how the application behaves without requiring you to create a subclass. For example, you can tell an application that it should quit after the last window closes by assigning a delegate that implements the applicationShouldTerminateAfterLastWindowIsClosed: method to return YES. This behavior is practiced in many single-window, utility applications that are intended for short-term, transient use.
The following delegate methods give you other opportunities to respond to various changes in the state of the application:
applicationDidFinishLaunching:
applicationWillHide:
applicationDidUnhide:
applicationWillResignActive:
applicationDidBecomeActive:
applicationWillTerminate:
The easiest way to assign a delegate to your application's NSApplication object is from within Interface Builder. MainMenu.nib's File's Owner represents the shared application instance, so you can connect an object directly by using its delegate outlet. It is also possible to assign an application delegate programmatically using NSApplication's setDelegate: method.
3.3.1.3 The run loop
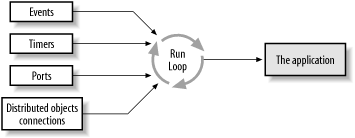
Run loops monitor the various sources of input for an applicationincluding timers, ports (receiving messages from other applications), Distributed Objects connections, and keyboard and mouse events from the window systemand dispatch them to the various parts of an application for handling. Because of their role in receiving and dispatching events, run loops are often referred to as event loops. NSApplication is responsible for creating and managing an application's main run loop.
Run loops work by polling each input source to see if there is input that needs to be processed. Multiple input sources are handled in successive passes through the run loop. If an input source does require processing, then the run loop takes the necessary action to handle that input source. For example, if the run loop determines that a timer needs to be handled, it invokes the method specified by the timer in a target specified by the timer. Once this method invocation has returned, the run loop continues processing input. Figure 3-4 illustrates how this process occurs.
Figure 3-4. How run loops process input sources

The Foundation class NSRunLoop is used as the interface to run loops. Generally you don't need to create or manage run loops, as this is taken care of by the application. Every thread in an application has a run loop created for it. However, NSApplication starts only the main application thread. If you create a new thread that needs to monitor input sources, you can obtain a reference to the run loop by using NSRunLoop's method currentRunLoop; a run message to this run loop will set it in motion.
3.3.2 The Window
In Cocoa, the window is the foundation of all drawing, and it is a crucial link in the path of an event. Windows are instances of the class NSWindow, or one of its subclasses. The NSWindow class implements many parts of an application's machinery, such as the control of a window's level relative to other windows, window zooming and resizing, miniaturization, hiding and unhiding, activation, and deactivation. A subclass of NSWindow, NSPanel, adds behaviors to windows that make them suitable for utility purposes. The AppKit implements several NSPanel subclasses that give access to standard Mac OS X user interfaces, such Open and Save dialogs in NSOpenPanel and NSSavePanel, the font panel with NSFontPanel, and the Print dialog with NSPrintPanel.
3.3.2.1 Delegate methods
Like NSApplication, NSWindow defines delegate methods that let you modify the window's default behavior. For example, a controller managing a document might change a window's default closing behavior, as shown in Example 3-1.
Example 3-1. Altering the default closing behavior of a window
- (BOOL)windowShouldClose:(NSWindow *)window
{
    // If the document is clean, let the window close
    if ( ![documentData hasUnsavedChanges] )  {
        return YES;
    } else  {
        // Run an alert panel to ask the user if they want to
        // save changes; return appropriate value
    }
}
3.3.3 The View
NSView, an abstract class that provides support for Cocoa's basic drawing, event-handling, and printing architecture, is the third class in the AppKit trifecta. It is the parent class of every control in Cocoa, from buttons and sliders to tables and color wells. Due to NSView's status as a child class of NSResponder (see Figure 3-2), all NSView subclasses can handle events. Additionally, NSView is the portal to Quartz; all custom drawing and graphics are handled by subclasses of NSView (Chapter 4 discusses NSView's relationship with Quartz and drawing graphics with NSView).
In the Application Kit, an interface's hierarchical composition is manifested as a view hierarchy in which every NSView is nested within a parent NSView. Any view may contain zero, one, or several subviews, and every subview has exactly one superview. The exception is the top-level view at the root of the hierarchy, which is the parent window's content view . To access the content view, use the NSWindow methods contentView and setContentView:.
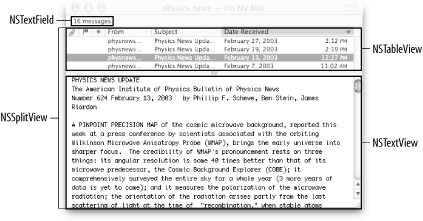
For an example of a view hierarchy, consider the main window of Mail, shown in Figure 3-5. Mail has a fairly simple view hierarchy. The window's top-level content view has two subviews: the NSTextField that displays the number of messages and an NSSplitView. This split view, in turn, has as its subviews an NSTableView and an NSTextView.
Figure 3-5. View hierarchy of a simple Mail window

|
3.3.3.1 Managing the view hierarchy
NSView declares a number of methods that manage the view hierarchy. To add a subview to a view, use the method addSubview:, or addSubview:positioned: relativeTo:. To remove a subview invoke in the subview to remove the method removeFromSuperview. You can easily determine the superview of a view by sending that view a superview message; likewise, the subviews of a viewcan be returned as an NSArray of NSViews by sending that view a subviews message. When building an interface, you don't usually have to interact with the view hierarchy, as Interface Builder takes care of the details.
More important than knowing how to work with the view hierarchy is understanding how a view's geometry is defined both in terms of its coordinate system and the coordinate system of its superview. When a view is added to the hierarchy, it claims a rectangular region of its superview, known as the frame, as its own and takes responsibility for drawing in that region and handling events that originate in that region. The view's frame defines the position and size of the view within the coordinate system of its superview. You can modify the view's frame with methods such as setFrame: and setFrameOrigin:.
Another rectangle parameterizes the geometry of a view: the bounds rectangle. The bounds rectangle defines the view in terms of its own coordinate system. Another way of looking at it is that the frame gives an external description of the view while the bounds gives an interior description of the view. NSView declares the methods frame and bounds for retrieving these rectangles, which are of type NSRect.
You will often need to convert coordinates in one view's coordinate system to that of another view. NSView provides several methods for converting points, sizes, and rects between coordinate systems. For example, convertPoint:fromView: converts the specified point from the coordinate system of fromView: into the coordinate system of the receiver. The method convertPoint:toView: does the opposite, converting from the receiver's coordinate system to that of toView:. Similar methods convert NSSizes and NSRects.
NSView, being a subclass of NSResponder, is a key component of the event handling system. By subclassing NSView, developers provide event-handling capabilities by simply implementing the relevant event-handling methods (declared in NSResponder), such as mouseMoved:. The event-handling system invokes these methods automatically, when appropriate.
Another feature of NSView is tracking rectangles. Tracking rectangles are regions in a view that generate special events as the mouse moves through the rectangle. When the mouse enters a tracking rectangle, a mouse-entered event is generated. When the mouse exits the rectangle, a mouse-exited event is generated. Implement the methods mouseEntered: and mouseExited: to handle these events. Tracking rectangles are defined with the methods addTrackingRect:owner: userData:assumeInside:. This method returns a tag identifying the tracking rectangle. A tracking rectangle may be removed by specifying the tag in the removeTrackingRect: method.

 NSScrollView


