Hack 13 Simulate Sepia Effects
![]()
![]()
Simulate hue/saturation effects in Flash to create sepia tone images.
Most graphics editing packages, including Photoshop and Fireworks, can change the hue and saturation of an image to create change-of-color effects, such as sepia tone effects. Flash also has this ability, although it is not immediately apparent. This hack shows how to create a sepia effect manually in Photoshop and then convert the workflow to Flash.
Creating a Sepia Effect in Photoshop
Sepia tones imitate the look of so-called sepia prints (a.k.a. albumen prints) produced in the latter half of the nineteenth century using a process invented by Louis-Desiré Blanquart-Evrard in 1850. The dark brown tones commonly associated with an antique look are not due to aging but rather caused by the original photographic development process. See the Royal Photographic Society (http://www.rps.org/book/terms/albumen.html) for more details on albumen prints.
If you are using a graphics editor with built-in support for sepia
tone effects, the process is straightforward. For example, you can
open the image in Fireworks and choose
Commands CreativeConvert to Sepia Tone.
Here we cover the more general process in Photoshop, so you can
create variations beyond sepia tones. With an image open in
Photoshop, select ImageAdjustmentsHue/Saturation.
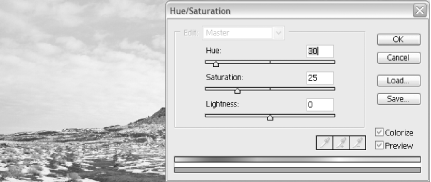
The Hue/Saturation window, as shown in Figure 2-12,
appears. Check both the Colorize and Preview options.
Figure 2-12. The Hue/Saturation window in Photoshop
Creating a sepia tone image consists of two steps:
Desaturating the image so you are left with a black-and-white image
Colorizing the image with a particular hue (sepia is a deep brown)
You can desaturate the image by setting the Saturation slider all the way to the left, but that's further than we want?we need some color information to remain so we can colorize. Set it to 25.
To colorize the image, set the Hue slider to a dark red/brown (0 to 30).
Note the final Hue value. You will need it when you reproduce the effect in Flash.
The original sepia photographs sometimes had a pinkish pigment, so hue values around 330 to 350 are also valid.
Reworking the Effect in Flash
Flash color effects allow you to colorize, but they do not allow desaturation because the Color class uses the RGB model and cannot therefore easily separate color from brightness. The only way to remove all color is to drastically increase or decrease brightness, which has the unfortunate side effect of also making your image fade to either white or black!
So, we have to start with a desaturated
image. To desaturate an image in Photoshop, select
ImageAdjustmentsDesaturate.
Import the desaturated image into Flash and place it on the Stage. Select it and convert it into a movie clip symbol (F8). This allows us to apply color effects to the image or allows us to target the image with a Color instance.
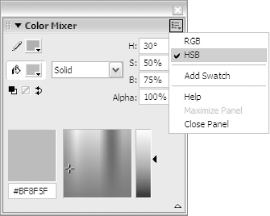
Next, we need to find the color that we want. In the Color Mixer
panel (WindowDesign PanelsColor Mixer), select
HSB mode from the panel's pop-up Options menu, then
enter the Hue value you used in Photoshop (30 in our example), adding
50% and 75% for the Saturation and Brightness values, respectively,
as shown in Figure 2-13. Leave the Color Mixer open.
Figure 2-13. The Color Mixer panel
With the movie clip containing your image selected, use the Properties panel to set the Color option to Tint. Change the Tint Amount (to the right of the color swatch) to 25%. Select the color swatch and click on the color you just created in the Color Mixer. Your image should now change color from black and white to the colorized sepia effect.
Although the Flash version of the sepia effect will have the same basic colorization, it will not maintain the bright areas as well as the Photoshop version. This is because Photoshop is performing a much more complex color change (it is preserving brightness), whereas the Flash version is also colorizing the highlights. This is the downside of real-time effects versus offline effects: Flash has to do things quickly so it cannot be expected to perform color changes as accurately as Photoshop.
Finally, if you want to re-create this effect in ActionScript, change the Color option to Advanced, click the Settings button, and note the color values, which can be used to specify color transforms at runtime [Hack #10] .
Using the Sepia Effect in Static Graphics
Using sepia and other colorization effects at runtime allows you to add interest to an image without significantly adding to the filesize of the SWF. Combined with other effects, you can make the images look significantly different. For example, framing the image via a circular border, as shown in Figure 2-14, will hide the rectangular nature of the original image, as shown in Figure 2-15, as well as avoid the artifacts you would encounter if you faded the image directly and exported it at low image qualities consistent with web use.
Figure 2-14. Creating a frame containing an inner hole with alpha faded edges
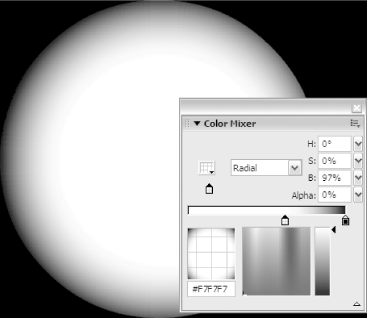
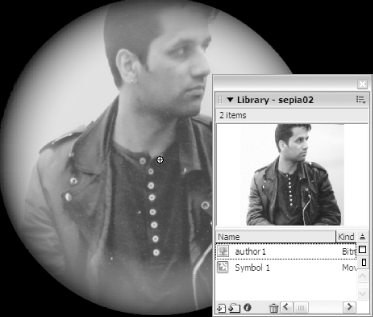
Figure 2-15. Displaying our sepia-colorized image through the frame
As well as sepia effects, you can of course colorize images to other base colors. In particular, applying blue colorization and adding techno-style lines and shapes over an image creates a more modern feel, as shown in Figure 2-16. Not only does this allow your images to fit in with a techno site design, overlaying vectors over the image allows you to add movement and hide any pixelation in the image.
Figure 2-16. A techno style image created with blue tones and overlain text
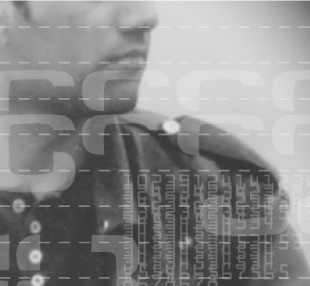
Replacing the film grain bitmap with a techno overlay consisting of graph lines and meaningless text (instead of film scratches and dirt) allows you to change the old film grain [Hack #3] into something decidedly more modern. Just the thing for a client who wants a modern and edgy site or for a retailer selling hand cams to Cyborgs.
Dynamic Sepia Effects with the Color Class
You can animate the sepia effect in much the same way we add colorization effects to video [Hack #10] . Combining this hack with old film grain effect [Hack #3] gives you an image that no longer looks static, but rather like a themed video clip. Adding sepia and other colorization effects allows you to perform runtime image manipulation.
Colorization is not limited to a single bitmap. If you apply it to an entire SWF by applying it to the _root timeline, you have a quick way of changing the site color scheme. Couple this with changing between sepia and techno image overlays, and you get to change the site theme. You can also use colorization to denote different states?for example, tinting parts of the UI that are not available or tinting thumbnails in an online portfolio with slightly different color tones depending on whether the full-size image is loaded and available to be viewed.


