Hack 58 Optimize Sound
![]()
![]()
Optimize MP3 sound for Flash.
In Flash sites, sound is not only integral but can also be the largest bandwidth hog. It's easy to find information on optimizing bitmaps for web use, but there is very little on optimizing sound. This hack shows ways to edit sounds before importing them into Flash so that the maximum quality can be achieved for a given filesize (or the minimum filesize for a given quality).
Hacking Around Quantization Noise
The sampling process inherently introduces an error called quantization error, which produces quantization noise. Quantization is the technical term for the process of converting a continuous (analog) signal into a digital one that can be defined by a number of fixed levels (quantization levels). The more commonly used term for this process is digitization, and a signal consisting of a number of quantization levels is called a digital signal. Quantization noise causes the high-pitched edge you hear on low-quality sound samples. It is the effect that makes your telephone voice sound mechanical.
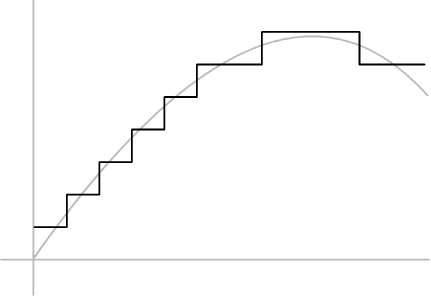
When you sample a continuous (analog) signal, you end up with an approximation that consists of discrete levels, creating a waveform that looks like a series of steps, as shown in Figure 7-16. These levels are the number of quantization levels. The quantization noise is the difference between the analog wave and its digital approximation (the digital signal is always an approximation of the original analog level).
Figure 7-16. An analog waveform (light curve) and its digital approximation (dark steps)
There are two ways to reduce quantization noise. The standard way is to decrease the quantization step size by increasing the number of quantization levels. This is why using 16-bit sound samples (65,536 quantization levels) sounds much better than using 8-bit samples (256 quantization levels). It also doubles your filesize versus 8-bit samples.
The hacky way around is to use all the available quantization levels. Using as many of the quantization levels as possible increases the fidelity of the digitized signal. Also, unlike analog noise, which can increase as you increase the signal volume or power, quantization noise stays at the same level regardless of the signal volume (it depends on the spacing between available quantization levels rather than the signal amplitude). So increasing the signal level drastically reduces the signal-to-noise ratio (SNR).
Consider the two waves shown in Figure 7-17. The bottom one shows a wave that has been recorded at low volumes. The quantization levels are large compared to the signal, causing sampling resolution to be low and the SNR to be high. The top wave has a higher volume and uses more quantization levels; it will have a much better SNR and digitization fidelity.
Figure 7-17. Improving the SNR by recording at 90-95% of the maximum quantization level
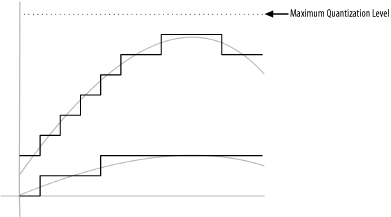
The maximum benefit is achieved if you increase the volume of the sample so that it is just below the maximum quantization level (around 90-95%), as indicated by the dotted line at the top of Figure 7-17.
To increase the volume of a sample, you need to either increase its amplitude using a maximizer filter or normalize it. We will show how to normalize using Adobe Audition.
Maximizing a wave is performed via a special type of compression filter that dynamically pushes the power level of all frequencies toward saturation but prevents saturation actually occurring and was first used in the 1990s. Anyone with a record collection will know that recordings before this date are significantly less bassy and "quiet," with more recent music (especially dance music) being much more up-front, while maintaining a high level of clarity between individual instruments. Much of this more recent style is made possible by maximization.
The MP3 format loves maximized sound, and importing maximized audio into Flash results in the best possible quality-to-filesize trade-off. You will find that you can export maximized audio as much smaller MP3 assets than nonmaximized sounds, assuming the same sound fidelity. The downside is that maximizing sound software is expensive and not widely available outside software aimed at professional studio environments.
Normalizing a sound does not provide the same level of efficiency as maximizing, but it is a widely available filter in most sound-editing software.
Normalize the sound as follows.
Adobe Audition
If using Adobe Audition:
Open your sound file in Adobe Audition.
In the Organizer window (Alt-9), select the Effects tab.
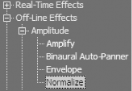
Find and double-click on Off-line Effects
 AmplitudeNormalize, as shown in Figure 7-18, to open the Normalize window, as shown in
Figure 7-19.
AmplitudeNormalize, as shown in Figure 7-18, to open the Normalize window, as shown in
Figure 7-19.Figure 7-18. The Normalize option in Adobe Audition's Organizer window
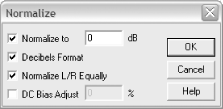
In the Normalize window, select the Normalize To, Decibels Format, and Normalize L/R Equally checkboxes. In the text entry box next to Normalize To, enter 0 dB (the default).
Figure 7-19. The Normalize window in Adobe Audition
Audacity
If using Audacity, select Effect Normalize. Make sure both checkboxes are checked and click OK.
The more confident among you may also want to add either bass boosting or compression, both of which will tend to hide quantization noise. In Audacity, the options to do this are easy to pick out from the Effect drop-down menu.
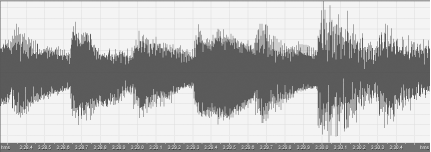
The before and after waveforms in Figure 7-20 and Figure 7-21 show the effects of normalization. The audio is rescaled so that it fills the full signal range. This ensures that more quantization levels are used and will reduce the effects of quantization noise.
Figure 7-20. The original waveform
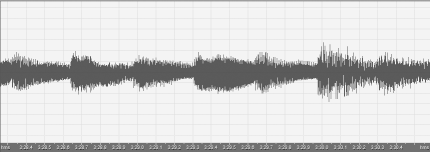
Figure 7-21. The normalized waveform
Hacking Around Aliasing Noise
When you export a sound from Flash, you are reducing sound quality via compression. Usually, the results of this are much the same as if you downsampled (reduced the number of samples in) the sound file. Compressing or downsampling a sound generates aliasing errors, which may produce noticeable aliasing noise.
Aliasing is an effect caused by the sampling frequency that causes harmonics of the sampling frequency (the aliases) to be heard. This usually sounds like a constant hum in the exported samples when you create your SWF. In extreme cases, it may appear as a screeching noise that makes the sample useless.
Aliasing is also a term used in bitmap errors, in which the effect can be reduced by antialiasing. In graphics, the sample rate corresponds to the pixel size, and the aliasing error appears as hard-edged "staircases" [Hack #22] when the original image had none. Although many designers are aware of the terms "aliasing" and "antialiasing," few realize that these terms originated in the audio- and signal-processing fields.
A digital sampling rule, known as Nyquist's Theorem, says you can reproduce a sound with perfect fidelity if you digitize at more than twice the maximum frequency in that sound. This is why the Redbook audio format (used for audio CDs) uses a 44.1 kHz sampling rate. The highest possible frequency that the human ear can sense is 22 kHz (and then only for a baby?your ears and my ears are probably down around 12-16 kHz). Doubling 22 kHz gives 44 kHz, and the 0.1 kHz gives us the "more than" in "more than twice the maximum frequency."
Thus, a listener cannot tell the difference between a CD recording and a live sound feed played through the same audio system.
When we undersample in Flash, we break this digital sampling rule, and aliasing frequencies spoil our samples. Most designers attempt to avoid aliasing noise by increasing the sampling rate, but that increases filesize. The hacky way to avoid aliasing noise is to delete higher frequencies that otherwise prevent us from staying within the "twice the maximum frequency" rule. This gives us a cutoff frequency for any audio that we want to use with a given export MP3 setting. If we can remove (filter out) any frequencies present in the original sample above this cutoff frequency, we eradicate the possibility of aliasing noise.
There is a problem, however; Flash doesn't specify the MP3 sampling frequencies but instead defines sampling in terms of data throughput per second (Kbps), as shown in Figure 7-22.
Figure 7-22. The sound export bit rate settings (in Kbps) in the Sound Properties dialog box
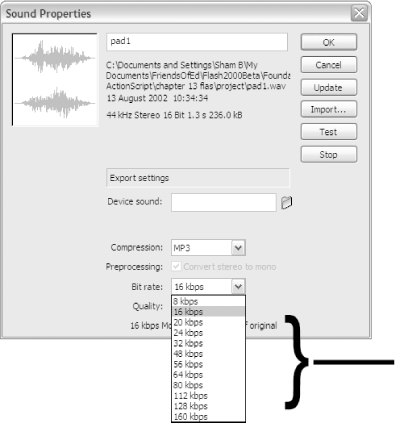
It's fairly easy to work out the cutoff frequencies corresponding to Flash Kbps export sound settings in Figure 7-22, and they are shown in Table 7-1. ("Fairly easy" is a relative term. I used an oscilloscope to look for the maximum frequency that each export setting could support without severe attenuation. Although it sounds a little complicated, it is all very easy in practice. You could probably also do it mathematically, but I'd rather not!)
|
Bit rate (Kbps) |
Cutoff frequency (kHz) |
|---|---|
|
8 |
3.0 |
|
16 |
5.5 |
|
20 |
6.0 |
|
24 |
6.0 |
|
32 |
8.0 |
|
48 |
10.0 |
|
56 |
10.0 |
|
64 |
12.0 |
|
80 |
16.0 |
|
96 |
16.0 |
Assuming Adobe Audition is our sound-editing application and assuming that we want to export a sound at 20 Kbps, here are the steps we would need to take to ensure that the sound from Flash has no aliasing noise:
Load your sound in Adobe Audition.
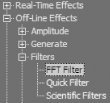
In the Organizer window (Alt-9), select the Effects tab and double-click on Off-line Effects
FiltersFFT
Filter, as shown in Figure 7-23.
Figure 7-23. Selecting the FFT Filter option in Adobe Audition's Organizer window
In the FFT Filter window that appears, set up the checkboxes and radio buttons as shown in Figure 7-24, making sure that Lock to Constant Filter option is checked. Change Max to 0 dB and Min to -15 dB.
Create a curve in the upper part of the FFT Filter window as shown in Figure 7-24, with the step-down point of the curve at the frequency specified in Table 7-1 (for 20 Kbps, the cutoff frequency is 6.0 kHz). This creates a low pass audio filter that filters out all frequencies above our cutoff, 6.0 kHz (Audition uses Hz, so we set the cutoff at 6000 Hz).
Figure 7-24. Selecting the FFT Filter window in Adobe Audition
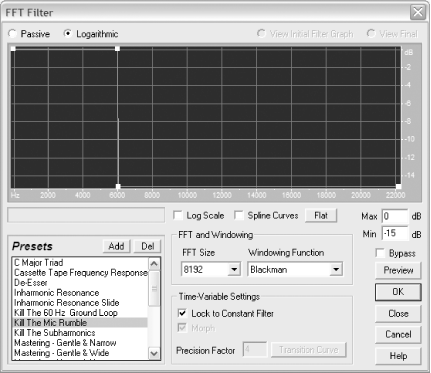
Click OK to perform the filtering.
Save this file in MP3 format.
Import the sound file into Flash using File
ImportImport to Library.
You will find that the sound becomes deeper than the original because you have cut the high-frequency components. When you export the sound into the final SWF, you will find that there is no background hum associated with aliasing noise.
Final Thoughts
Normalizing a sound and filtering out any sound components above the cutoff frequency significantly increases the fidelity of the sound when you import the same sound into Flash for export into a SWF. This allows you to reduce SWF filesizes or gain better-quality sound at no additional bandwidth costs.
Although optimizing sound (rather than just compressing it in Flash and hoping for the best!) is a new technique for many Flash designers, it can pay real benefits to sound-heavy sites. You should at least give it a try. After all, you wouldn't dream of not optimizing bitmaps for an HTML page, and sounds can be significantly worse bandwidth hogs!


