Hack 17 Fill Areas with Patterns
![]()
![]()
Flash can't fill a nonrectangular area with a custom tile pattern at runtime. But you can fill any shape with a pattern of custom tiles by using masking.
Like most graphics
applications, Flash has a Paint Bucket tool that can fill
an arbitrary area with a solid color or a gradient. Flash treats the
fill as a separate entity from the shape's border
(stroke). The Paint Bucket tool uses the fill color specified using
the Fill Color swatch in the Colors section of the Tools palette
(Window Tools). For example, you can select a gradient fill
by clicking on the Fill Color swatch and selecting one of the
gradient chips from the pop-up palette.
Tools). For example, you can select a gradient fill
by clicking on the Fill Color swatch and selecting one of the
gradient chips from the pop-up palette.
Furthermore, you can use the Color Mixer panel to customize the
gradient for a fill. Simply select a fill using the Selection tool
and then choose WindowDesign PanelsColor Mixer.
In the Color Mixer panel, you can set the fill type to a Linear
gradient or Radial gradient using the pop-up menu in the center of
the panel. You can even choose a Bitmap fill, in which case Flash
prompts you to select an image to use as a tile to fill the specified
area.
Therefore, filling an area during authoring is relatively trivial. Furthermore, you can customize (scale, skew, rotate, and translate) a gradient or bitmap fill using the Tools palette's Fill Transform tool. However, the built-in ActionScript options for specifying fills are more limited. The MovieClip class's fill( ) and beginGradientFill( ) methods, part of the Drawing API, allow you to create solid, linear gradient, and radial gradient fills, but not patterned tile fills at runtime.
Earlier we learned how to create a tile that could be repeated to form a fill pattern [Hack #16] . Let's use our tile to fill different shapes with our custom pattern.
Filling a Rectangular Area
Assuming you have given your tileable movie clip symbol a linkage ID of tilePattern in the Symbol Linkage properties dialog box, the following code generates a rectangular pattern from it:
function tiler(linkageID:String, target:MovieClip, clipName:String,
depth:Number, x:Number, y:Number,
row:Number, column:Number):MovieClip {
var pattern:MovieClip = target.createEmptyMovieClip(clipName, depth);
var depthCount:Number = 0;
for (var j:Number = 0; j < column; j++) {
for (var i:Number = 0; i < row; i++) {
var tile:MovieClip = pattern.attachMovie(linkageID,
"tile" + i + "_" + j, depthCount);
tile._x = x + (tile._width * i);
tile._y = y + (tile._height * j);
depthCount++;
}
}
return pattern;
}
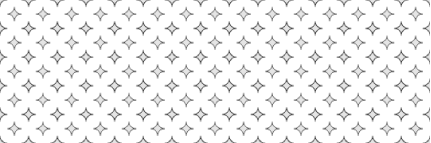
var patternClip:MovieClip = tiler("tilePattern", this,
"patternClip", 1, 50, 50, 15, 5);The preceding code creates a movie clip named patternClip and fills it with a pattern consisting of 15 5 tiles, with the top-left tile positioned at (50, 50), as shown in Figure 3-15.
Figure 3-15. A large pattern created from a single tile
The tiler( ) function shown in the previous listing accepts eight arguments:
- linkageID
-
The linkage name of the tileable movie clip symbol
- target
-
The path to the timeline that you want to create the pattern on
- clipName
-
The movie clip that will contain the pattern
- depth
-
The depth at which you want to create clipName
- x, y
-
The position of the first (top-left corner) tile
- row, column
-
The number of rows and columns of tiles you want in the pattern
Our tiler( ) function offers a useful way to add a vector-based pattern around your SWF when your Stage size is smaller than the browser window and you want to fill the unused border area [Hack #92] . You could also use a pattern fill, such as an area of diagonal lines, atop content to signify something about that content (such as "this is not selectable" or "this part of the UI is currently disabled").
Filling a Nonrectangular Area
Although it is easy to fill a rectangular area, filling an irregular area is more challenging. For example, if you are creating a Flash-based online drawing application, it would be nice for the user to be able to create pattern-filled shapes. Flash allows you to create vector shapes with solid or gradient fills at runtime, but not with pattern fills. Masking offers a way around this limitation.
The following code uses our rectangular pattern tiling routine to create a filled circle. It works by making a dynamically created circle a mask for the tiled pattern.
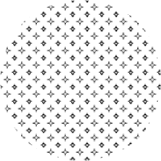
Let's see how it works. First, the code creates an empty clip named myCircle. Inside myCircle, it creates two further movie clips. One is named mask and consists of a circle. The other is named pattern and contains a tiled area with enough rows and columns to ensure there are enough tiles to fill the circle (plus some overlap to make sure we always have complete tiles inside the circle). Figure 3-16 shows the rectangular fill overlain with a circular mask.
Figure 3-16. The rectangular fill overlain with a mask shape

Figure 3-17 shows the mask used to hide everything outside the circle, giving us a pattern-filled circle.
Figure 3-17. Using the mask to hide everything outside the circle yields a pattern-filled circle
The following code uses our earlier function, tiler( ), to create the pattern fill. Apart from the following points, it is pretty straightforward:
The patternCircle( ) function creates an extra movie clip named dummy, which contains only one tile. The function does this to find the dimensions of the tile. This dummy clip is overwritten by the pattern because they share the same depth.
The circle shape is created using four curves drawn with curveTo( ). Although this creates a circle that is far from mathematically correct, the approximation improves speed. In any case, Flash never creates mathematically perfect circles (they are always an approximation to gain performance), so we are in good company in this decision!
Here's the code. The tiler( ) function is the same as in the previous listing and therefore not repeated here:
function patternCircle(linkageID:String, target:MovieClip,

             clipName:String, depth:Number,

             x:Number, y:Number, r:Number):MovieClip {

  var r2:Number = r*0.93;

  var mc:MovieClip = target.createEmptyMovieClip(clipName, depth);

  mc._x = x;

  mc._y = y;

  // Capture required pattern size

  var dummy:MovieClip = tiler("tilePattern", mc, "dummy", 0, 0, 0, 1, 1);

  var size:Number = Math.ceil( (2*r) / dummy._height) + 1;

  // Draw pattern

  var pattern:MovieClip = tiler("tilePattern", mc, "pattern",

                               0, -r, -r, size, size);

  // Draw a circle

  var circle:MovieClip = mc.createEmptyMovieClip("mask", 1);

  circle.lineStyle(undefined, 0x0, 100);

  circle.moveTo(-r, 0);

  circle.beginFill(0x0, 100);

  circle.curveTo(-r2, -r2, 0, -r);

  circle.curveTo(r2, -r2, r, 0);

  circle.curveTo(r2, r2, 0, r);

  circle.curveTo(-r2, r2, -r, 0);

  circle.endFill( );

  // Make circle a mask for the pattern

  pattern.setMask(circle);

  // Return created clip

  return mc;

}

myCircle = patternCircle("tilePattern", this, "myCircle", 1, 270, 200, 100);
Final Thoughts
Flash does not support arbitrary vector pattern fills (it supports bitmap fills, but only at authoring time) but that shouldn't stop us from trying to hack a way around the limitation.
Using negative space is a really easy way to create interlocking tiles that can fill rectangular areas [Hack #16], which in turn can be used to fill any shaped area via masking.


