Hack 37 An Optimized 3D Plotter
![]()
![]()
Create a compact and fast 3D engine to plot 3D objects on Flash's 2D Stage.
True 3D requires presenting two different images to the viewer's eyes. The viewer's brain uses the differences in the two images to calculate the depth of each object in space (so-called stereo vision). For example, 3D movie glasses use red and blue filters (or vertical and horizontal polarizing filters) to ensure that each eye sees a slightly different image (the theater screen displays two offset images), and your brain constructs a single image with depth. However, so-called 3D computer displays don't present different images to each eye. Instead, they merely project a 3D image onto a 2D plane. The image looks the same even if you close one eye, and your brain makes reasonable guesses about depth based on scale and shading. Creating a basic 3D engine isn't as hard as you might imagine. This hack shows the math behind a simple 3D point plotter, which projects a 3D (x, y, z) coordinate into the 2D (x, y) space of Flash's Stage.
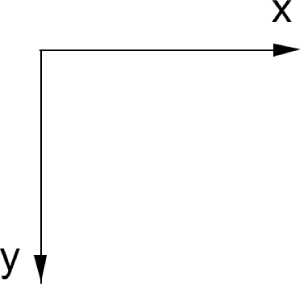
Like most graphics programs, Flash uses the coordinate system shown in Figure 5-7, in which the Y values increase as you move down the screen (the opposite of the Cartesian coordinate system). The X axis increases to the right, as you'd expect.
Figure 5-7. Flash's Y axis points down
Flash supports only 2D (X and Y axes). To simulate the Z axis, we use scaling to approximate the depth into the screen. In Figure 5-8, our cube becomes smaller as it moves further away along the Z axis. Depending on the perspective angle, we may also see the X and Y positions of the cube change as it moves along the Z axis.
Figure 5-8. A cube moving along the Z axis
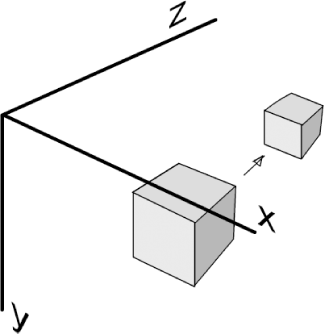
The scaling of the x and y coordinates at a distance z, when viewed through a camera of focal length fo is fo/(fo+z).
To plot a 3D point (x, y, z) in two dimensions, (x, y), with scaling s, we can use the following approximations:
scale = fo / (fo + z)

xLoc = x * scale

yLoc = y * scale

s = 100 * scale
Although the scaling of a true 3D object varies across its dimensions (faces closer to us appear bigger than faces further away), we treat a given object as existing at a single point for simplicity (unless the object is very large or very close to the camera, the approximation is sufficiently accurate).
The preceding approximation is very easy to implement in code as a basic 3D plotter. Create a new FLA with default Stage dimensions (550 400) and set its frame rate to 24 fps. Attach the following code to frame 1 of the main timeline:
function moveSpheres( ) {

  // This function moves the spheres

  for (var i:Number = 0; i < n; i++) {

    pX[i] += pXS[i];

    if (Math.abs(pX[i]) > wSize) {

      pXS[i] = -pXS[i];

    }

    pY[i] += pYS[i];

    if (Math.abs(pY[i]) > wSize) {

      pYS[i] = -pYS[i];

    }

    pZ[i] += pZS[i] * scale;

    if (Math.abs(pZ[i]) > wSize) {

      pZS[i] = -pZS[i];

    }

    threeDPlotter(i);

  }

}

function threeDPlotter(i) {

  scale = fLength/(fLength + pZ[i]);

  world["p"+i]._x = (pX[i] * scale);

  world["p"+i]._y = (pY[i] * scale);

  world["p"+i]._xscale = world["p"+i]._yscale = 100 * scale;

}

// MAIN CODE

var fLength:Number = 150;

var wSize:Number = 100;

var centerX:Number = 275;

var centerY:Number = 200;

var n:Number = 30;

var pX:Array = new Array( );

var pY:Array = new Array( );

var pZ:Array = new Array( );

var pXS:Array = new Array( );

var pYS:Array = new Array( );

var pZS:Array = new Array( );

// Create the 3D world

this.createEmptyMovieClip("world", 0);

world._x = centerX;

world._y = centerY;

// Initialize each sphere

for (var i:Number = 0; i < n; i++) {

  world.createEmptyMovieClip("p" + i, i);

  world["p"+i].lineStyle(10, 0x0, 100)

  world["p"+i].moveTo(0, 0)

  world["p"+i].lineTo(1, 0)

  pX[i] = pY[i] = pZ[i] = 0;

  pXS[i] = Math.random( ) * 5;

  pYS[i] = Math.random( ) * 5;

  pZS[i] = Math.random( ) * 5;

  threeDPlotter(i);

}

// Set up the animation's onEnterFrame event handler.

this.onEnterFrame = moveSpheres;
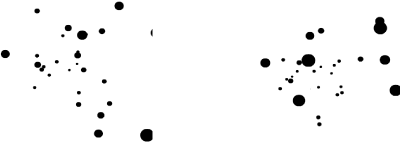
Executing the preceding code causes 30 spheres to bounce around a 3D world as shown in Figure 5-9. We'll see shortly why we drew the spheres as 2D black dots instead of true spheres with specular highlights.
Figure 5-9. Dots in a 3D world shown at two different points
Let's review some portions of the main code. First it defines variables:
- fLength
-
The focal length.
- centerX, centerY
-
The position (relative to the Flash Stage) of the origin of our 3D world.
- n
-
The number of dots in the animation.
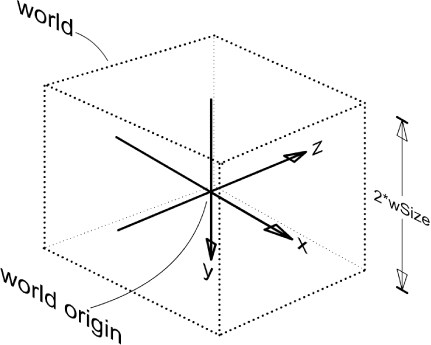
- wSize
-
The distance from the origin to each face of the 3D cube that forms the boundaries of our world. Because the origin is in the center of the cube, the size of the cube sides are 2*wSize.
The 3D world is shown in Figure 5-10.
Figure 5-10. The 3D world
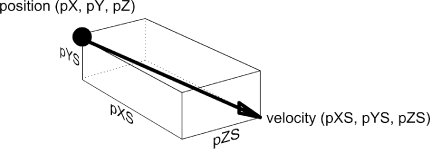
Within the 3D world, we define the location and velocity of a point as follows (and as shown in Figure 5-11):
- pX, pY, pZ
-
The (x, y, z) coordinates of each point in the animation
- pXS, pYS, pZS
-
The (x, y, z) speed and direction (i.e., velocity vector) of each point
Figure 5-11. The location and velocity of a point in the 3D world
We then create a movie clip named world. Inside it, we create the clips for each sphere, p0 to pn.
The moveSpheres( ) function constantly updates the positions of each sphere and makes them bounce off the walls of the world cube. This function also calls the threeDPlotter( ) function, which transforms the (x, y, z) coordinates into the (x, y) position and scaling factor needed to generate a 2D projection of the 3D view.
By using black dots (i.e., all with the same solid color), we avoid the need to arrange our dots in distance order (z-buffering), because the viewer can't tell which sphere is in front of the others. This reduces the number of calculations needed to generate a moving 3D scene.
We create our 3D scene inside a clip, world, which allows us to move the origin by moving the world clip (and avoids having to use offsets in every frame in our calculations, which would slow down rendering).
Final Thoughts
Although basic, our engine is a good base upon which to build a number of more advanced 3D engines:
By joining up our points via lines, we can build a 3D vector engine or wireframe viewer [Hack #85] .
By adding z-buffering, we can create a more compelling effect that more fully represents 3D depth (and allows us to, say, use spheres with specular highlights instead of black dots).
Real-time 3D is one of the most processor-intensive things you can do with the Flash Player. As seen here, keeping it simple can produce fast effects.


