Hack 48 Text Effect Framework
![]()
![]()
Text effects allow you to animate or present text in interesting ways. Create a general text effect generator with surprising ease.
You may be familiar with text effects in presentation software such as Microsoft PowerPoint, in which text slides in or animates in a simple way. The range of possible animated text effects in Flash is as diverse as Flash is ubiquitous. Although text effects are often overused, they can also be an effective way to convey a message graphically or add subdued animation to buttons and banners.
There are a surprising number of third-party Flash text effects generators, including SWiSH (http://www.swishzone.com), Flax (http://www.flaxfx.com), Magic Flare (http://magicflare.com), and Anim-FX (http://www.flashtexteffects.com). Better designers use text effects sparingly, so you may not want to pay for a text generator to create just an occasional effect. With this in mind, I developed the following code to create text effects quickly and easily.
The basic premises are:
Our code animates each letter in the text separately.
Our code animates the letters with a delay to simulate the text being "written." For example, if we want to animate the letters "c-a-t," we want the "c" to appear first, then the "a," and finally the "t." Alternative orders for the letter may make the text difficult to read, and this should be avoided unless it is part of the intended effect. If all the letters appear simultaneously and the text is large, it may slow down the effect.
Our text effect ends with the text in its "normal" position and orientation. Although this is not always desirable (you may want your text to fade in, pause, then fade out, for example), it is a good premise from which to develop an initial general solution.
Create the Text
Although you can create empty text fields dynamically with MovieClip.createTextField( ), you need to create the text field inside an empty movie clip before you can animate it effectively (because the TextField class does not support an onEnterFrame event for frame-by-frame updates). You also have to make sure that the font your text field is using is correctly embedded in the final SWF. The easiest and least-error-prone approach is to create your text field within a movie clip and embed the font manually at authoring time. Then use ActionScript to place your manually created symbol onto the Stage at runtime.
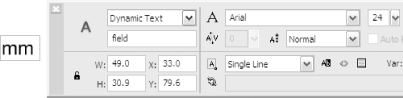
Let's create a dynamic text field on the Stage using the Text tool. Inside it, enter the text "mm" to ensure that it is large enough to fit any one character in your chosen font. Using the Properties panel, as shown in Figure 6-26, make sure the text type is set to Dynamic Text, choose a plain sans-serif font (such as Arial or Helvetica), and set the point size to 24. Finally, give the text field an instance name of field.
Figure 6-26. Setting the properties for the text field
|

Embed the Font
To embed the font in the SWF, with the text field still selected, click the Character button on the far right of the Properties panel (if the Character button isn't visible, you forgot to the change the text type to Dynamic Text). In the Character Options dialog box that appears (see Figure 6-27), select the Specify Ranges radio button and Shift-select the first four options (Uppercase [A..Z], Lowercase [a..z], Numerals [0..9], and Punctuation [!@#%...]) in the list.
Figure 6-27. The Character Options dialog box

Wrap It in a Movie Clip
With the text field still selected, press F8 to make it a movie clip symbol (or rather, wrap the text field within a movie clip). Give the movie clip symbol the name letter. Double-click it to enter Edit mode, and move the text field (using the Selection tool) so that the bottom-left corner of the text field is at the registration point of the movie clip, as shown in Figure 6-28. Once you have done that, exit Edit mode by clicking Scene 1 in the Timeline panel's navigator area and delete the instance of letter on the Stage.
Figure 6-28. Aligning the bottom-left corner of the text field with the movie clip registration point
Finally, we need to give our movie clip a linkage symbol identifier
so that ActionScript can place it on stage dynamically. Select the
letter symbol in the Library and right-click
(Windows) or ![]() -click (Mac) on it and select Linkage.
Check the Export for ActionScript and Export in First Frame options.
In the Identifier field, make sure the identifier name is
letter and click OK.
-click (Mac) on it and select Linkage.
Check the Export for ActionScript and Export in First Frame options.
In the Identifier field, make sure the identifier name is
letter and click OK.
Place the Text Dynamically
To place the text onto the Stage using proportional spacing, attach the following script on frame 1 of the timeline:
// ActionScript 2.0 code

function placeText(target:MovieClip, x:Number, y:Number,

                   banner:String, tFormat:TextFormat):Void {

  // For each character...

  for (var i = 0; i < banner.length; i++) {

    // Create a clip and place the current

    // character in the text field inside it.

    var char:MovieClip = target.attachMovie("letter", "char" + i,

                                    target.getNextHighestDepth( ));

    char.field.text = banner.substr(i, 1);

    char._x = x;

    char._y = y;

    // Add the width of the current text character

    // to the next letter's x position.

    x += tFormat.getTextExtent(char.field.text).width;  }

}

var format:TextFormat = new TextFormat( );

format.font = "Arial";

format.size = 24;

placeText(this, 100, 100, "This is a text effect", format);
The placeText( ) function creates the text banner specified by the argument banner at position (x, y) on timeline target. It uses the character spacing defined by the TextFormat object tFormat. If you use a font other than Arial or a font size other than 24, change the two boldface lines in the preceding code accordingly. To accommodate a different font size, resize the text field by selecting it with the Text tool and dragging the bounding rectangle to the desired size.
Using the values specified in the last line of the code, you will see the correctly spaced text, as shown in Figure 6-29.
Figure 6-29. Our text generator's output, proportionally spaced
If you do not use the TextFormat instance and instead place your text characters at fixed distances, you would instead see something like Figure 6-30.
Figure 6-30. Text output without proportional spacing
The line in our code that makes this difference is:
x += tFormat.getTextExtent(char.field.text).width;
Changing this to a constant value, such as x += 12;, gives you the nonproportionally spaced text shown in Figure 6-30.
Although our banner looks like a normal line of Flash text, we have actually created a series of separate movie clips, each containing one character.
The best way to see how to create an animated effect from this starting point is to run through a few of them, including a typewriter effect [Hack #49] .
Final Thoughts
Although there are a number of third-party text effect generators, the basic code to create text effects is always the same. Once you know the basic framework, you can easily roll your own. The writing of text transitions is limited only by your imagination.
Although famous movie text effects [Hack #31] can be created using various techniques, this all-purpose framework will help you generate your own text effects [Hack #50] . If you need a kick start in thinking up more effects, look at the opening titles for films such as Star Wars, Seven, or any Hitchcock film.


