Hack 51 Timeline Text Effects
![]()
![]()
Some text effects can only be created using shape tweening. Create advanced timeline text effects with the rarely used but invaluable Envelope tool.
We've already looked at ways to create scripted text effects [Hack #50] . However, ActionScript-based text effects are limited to creating animations based on changing clip properties over time. Although property-based animation can change the position, transparency, color, orientation, and scaling of text, ActionScript cannot create complex animations that change the actual shape of your text. To do this, you have to instead convert your text into raw vectors and then treat the text as a primitive shape.
Having to edit a large number of shapes at such a low level can be daunting, but the Envelope tool is very useful in this situation. This tool is ignored by most designers, but it can quickly apply effects to multiple letters in a way that cannot be easily implemented via scripting.
Breaking Apart Text
Before you can edit text as vector shapes, you have to convert it to
raw vector shapes, a process referred to as breaking
apart in Flash. To do this, create your text
using the Text tool, then, with the text still selected, choose
Modify Break Apart twice. The first Break Apart command
splits your text field into several text fields (one per letter), and
the second command splits each letter into a raw vector shape.
Break Apart twice. The first Break Apart command
splits your text field into several text fields (one per letter), and
the second command splits each letter into a raw vector shape.
|

Using the Envelope Tool
Using the Selection tool, select all letters in your text. Then choose the Free Transform tool. In the Options for this tool (at the bottom of the Tools panel), select the Envelope icon. Your shapes will appear as shown in Figure 6-36, with the envelope bounding box enclosing them.
Figure 6-36. Text that has been broken apart and selected using the Envelope tool

The bounding envelope can be difficult to use because it has many
points cluttering its perimeter. There are actually two types of
points: the square points are control points, and the round points
are the ends of bow-tie handles controlling the tension of the
envelope as it passes through each control point. Just remember that
there are two round points for each square point. You can see the
control points better if you temporarily darken the background color,
as shown in Figure 6-37. You can set the background
color under ModifyDocument (the envelope does not become
deselected if you do this).
Figure 6-37. Darkening the background color makes it easier to distinguish the two types of points around the envelope

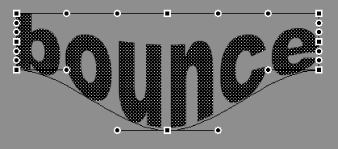
By moving the control points, you change the shape of the envelope, and the text inside it will conform to the new envelope shape, as shown in Figure 6-38.
Figure 6-38. Moving a control point
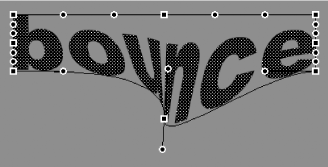
Changing the direction or length of the bow-tie handles associated with a control point affects the direction and tension of the envelope perimeter as it passes through the control point. Again, the text will conform to the envelope shape, as shown in Figure 6-39.
Figure 6-39. Changing a bow-tie handle
By varying the shape of the envelope, you can conform the text to new shapes. Although the text consists of many separate shapes, the envelope allows you to quickly modify them as a single entity while at the same time allowing you a large amount of control over the final shape to which the text will conform, as shown in Figure 6-40.
Figure 6-40. Changing the shape and/or orientation of the text shapes using the Envelope tool

There are a few issues to be aware of when using the Envelope tool:
The envelope becomes deselected if you click on anything other than a control point or bow-tie handle. Don't miss when you attempt to click on either!
The envelope is not remembered when you deselect. For example, if you deselect the envelope at the point shown in Figure 6-40, reselecting does not return you to the same curved envelope shape. Instead, the envelope appears as a rectangle bounding the "bounce" text. This can be very annoying, because even pressing undo (Ctrl-Z or
 -Z) does not bring back the envelope shape.
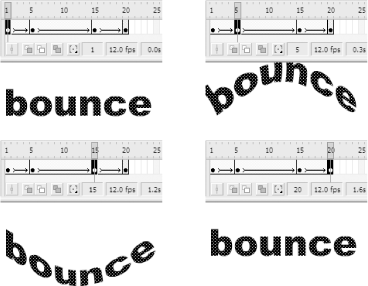
Notwithstanding these issues, the Envelope tool is a very quick way to create shape tweens using text shapes [Hack #34], as shown in the series of images in Figure 6-41. Here, a new envelope shape is defined per keyframe within a shape tween, quickly creating an organic "bounce" transition.
Figure 6-41. Creating a shape tween animation using the Envelope tool
Final Thoughts
For animations that cannot be easily created using ActionScript, the best option is to edit your text at the vector level. This can be a very laborious task if you edit each letter's shape individually. The Envelope tool allows you to treat multiple letters as a single entity and can be a powerful (if unforgiving) tool. This hack shows how to transform text over time.
For more complex shape tweens, you should consider editing your text
in an external vector-based editing application such as Freehand or
Illustrator (or even some of the latest versions of Photoshop), then
importing the shapes into Flash using FileImport.


