Hack 61 Amit's Dials (Interactive Testing)
![]()
![]()
User interface elements need not be limited to runtime use for the benefit of end users. Use UI elements during development to test various scenarios quickly.
Every time I go to a Flash conference, I learn something. Usually, it is something like how to use Flash MX 2004 components or the FlashCom server. Occasionally though, I learn a trick or hack that seems innocuous but really changes the way I work. This is one of those hacks.
During a talk by Amit Pitaru and James Paterson, James said something like, "Well, I do some freaky animations, and then Amit comes around and says `hey, let's put a dial on this,' and so we kick it around with the dial for a bit to see what happens. Once we are happy with it, we make the dial setting permanent."
Around the same time, I attended a presentation by the guys who did the Banja site (http://www.banja.com). Banja is a full and complex adventure game, so I assumed they wrote some code to define the data for each location, but they didn't. They were using a more complex version of Amit's dials. Each location in the game requires data, which they input using lots of offscreen text fields and sliders. Rather than having to update a code section (or text file) whenever you add a new location, the whole thing is visual and contained in one file. Once you have drawn the location and filled in the offscreen text fields and sliders, you are done; no need to change any code.
Let's see how it works.
First of all, we'll create a dial, which is just Amit's name for any adjustable UI element such as a slider or knob. It need not use Flash's built-in UI components (in fact, we avoid them to keep the filesize small) and it need not be round like the dials on your oscilloscope (oh, we know you have one in the basement!).
For our "dial," we'll create a simple slider with a numeric readout. First, create a single hairline, 200 units in length, and convert it to a movie clip symbol; place the registration point halfway along the line, as shown in Figure 8-1. This will act as the line along which our slider's puck will travel. Name the symbol slider.
Figure 8-1. A hairline with its registration point in the middle
Next, inside the slider movie clip symbol, insert a new layer and name it puck. On the new puck layer, create a small 10x10 square and make it into a symbol named puck with a centered registration point. Then place it at (-5, -5) and give the on-stage clip the instance name puck_mc, as shown in Figure 8-2.
Figure 8-2. The puck_mc clip positioned along the slider

Finally, create a new layer named actions above the default layer, and attach the following code to frame 1 of the actions layer:
puck_mc.onPress = function( ) {

  this.startDrag(true, -100, 0, 100, 0);

  this.onMouseMove = _onMouseMove;

};

_onMouseMove = function( ) {

  _parent[_name + "_txt"].text = this._x;

  updateAfterEvent( );

};

_parent[_name + "_txt"].onChanged = function( ) {

  puck_mc._x = Number(this.text);

};

puck_mc.onRelease = puck_mc.onReleaseOutside = function ( ) {

  this.stopDrag( );

};

_parent[_name + "_txt"].onChanged( );
The preceding code makes puck_mc draggable along the hairline when you click on it. It also associates the puck_mc clip with a text field that is on the same timeline as the slider clip. The text field must have the same name as the slider clip, except with "_txt" at the end, such as slider_txt.
Using the Slider
When I was generating fractal trees [Hack #6], I worked out the "seed" values using sliders. There were two function values for which I didn't really have a feel for the suitable range. They were angle (which controls the angle of the branches) and branch (which controls how often the tree sprouts branches).
In the code where the values of these two variables were defined, I simply commented them out as follows:
// angle = 10;

// branch = 2;
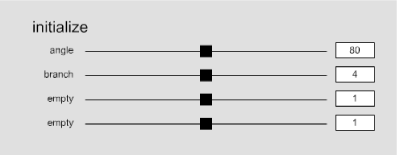
Then, I quickly created my slider symbol and added a few slider instances and associated text fields off stage, as shown in Figure 8-3.
Figure 8-3. Sliders used to tweak my tree generator parameters

The first slider is labeled with the static text "angle" and has the instance name value01. The text field to its right (showing "80") is named value01_txt. When the SWF starts, this slider's puck moves to the position corresponding to 80 on its scale (the scale is from -100 to 100). When I click and drag the puck, it changes the value in value01_txt. If you make the text field an input field, you can enter a value directly into the text field and the puck position changes to reflect the new value. To make this text field control the value of the angle variable, commented out in the preceding code, select the value01_txt field on stage and specify angle in the Var field of the Properties panel.
The Var field, which is equivalent to setting the TextField.variable property, is provided for backward compatibility with the Flash 5 style of assigning a value directly to a text field. The recommended way to read/write the contents of a text field in Flash Player 6 and later is to use the TextField.text property. If you don't use the text property, some components that rely on it, such as scrollbars, may not react properly to changes in your text field. We are not using components in our slider and this is a hack, so we chose to use the Var field for simplicity.
Here's a version that uses the text property instead. The setup is a little different. It requires the text field to have the instance name angle_txt and the slider to have the instance name angle_mc in order to control a variable named angle. However, you no longer have to set the Var field in the Properties panel.
// Text field has the same name as the slider but with "_txt".

this.targetTextField = _parent[_name.split("_")[0] + "_txt"];


// The variable we're setting has the same name as the

// text field up to the "_".

this.targetTextField.targetVariable = _name.split("_")[0];


puck_mc.onPress = function( ) {

  this.startDrag(true, -100, 0, 100, 0);

  this.onMouseMove = _onMouseMove;

};

_onMouseMove = function( ) {

  this._parent.targetTextField.text = this._x;

  this._parent.targetTextField.onChanged( );

  updateAfterEvent( );

};

this.targetTextField.onChanged = function( ) {

  puck_mc._x = Number(this.text);

  this._parent[this.targetVariable] = Number(this.text);

};

puck_mc.onRelease = puck_mc.onReleaseOutside=function ( ) {

  this.stopDrag( );

};

this.targetTextField.onChanged( );
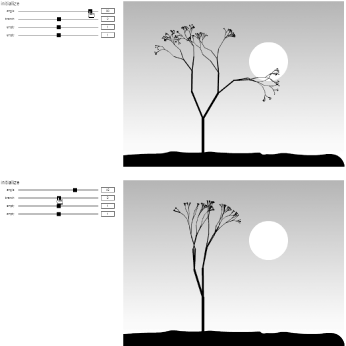
Regardless of which technique you've used (Var or the text property), we have "sliderized" our input so that varying the slider value changes the value of our angle variable. Twiddle the slider to create different trees, as shown in Figure 8-4.
Figure 8-4. Two different trees generated by different inputs

Some of you will be saying, "I can do that in the debugger!" True, but this approach makes it easier to focus on the variables of interest and the slider value can be made permanent without having to change the code you are developing.
When you are happy with the results, note the value of each variable, stop the SWF, and enter the value directly in the text field, such as value01_txt or angle_txt, in the FLA. This makes your chosen value the default value when you publish the SWF. When you want to finalize the design so that the sliders are no longer able to change your values, simply delete the sliders from the Stage, leaving the text fields behind.
Final Thoughts
The longer you think about this technique, the cooler it is. Whenever you are unsure about the appropriate input values, simply wire the values up to sliders and fiddle around with them. This technique helps you work out initial values even if you have already finished the logic code. You don't need to go back into the code to change the values because the configurable variables have been abstracted from the code base. If you can't determine appropriate initial values using sliders, this fact might help you realize the limitation of your existing logic and the need to modify it.
The Banja site developers used a standard set of sliders to map out the island navigation visually, a big advantage on a team consisting of coders and designers. The coder writes the ActionScript and sets up the offscreen sliders. The designers can build the graphics and configure the navigation via the sliders. That is, even hard-core coders can benefit from this technique because it lets others tweak the inputs without touching the code. And you can even leave the sliders in the final user interface if you want to create a user-configurable experience or animation! If you don't like the idea of leaving the text fields in the movie permanently, you can hardcode the final variable values in ActionScript and delete the text fields, too.


