Hacks #26-34
This chapter covers a topic near and dear to Flash's heart: animation. The Flash interface is based on the techniques of traditional cel animation. The Flash timeline is the digital equivalent of a flip book, with each frame representing a slice of time and successive cels (frames) displayed over time to create the illusion of motion. Like traditional cel animation, Flash supports the concept of layers, which are used to build up an animation from the background to the foreground, with various elements at appropriate depths.
Keyframes
and tween frames, in which the master artist
creates the keyframes and underlings create the in-between (tween)
frames, will also be familiar to traditional animators. In
Flash's tween-based system, the artist creates the
keyframes and Flash can generate the tween frames automatically. All
changes created by the animator, such as moving a graphic to a new
location, must occur on a keyframe. Frame 1 is always a keyframe and
you can create additional keyframes using
Insert TimelineKeyframe (F6). So you might create
a graphic in frame 1 and position it at the left side of the Stage.
Then you can create a keyframe in frame 19 and move the graphic to a
new position at the right side of the Stage. You can apply a motion
tween by selecting the animation's beginning and
ending keyframes in the timeline and setting the Tween option in the
Properties panel to Motion (or by choosing
InsertTimelineCreate Motion Tween). Flash
automatically tweens the animation, which makes the graphic appear to
move across the Stage in 19 steps as you scrub the playhead across
the first 19 frames.
TimelineKeyframe (F6). So you might create
a graphic in frame 1 and position it at the left side of the Stage.
Then you can create a keyframe in frame 19 and move the graphic to a
new position at the right side of the Stage. You can apply a motion
tween by selecting the animation's beginning and
ending keyframes in the timeline and setting the Tween option in the
Properties panel to Motion (or by choosing
InsertTimelineCreate Motion Tween). Flash
automatically tweens the animation, which makes the graphic appear to
move across the Stage in 19 steps as you scrub the playhead across
the first 19 frames.
When a graphic is placed in a layer, it appears on Stage until a
blank keyframe is encountered in that layer. For example, if you want
a graphic to be removed from the Stage after frame 19, you can insert
a blank keyframe in frame 20 (using
InsertTimelineBlank Keyframe or F5).
Even though Flash does a lot of the work for you, this chapter has a number of hacks that benefit the traditional animator and newcomer alike. Creating animation can require a lot of time and skill, so this chapter offers hacks that both reduce the time required and simplify the process. Unlike traditional animators, Flash animators must also be concerned with download times and runtime performance. This chapter looks at ways of reducing or automating common animation tasks by:
Simplifying animations (for both the animator and Flash)
Generating complex animation via third-party tools, particularly for character animation
Showing how to make long nonrepetitive animations via short, repetitive animations
Flash also allows you to generate scripted motion. In scripted motion, the appearance of the next frame in the animation is calculated and drawn by ActionScript. This form of animation is the route best taken when you want to create interactive animation or when your animations are controlled by mathematical rules (such as physical equations of motion).
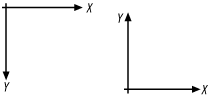
When using scripted animation, be aware that Flash uses print-based coordinates, not mathematical ones. A printed page takes the origin at the top-left corner, whereas the traditional Cartesian axes use the bottom-left corner as the origin. This means that the Flash origin is at the top-left corner of the Stage, and the positive Y direction is downward, as shown in Figure 4-1.
Figure 4-1. Flash coordinate axes (left) and traditional Cartesian coordinate axes (right)
For scripted motion, the limiting factor is performance, and we will look at ways of making your code create animations that are as smooth and responsive as possible. We will also look at several quick ways of creating common scripted animation effects.


