Section 3.4. Basic Blogger Settings
In the previous section, you created a blog and made your first posting, accepting the default behavior of Blogger. However, over time you'll most likely want to customize the blog to provide a look and feel uniquely your own. The first step in customizing your blog is understanding the components of a Blogger blog and how to adjust the settings related to each of them.
3.4.1 Title and Description
Figure 3-5 shows the blog description at the top of the lefthand column and the title in large type across the top of the page.
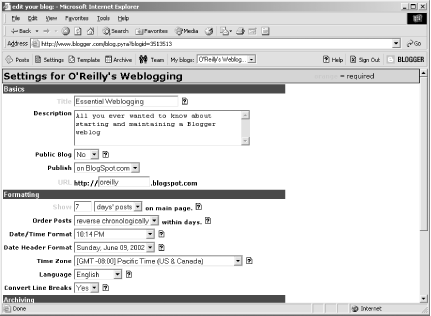
To change the title, return to the Blogger Edit view page and select the Settings option from the toolbar at the top of the web page. This opens a page that allows you to change various settings of your blog, as shown in Figure 3-6.
Figure 3-6. Changing the blog title in Blogger Settings

You can change the title in the first field, as we did for the example. You can also edit or remove the description in this Settings page. For the example, we'll leave the description as is.
Change the URL field to specify your blog's subdomain on blogspot.com. For example, Figure 3-6 shows a URL of "oreilly," so the blog is visible at http://oreilly.blogspot.com. Blogspot will give you an error if you try to set the URL field to something that's reserved or already taken(e.g., "www").
Once you've made the changes, save them by clicking the Save Changes button at the bottom of the page. Be careful with this button ? right next to it is one that will delete the blog!
After saving the changes, you're returned to the Edit view page. To promote the changes you made to your displayed blog, click the Publish button that shows above the calendar in the bottom half of the page. View the blog again to see the new title on the page.
3.4.2 Formatting Basics
As described in Chapter 1, blog postings are commonly date- and timestamped and displayed in reverse chronological order (latest at the top of the page).
In the Blogger Settings, shown previously in Figure 3-6, you can see that the date formatting and posting display sequence can be adjusted for your blog. For instance, the number of postings displayed on the main page can be adjusted from the default of seven days' postings. Instead of displaying a set number of day's postings, you can choose to display a certain number of postings at a time. This approach is popular if you post frequently throughout the day.
The greater the number of postings, the larger the main blog page and the more time it takes to download. If you have large postings or post frequently, consider adjusting the number of postings shown on the main page, in consideration of your readers who might be using a slow modem and have slow access times.
Another thing you can change is the ordering of the posts, choosing to display postings in strict chronological order. However, before doing this, consider the fact that probably about 99% of bloggers post in reverse chronological order, and changing this default setting may confuse your blog readers.
If you prefer to post in a language other than English, the default, you can choose from among other language such as French and German. If you subscribe to Blogger Pro, you have access to even more language choices, including Arabic, Croatian, and several variations of English, German, Spanish, and so on.
Other formatting settings you can alter are the date- and timestamp associated with your postings. By default, each posting is date- and timestamped, and a date field heads each day's postings. In addition, the date itself is controlled with the Time Zone field. Use whatever matches your time zone.
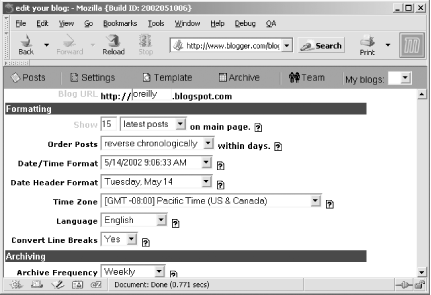
For your blog, change the posting number to show 15 of the latest postings. In addition, change the Date/Time Format to:
M/D/YYYY HH:SS:MM AM/PM
And the Date Header Format to:
Day of week, Month Date
Alter the Time Zone and Language settings to reflect your own preferences. The settings at this point should be similar to those shown in Figure 3-7.
Figure 3-7. Blog Settings after modifications in formatting

Once saved, republish your blog to reflect the changes.
3.4.3 Blogger Archives
By default when you create your new Blogger blog, archives are stored by week, which means there is a separate archive file for each week. These archives are accessible through hypertext links within the blog, as shown earlier in the blogging snapshot in Figure 3-5.
Archives by week are particularly useful because your blog page readers can reference an archived entry though a smaller weekly file rather than a larger monthly one. However, after a time, you can have so many archive files that the listing within your blog page is cluttered and hard to view. For this reason, a lot of bloggers prefer to store their archive files monthly.
You can adjust your archive frequency in the Settings. For your blog, change this to monthly. Once you save these changes and republish your blog, you'll see that the archive link changes to reflect the new date period.
Now that you've made some basic adjustments to your blog settings, it's time to focus on the blog content itself ? your writing.


