Section 6.5. Adding Comments
Unlike more traditional web pages, blogging is highly interactive, with the blog reader responding directly to the blog writer. This process is facilitated with blog comments ? functionality to allow your blog readers to add comments to each posting.
At this time, Blogger doesn't have a built-in comment system, but you can use any number of commenting software packages, particularly if you host your blog pages yourself and are comfortable with incorporating some coding into your blog. One PHP-based comment system called dotcomments (accessible at http://groups.yahoo.com/group/dotcomments-support/files/) works well.
|
However, if you're not interested in server-side coding, or if you aren't hosting your blog pages on your own server, you can still incorporate comments by using a JavaScript client-based comment system such as YACCS.
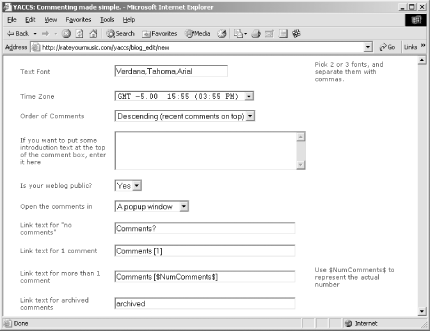
YACCS commenting is an online service that works with several blogging tools including Blogger and Radio UserLand. You begin the process of using YACCS by signing up for an account at http://rateyourmusic.com/yaccs/, providing information such as blogging tool used (this is important as it impacts the code incorporated into your blog), your name, the URL for the blog, and so on. You'll also provide some basic operating instructions for the comments, such as ordering comments in descending order (recent comments on top), whether the blog is public, and so on.
Add the information for your blog, making sure to pick the Pop-up Window option for opening the comments. Also change the "No Comments" text to "Comments?", as shown in Figure 6-13.
Figure 6-13. Providing basic comment information

One you're finished providing information on the page, clicking the Modify Your Comments button will open a second window providing two options for installing the comments: either manually using copy and paste, or automatically.
Automatic comment installation uses the Blogger API to update your template, as is demonstrated in the next section when you add a statistics counter to your blog page. For now, you'll add the Comment code directly yourself.
The generated code is shown in Example 6-5. To manually add this to your blog, we select and copy all of it.
Example 6-5. Generated YACCS code
<!-- Begin YACCS Code (part 1) -->


<script type="text/javascript"

src="http://rateyourmusic.com/bclw?b=90000020370"></script>

<script type="text/javascript">

function yaccs_c(  ) {

   document.write(ycso[0]);

}

function ycs(e) {

   for(i=0;i<ycso[2];i++)

    {if(ycsx[i*2]==e){return ycsx[(i*2)+1];}

}

if(e<ycso[3])if(ycso[2]>=ycso[1])

   {return -1} else{return 0} else return 0

}

function get_comment_link(e){

 cc=ycs(e);if(cc==0){yfs=ycso[9]}

 if(cc==1){yfs=ycso[10]}if(cc>1){yfs=ycso[11];

 if(ycso[13]){yfs+=cc}yfs+=ycso[12]}if(cc==-1){yfs=ycso[14]}

 if(ycso[5])

 {

   document.write('<a target=\"'+ycso[4]+

       '\" class=\"yaccslink\" href=\"javascript:void(0)\" ' +

       'onmouseover=\"window.status=\'Comment on this post\'; return true\" '+

       'onMouseout=\"window.status=\' \'; return true"

           onclick=\"window.open(\'http://' + ycso[8] +

           'commentsn?blog_id=' + ycso[15] + '&blog_entry_id='+e+'\',\'intags\',\

'scrollbars=yes,resizable=yes,height=' +

          ycso[6]  + ',width=' + ycso[7]  +',left=80,top=80\');\">'+yfs+'<\/a>')

  } else {

    document.write('<a class=\"yaccslink\" href = \"http://' + ycso[8] +

      'commentsn?returnurl=' + document.URL + '&blog_id=' + ycso[15] + '&blog_entry_

id='+e+'\">'+yfs+'<\/a>')}}

</script>


<!-- End YACCS Code (part 1) -->
The code gets added to the Blogger template directly after the opening head tag.
In the next step, code to handle the individual post comments is copied and added to the template area contained within the Blogger tags. The actual placement of the code can vary and depends on your preferences as to where you want the comment link to appear. In the Essentials blog, we placed it right next to the <$BlogItemDateTime$> template tag, within the posts div block, with a couple of dashes preceding it as shown in Example 6-6.
Example 6-6. Modification of Essential Blogger template to incorporate YACCS comment
<Blogger>
<BlogDateHeader>
<div class="date"><$BlogDateHeaderDate$></div>
</BlogDateHeader>
<div class="posts">
<a name="<$BlogItemNumber$>"> </a><br>
<PostSubject>
<h5><$BlogItemSubject$></h5>
</PostSubject>
<$BlogItemBody$><br>
<span class="byline">posted by <$BlogItemAuthor$> at
<a href="/archives/<$BlogItemArchiveFileName$>#<$BlogItemNumber$>">
<$BlogItemDateTime$></a></span>
-- <SCRIPT language="javascript">get_comment_link(<$BlogItemNumber$>)
</SCRIPT><noscript>
<a href =
"http://rateyourmusic.com/yaccs/commentsn?b=90000020370&e=<$BlogItemNumber$>">
Add a comment</a></noscript>
</div>
<br>
</Blogger>
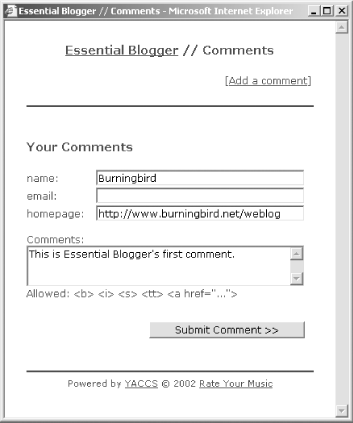
Save the template change and republish the blog page to add the comment capability to the blog. If you click on the Comments? link, the comment window opens, as shown in Figure 6-14.
Figure 6-14. Comment window supported by YACCS and attached to Essential Blogger blog

Typing and submitting a comment adds it to your comments; refreshing the blog page shows that the comment count is now at one. Clicking the Comments link opens the comments window and the saved message is displayed.
If you wish to try a different look for your comments, you can access the YACCS control panel and select one of the public templates or create one of your own. The best thing about this is you don't have to modify your Blogger template again ? the comment template is separate from the Blogger template.
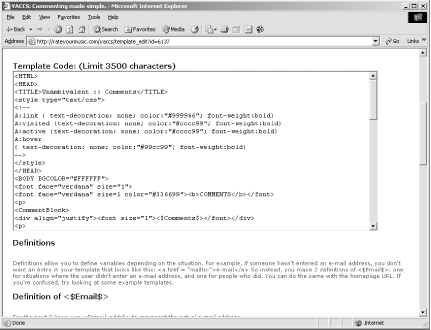
For the Essential Blogger blog, we picked the Movable Type template because of its simplicity and ease of reading. After previewing it, click the Copy link associated with it. A new page opens giving you a chance to preview the template and modify it if you wish. Clicking on the link to modify the template, opens the template modification page, as shown in Figure 6-15.
Figure 6-15. Template page for YACCS comment

As you can see, the YACCS template page is quite similar to the Blogger template page ? a top text box for editing the template, as well as individual fields for modifying specific elements of the template such as how to handle the email field when a user doesn't specify an email, and so on.
For now, the only change we made to the template is to change the comment window title from "Unambivalent::Comments" to "Essential Blogger::Comments." After saving the changes, the next step is to incorporate YACCS functionality into the Blogger template.
Returning to the YACCS control panel, the comment account shows in the top of the page. Click the More>> associated with the account to open the detailed information page for the comments. In this page, you can select the new template from a drop-down box. Click the Apply button to apply the change.


