Taking a Quick Tour of Your Workspace
After making your Project Settings selection, Premiere opens its workspace. At first glance it may seem busy and counterintuitive, but after working with it for a while you'll come to appreciate its layout. For now, I'll limit my discussion to only two features:
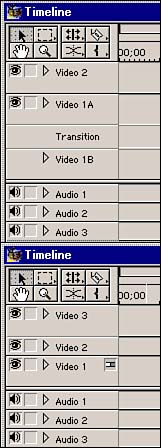
Timeline? For those of you who started Premiere before cracking open this book, you already ay have opted for the A/B Editing workspace. If so, your timeline?that collection of parallel, horizontal lines in the bottom left portion of your workspace?will say Video 1A and Video 1B with a transition line between them. You can switch that to single-track editing with a couple mouse clicks. I'll cover this in Hour 3. See Figure 2.10 for a view of both types of timelines.
Figure 2.10. If you opted for A/B editing, your timeline will look like the top window. The single-track editing workspace (bottom window) looks slightly different.
Monitors? This is the second reason why I think it's best to choose single-track editing instead of A/B. The default workspace setting for single-track has two monitors?two little TV windows (see Figure 2.11). One for your "source" video/images/graphics/audio and the other for the "program" (your edited project).
Figure 2.11. Selecting single-track editing means your default workspace opens with two monitors?a more intuitive work environment.
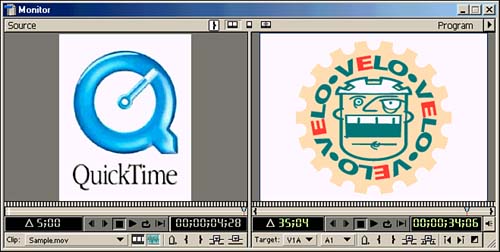
A/B editing defaults to a single monitor, which I think is counterintuitive and confusing. You can start Premiere by selecting A/B editing and then switch to two monitors (remember that Premiere is mind-numbingly configurable), but by opting for single-track editing you at least start with the right frame of reference.
I'll give you a more detailed workspace tour in the next chapter.


