Adding Transitions to Your Own Project
Okay, this time for sure. It really is time to add transitions to your project. If you saved your project, simply click File, Open Recent Project and select your project name.
If instead you simply want to experiment on a few clips, add them to the Project window and drag them in succession to the Timeline Video 1 track.
Now all you have to do is drag and drop transitions to your heart's content to edit points on your project. Try out a whole bunch of transitions. You easily can replace one transition with another by simply dragging the new one on top of the old one. It'll automatically replace the rejected transition.
If you want to lengthen or shorten a transition, simply right-click the purple transition segment, select Duration, and type in a new time. One second is the default transition time.
Task: Preview Your Transitions
Instead of using the Transition Settings slider to preview your transitions, you can use the Program Monitor screen. If your computer has the horsepower, you can preview the transitions in real time. If not, you can scrub through them manually.
Here are the steps to use Real-Time Preview:
To check whether you selected Real-Time Preview during startup (or to select that mode now), select Project, Project Settings, Keyframe and Rendering from the main menu. Make sure you've placed a check mark in the Real-Time Preview box.
Click OK.
Place your edit line in front of the transition you want to preview and press Enter/Return. You should see that transition playing in the Program Monitor screen.
If your computer processor cannot perform a real-time preview smoothly, you can do it manually by using a scrub preview. Here are the steps:
Drag the timeline's edit line to just before your transition.
Release the mouse button.
Press Alt (Windows) or Option (Mac), click and hold the edit line, and drag it across the transition. The transition will display in the Program Monitor screen.
This is not true real-time preview, but if you drag the edit line smoothly, it'll be close enough.
Task: Render to View a Transition in Real Time
Once you've created a transition to your satisfaction, you may want to have Premiere "render" it. This process converts the transition from a series of mathematical calculations to a straight video clip, making it easier for Premiere to play it. You'll eventually have to render all such transitions and other effects before you record your project to videotape or to your hard drive later. Therefore, taking care of some individual transitions now will save you time later. Also, these transitions will be displayed smoothly from this point on without the need to use Real-Time Preview or a scrub preview. Here's how you render a transition:
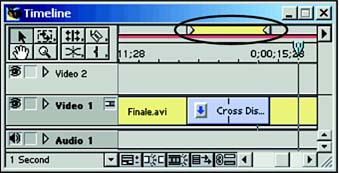
Double-click the yellow bar above the timeline. That shortens the "work area" to only the current active window.
Grab the handles at the ends of the bar (one at a time) and drag them to the edges of the transition you want to render. I've highlighted those handles in Figure 5.17. If Snap To Edges is enabled, the handles will "snap" to the edges of the transition. This tells Premiere to render only that transition.
Figure 5.17. Setting the work area to only your transition makes the rendering brief and gets you to real-time playback more quickly.
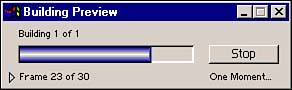
Press Enter, which starts the rendering process and pops up a progress indicator like the one in Figure 5.18. Once the process is completed, Premiere automatically plays the rendered transition in real time so you can check out your handiwork.
Figure 5.18. While Premiere "builds" your preview (renders your transition), a little progress indicator pops up.
If you don't like what you see?it's too short, too long, the border is the wrong color or is too thick?simply double-click the transition segment and make some adjustments in the Settings dialog box. To see your fixes in real time, you'll need to do that rendering thing again.
No matter?this is the time to experiment. Look for clips that lend themselves to specific transitions. Try out a variety. Then after you've had some fun, be sure to use transitions judiciously. Restraint is a good thing when it comes to transitions.
To give you an overview of virtually all the transitions Premiere has to offer, see Table 5.1.
|
Transition Type |
Name |
Image |
Border/Anti-Aliasing |
Forward/Reverse |
Custom |
|---|---|---|---|---|---|
|
3D Motion |
Cube Spin |
|
** |
** |
|
|
Curtain |
|
** |
|||
|
Doors |
|
** |
** |
||
|
Flip Over |
|
** |
Number of bands/color |
||
|
Fold Up |
|
** |
|||
|
Motion |
|
** |
12 motion files |
||
|
Spin |
|
** |
** |
||
|
Spin Away |
|
** |
** |
||
|
Swing In |
|
** |
** |
||
|
Swing Out |
|
** |
** |
||
|
Tumble Away |
|
** |
** |
Change disappear point |
|
|
Dissolves |
Additive Dissolve |
|
|||
|
Cross Dissolve |
|
||||
|
Dither Dissolve |
|
** |
|||
|
Non-Additive |
|
||||
|
Random Invert |
|
Invert A or B; change box sizes |
|||
|
Iris |
Iris Cross |
|
** |
** |
Start location |
|
Iris Diamond |
|
** |
** |
Start location |
|
|
Iris Points |
|
** |
** |
||
|
Iris Round |
|
** |
** |
Start location |
|
|
Iris Shapes |
|
** |
** |
Number of shapes; three shape types |
|
|
Iris Square |
|
** |
** |
Start location |
|
|
Iris Star |
|
** |
** |
Start location |
|
|
Page Peels |
Center Peel |
|
** |
||
|
Page Peel |
|
** |
Start corner |
||
|
Page Turn |
|
Start corner |
|||
|
Peel Back |
|
** |
|||
|
Slide |
Band Slide |
|
** |
** |
Number of bands; movement direction |
|
Center Merge |
|
** |
** |
||
|
Center Split |
|
** |
** |
||
|
Multi-Spin |
|
** |
** |
Number of boxes |
|
|
Push |
|
** |
** |
Movement direction |
|
|
Slash Slide |
|
** |
** |
Number of slices; movement direction |
|
|
Slide |
|
** |
** |
Movement direction |
|
|
Sliding Bands |
|
** |
** |
Movement direction |
|
|
Sliding Boxes |
|
** |
** |
Movement direction |
|
|
Split |
|
** |
** |
Movement direction |
|
|
Swap |
|
** |
** |
Movement direction |
|
|
Swirl |
|
** |
** |
Number of boxes; percent of movement completed at end |
|
|
Special |
Displace |
|
Various settings |
||
|
Image Mask |
|
** |
Can use any mask |
||
|
Texturize |
|
||||
|
Three-D |
|
||||
|
Stretch |
Cross |
|
** |
** |
Movement direction |
|
Funnel |
|
** |
** |
Movement direction |
|
|
Stretch |
|
** |
Movement direction |
||
|
Stretch In |
|
Movement direction |
|||
|
Stretch Over |
|
** |
** |
Movement direction |
|
|
Wipe |
Band |
|
** |
** |
Movement direction |
|
Barn Doors |
|
** |
** |
Movement direction |
|
|
Checker Wipe |
|
** |
** |
Movement direction |
|
|
Checker-board |
|
** |
** |
Movement direction |
|
|
Clock Wipe |
|
** |
** |
Movement direction |
|
|
Gradient Wipe |
|
** |
Movement direction; graphic selection |
||
|
Inset |
|
** |
** |
Movement direction |
|
|
Paint Splatter |
|
** |
** |
Movement direction |
|
|
Pinwheel |
|
** |
** |
Movement direction; number of wedges |
|
|
Radial Wipe |
|
** |
** |
Movement direction |
|
|
Random Blocks |
|
** |
** |
Movement direction; number of blocks |
|
|
Random Wipe |
|
** |
** |
Movement direction |
|
|
Spiral Boxes |
|
** |
** |
Movement direction; width of spiral |
|
|
Venetian Blinds |
|
** |
** |
Movement direction; number of bands |
|
|
Wedge Wipe |
|
** |
** |
Movement direction |
|
|
Wipe |
|
** |
** |
Movement direction |
|
|
Zig-Zag Blocks |
|
** |
** |
Movement direction |
|
|
Zoom |
Cross |
|
Specific movement direction (begin and end) |
||
|
Zoom |
|
** |
** |
Specific opening location |
|
|
Zoom Boxes |
|
** |
** |
Number of shapes |
|
|
Zoom Trails |
|
Specific opening location; number of trails |
Expert Editing TipsForever seared in my brain is one edit. It was in my first "magazine" piece for KSL-TV in Salt Lake City. This was back in the mid 1980s. The national Radio and Television News Directors Association had just named KSL the TV news station of the year. An honor KSL would win an unprecedented two years in a row. KSL had the highest rated (by percentage of viewers) news shows in the country. It was a TV news powerhouse. I had just moved there from a medium-sized market and was in awe of the professionalism, the scope of the news operation, and the array of high-tech goodies. John Crossman, Crossman Post Productions.
Buried deep in the editing bays was something akin to the command center of the Starship Enterprise. At its helm was John Crossman, KSL's chief editor. For me, having come from a station with no editors (the photographers did all the editing), this was a tad overwhelming. One of my first assignments was a long, feature story on a local piano manufacturer. I had never done a magazine-style piece and handed John a straightforward news-style voiceover. He barely batted an eye. A couple hours later he called me into his realm wanting to show me how the piece was coming together. It sang. It danced. It had rhythm. I was confounded. The segment ended with a Billy Joel piano crescendo followed by a loud "clip" of a wire cutter snipping a piano string. I looked at John and at all his whiz-bang electronics and said one of the dumbest comments I've ever muttered in my TV career: "This equipment is amazing!" Fortunately he forgave me my egregious error and we got on famously after that. John spent eight years at KSL and now runs Crossman Post Production (www.xmanpost.com) just outside of Salt Lake City. He provides video editing, graphics, and computer-generated animation for a lengthy list of corporate, educational, and broadcast clients. He's won five regional Emmys, 26 national Tellys, and a slew of other awards. John is a wonderfully talented guy who has a true passion for the art of editing. Here are his editing tips. To begin, good editors need certain basic talents:
To edit well you need to do the following:
In the world of broadcast television you are surrounded by people who know how to create good stories. In corporate production you may be working with someone who has no clue. At this point you become 90% teacher and 10% editor. Your attitude will win you a loyal client or lose you a lifetime customer. Like music in a movie, good editing helps communicate your message and shouldn't really stand out to the viewer. The editing is not the message, but the editing can make the message work, not work, or work better than it should. |