Creating Special Transitions
Back in Hour 5, "Adding Transitions: From Dissolves to Zooms," I skipped a few of the more-involved transitions. I'll run some by you here.
Creating Image Mask Transitions
This is more like a special effect than a transition. Basically you use any image?black and white, grayscale, or full color?as a means to display part(s) of clip A and part(s) of clip B at the same time.
Clip A shows through the black area of your image (or any part of it that is 50% or more gray), and clip B shows through the white area (or any part that is less than 50% gray). To reiterate, in this case Premiere sees things only as black or white. Even if you use a mask with color, Premiere will make the transition by converting the color image to grayscale.
To do this, you'll need a mask. To get some hand's-on experience, I'd suggest you make a rudimentary mask using a tool such as MS Paint. Create your mask and save it on your Premiere scratch disk.
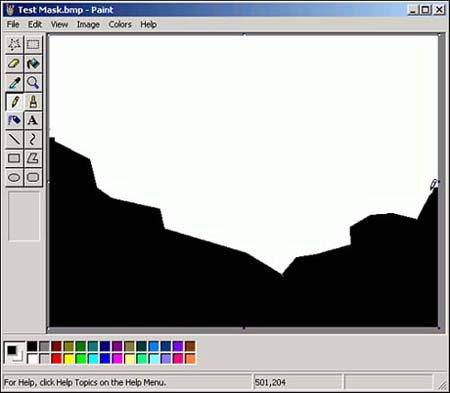
Figure 9.11 shows how a mask might look. Basically it's a stark black-and-white graphic. Remember the black area will let that part of clip A show through, and the white area displays that section of clip B.
Figure 9.11. A rudimentary mask created in MS Paint for use with the Image Mask transition.
Task: Create an Image Mask Transition
To create an Image Mask transition, follow these steps:
Open Premiere to your workspace.
To make it clear how the Image Mask transition works, I'd like you to make two color mattes. Right/Option-click in the Project window (or click on the New Item icon?it's the little folded up page in the bottom of the Project window) and select New, Color Matte. Select a color and give your matte a descriptive name. Do that again for a distinctly different color.
Drag each matte to the timeline Video 1 track.
Locate the Image Mask transition in the Special Effect folder in the Transitions palette and drag it to the edit point between the two mattes. This pops up a small Image Mask Settings dialog box, as illustrated in Figure 9.12. This is a tad confusing because you'd expect to see a standard Transitions Settings dialog box with a Custom button instead (we'll get to that dialog box in a moment).
Figure 9.12. The preliminary Image Mask Settings dialog box.

Click Select Image, locate your mask, and double-click it. When this brings you back to the Image Mask Settings dialog box, click OK.
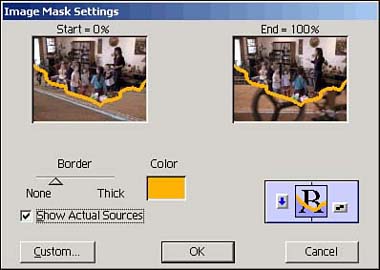
Now open the regular Image Mask Settings dialog box by double-clicking the transition on the timeline. Ah-ha. This looks more familiar (see Figure 9.13). Check Show Actual Sources, give your mask transition a border (with a nice complementary color), and then admire your work.
Figure 9.13. The actual Image Mask Settings dialog box.
As with most transitions, if you click the little down arrow, you'll switch how Premiere performs this transition. Instead of letting clip A show through the black portion of your mask, clip A now shows through the white and clip B shows through the black.
Creating Gradient Wipe Transitions
This is more like what you'd expect to see in a transition. It works like the Image Mask transition in that it lets parts of clip A and clip B display together using a custom mask, but the Gradient Wipe transition actually moves from one scene to the next using a smooth animation.
In a reversal of the Image Mask transition, clip A shows through the white area whereas clip B shows through the black. Also, in this case, Premiere does see things as gray?gradually. As the transition progresses, the gray areas "darken" and more of clip B shows through until at the end of the transition only clip B is onscreen.
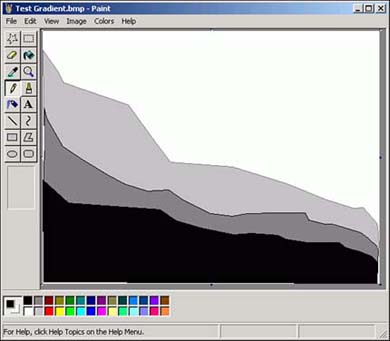
As with the previous task (the Image Mask transition), I'd suggest you create a grayscale gradient mask. Figure 9.14 shows a very rudimentary example using black, two grayscale areas, and white.
Figure 9.14. A rudimentary grayscale mask created in MS Paint for use with the Gradient Wipe transition.
Task: Create a Gradient Wipe Transition
To create a Gradient Wipe transition, follow these steps:
Return to your timeline and replace the Image Mask transition with the Gradient Wipe transition (it's in the Wipe folder).
This, too, pops up a little preliminary Gradient Wipe Settings dialog box, as shown in Figure 9.15. Click Select Image, locate your gradient graphic, and double-click it.
Figure 9.15. The preliminary Gradient Wipe settings dialog box.
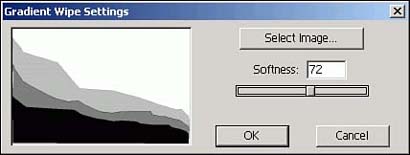
This returns you to the preliminary Gradient Wipe Transition dialog box. Select a Softness setting (this smoothes sharp edges in your gradient graphic). Click OK.
As with the Image Mask transition, open the real Gradient Wipe Settings dialog box by double-clicking the transition on the timeline.
Check the Show Actual Sources box and preview your transition by dragging the slider under the first window.
Similar to the Image Mask transition, you can change how this transition works by clicking, in this case, the R button. This starts the transition from the top instead of the bottom.
Creating QuickTime Transitions
I don't know why the QuickTime transitions get such minimal coverage in the Premiere manual or other how-to books because they are almost as varied and customizable as all the standard Premiere transitions.
Using the same two color mattes (or two video clips of your choosing), find the QuickTime transition (in the QuickTime folder) and drag and drop it over the edit point. It'll replace the Gradient Wipe transition.
This automatically opens the Select Effect dialog box shown in Figure 9.16. If you scroll down the transition menu you'll see a lot of familiar names?Cross Fade (same as Cross Dissolve), Push, Radial, Slide, Wipe, and Zoom. There is some redundancy here, but the customizing tools are different and in some ways are an improvement over Premiere.
Figure 9.16. The QuickTime transition interface with the Gradient Wipe transition customization interface.
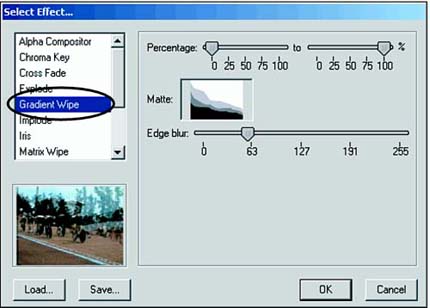
Just to see how the QuickTime transition process compares to Premiere's, select the now familiar Gradient Wipe transition. I've highlighted it in Figure 9.16.
Note that QuickTime transitions automatically display a real-time preview. Nice. Adjust the Edge Blur setting to see how that changes things.
If you double-click the Matte window, you can select your gradient graphic and see how that'll work.
The Percentage sliders work much like the sliders in Premiere's Transition Settings dialog box?they indicate where the transition will start and end. If you make the first slider 100% and the second 0%, that is like changing the direction of the arrow in the Premiere Transitions Setting dialog box.
Select the Iris transition and open the Wipe Type drop-down menu. Here is the QuickTime transition's real power. Check out all those types of irises. Try a diamond; then change the Horizontal and Vertical repeat numbers to something like 2 and 3. Add a border (4 pixels works well), select a color, and soften the edges. It should look like Figure 9.17.
Figure 9.17. QuickTime's Iris transition offers infinite customizability.

Try the Implode transition. This is the perfect means to let one image slide down a drain to reveal a sink. Using an X/Y axis you can select the specific endpoint.
Finally, explore the Wipe transitions?all 36 of them!
You may notice that the QuickTime color-selection tool is different from Premiere's. This, too, is an improvement. To see how it works, open any QuickTime transition with a border?Iris, Matrix Wipe, Radial, and Wipe?and click the small Border Color selection box. If you click somewhere in the color spectrum window and click OK, your border color will not change. As I've highlighted in Figure 9.18, you need to click in the spectrum window (note that it displays the color from dark to light in a vertical column to the right), use the slider to select just the right color, click the Add to Custom Colors box, and then click OK. Figure 9.18. QuickTime's border color selector interface gives you additional options over Premiere's standard color picker.
|

As you've worked with the timeline, you may have noticed that the clip and time bar colors change. Here's the basic color scheme:
|
Task: Stringing Together Multiple Transitions
This is an instance where you'll want to shift the regular direction of a transition from clip A to clip B, to clip B to clip A. Backwards.
It's best to use the A/B editing mode because you need to have a large overlap. After eight steps your timeline should look like Figure 9.19:
Switch to A/B editing. As a reminder, use the fly-out menu in the timeline's upper-right corner and select A/B Editing.
Place a clip on Video 1A and another directly below it on Video 1B. Neither should be too long?30 seconds or so will work fine.
Select a Transition?I suggest Venetian Blinds?and place it between the two clips on the transition line. It automatically takes up the entire overlap.
Shorten the transition by right/Option-clicking it, selecting Duration, and changing the duration to about one-fourth its original amount. If you try to shorten the transition by dragging its right end to the left, you will shorten clip A as well.
Add the same transition to the transition line at about the middle of the clip. This time it will automatically have the default duration of 30 frames.
Add one more transition to the end of the overlap.
Slice out the portion of clip A that is above and between the first two transitions to let clip B play through. Remember, the highest clip in the timeline covers all clips below it.
Change the little arrow in the second transition so it will operate "backwards"?that is, transition from clip B to clip A. Your timeline should look like Figure 9.19.
Alt/option-scrub through your project to see how this works. You can switch back to single-track editing and everything should work fine.
Figure 9.19. Multiple transitions let you shift from clip A to clip B then back to clip A.
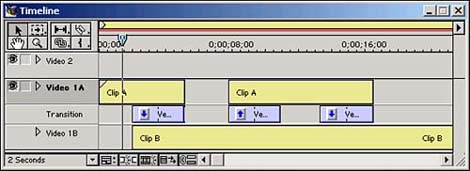
You can use multiple transitions to give a brief glimpse of a clip before going back to it.


