Hack 33 Particle Effects
![]()
![]()
Add realism to any animation using effects with small particles, such as explosions, sparks, rain, or snow.
When animating using timelines, one of the hardest things to achieve is common particle effects such as snow, star fields, or moving water. Flash doesn't have native support for particle effects, and animating thousands of tiny movie clips in different directions is time consuming. But it is easier than you may think to create varied effects.
The simplest particle is one that moves in only one direction?straight down. So let's start with a simple "dropping particle," created using a nested movie clip. This clip can be rotated to create a number of different effects without too much effort on your part.
function mover( ):Void {

  this._y += this.speed;

  if (this._y > 400) {

    this._y = 0;

    this.speed = Math.random( )*10+5;

  }

}

var path:MovieClip = this.createEmptyMovieClip("path", 0);

var dot:MovieClip = this.path.createEmptyMovieClip("dot", 0);

dot.lineStyle(0, 0x0, 100);

dot.moveTo(0, 10);

dot.lineTo(0, 15);

dot.speed = Math.random( ) * 10 + 5;

dot.onEnterFrame = mover;
The preceding code creates a movie clip, path, inside which another clip, dot, is created. The dot clip is then made to move from the top of the screen downward. You're probably thinking, "What's the point of path?" Well, that's the hacky part?by rotating path, we can change the direction in which dot moves. Try adding this to the end of the previous listing to see how it works:
// Move the clip to (100, 100) so it is visible even if rotated.

path._x = path._y = 100;

path._rotation = 50;
By rotating path, we rotate the direction in which dot falls. Further, by scaling path as dot moves, we can create complex acceleration without doing too much work.
Star Field
The
following listing shows a modified version of the preceding code.
Note the scaling and rotation effects highlighted in bold. Also, note
that the code assumes you have turned the Stage color to black
(choose Modify
function mover( ) {

  // Move the particle over time

  this._y += this.speed;

  this._yscale += 10;

  this.speed++;

  if (this._y > 500) {

    this._y = 0;

    this.speed = Math.random( ) * 10;

    this._yscale = 100;

  }

}

function starField(x, y, n) {

  // Generate a starfield of specified dimensions with n  stars

  for (var i = 0; i < n; i++) {

    var star = this.createEmptyMovieClip("star" + i, i);

    var dot = star.createEmptyMovieClip("dot", 0);

    star._rotation = Math.random( ) * 360;

    star._x = x;

    star._y = y;

    dot.lineStyle(0, 0xFFFFFF, 100);

    dot.moveTo(0, 10);

    dot.lineTo(0, 15);

    dot.onEnterFrame = mover;

    dot.speed = Math.random( )*10;

  }

}

starField(275, 200, 100);
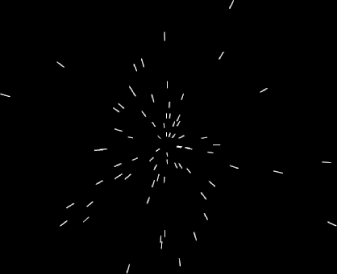
In the preceding code, we create multiple star clips, each of which takes the role of the path clip in the earlier example. Each star clip is rotated at a random angle, as shown in Figure 4-21.
Figure 4-21. A star field created with particle effects

We also scale the star clips; elongating the path (the star clip) while the dot is moving along creates acceleration, simulating the way things appear to get faster as they get closer to us.
Using the "scale the path clip as the dot clip moves" trick, you can create gravity effects [Hack #38] . This code listing employs the same techniques to simulate moving water:
function mover( ):Void {

  this._y += this.speed;

  this._yscale += 10;

  this.speed++;

  if (this._y > 500) {

    this._y = 0;

    this.speed = Math.random( ) * 10;

    this._yscale = 100;

  }

}

function waterfall(x1, x2, n) {

  for (var i = 0; i < n; i++) {

    var star:MovieClip = this.createEmptyMovieClip("star" + i, i);

    star._x = Math.random( ) * x2 + x1;

    star._y = 0;

    var dot = star.createEmptyMovieClip("dot", 0);

    dot.lineStyle(0, 0xFFFFFF, 100);

    dot.moveTo(0, 10);

    dot.lineTo(0, 15);

    dot.onEnterFrame = mover;

    dot.speed = Math.random( )*10;

  }

}

waterfall(200, 300, 800);
The final effect shown here is snow. By varying the angle of the particle paths randomly, we get a flurry of moving particles that look a lot like snow:
function mover( ) {

  this._y += this.speed;

  if (this._y > 500) {

    this._y = 0;

    this.speed = Math.random( )*10+5;

  }

}

function snow(a,  n) {

  for (var i = 0; i < n; i++) {

    var star:MovieClip = this.createEmptyMovieClip("star" + i, i);

    star._x = Math.random( ) * 550;

    star._rotation = (Math.random( ) * 2 * a) - a

    star._y = 0;

    var dot:MovieClip = star.createEmptyMovieClip("dot", 0);

    dot.lineStyle(0, 0xFFFFFF, 100);

    dot.moveTo(0, 10);

    dot.lineTo(0, 15);

    dot.onEnterFrame = mover;

    dot.speed = Math.random( ) * 10 + 5;

  }

}

snow(30,  800);
Final Thoughts
Although it is normal to attempt to create particle effects using (x, y) coordinates, you can sometimes get bogged down with the trigonometry or complex motion effects. By using an embedded clip to allow you to define a particle angle and speed (i.e., a polar coordinate description), many particle effects become much easier and require minimal calculations, which means you can have lots of them, and they become very easy to create.


