Special Installation Topics
Special Installation Topics
Some things that you run into during installation merit whole discussions by themselves. Rather than bog down the procedures with details that not everyone needs, I have added these topics to this section. Descriptions cover things such as reclaiming disk space and partitioning.
Partitioning your disks
The hard disk (or disks) on your computer provides the permanent storage area for your data files, applications programs, and the operating system (such as Red Hat Linux). Partitioning is the act of dividing a disk into logical areas that can be worked with separately. There are several reasons you may want to do partitioning:
-
Multiple operating systems — If you install Red Hat Linux on a PC that already has a Windows operating system, you may want to keep both operating systems on the computer. To run efficiently, they must exist on completely separate partitions. When your computer boots, you can choose which system to run.
-
Multiple partitions within an operating system — To protect from having your entire operating system run out of disk space, people often assign separate partitions to different areas of the Red Hat Linux file system. For example, if /home and /var were assigned to separate partitions, then a gluttonous user who fills up the /home partition wouldn't prevent logging daemons from continuing to write to log files in the /var/log directory.
Multiple partitions also make it easier to do certain kinds of backups (such as an image backup). For example, an image backup of /home would be much faster (and probably more useful) than an image backup of the root file system (/).
-
Different file system types — Different kinds of file systems that have different structures. File systems of different types must be on their own partitions. In Red Hat Linux, you need at least one file system type for / (typically ext3) and one for your swap area. File systems on CD-ROM use the iso9660 file system type.
Tip? When you create partitions for Red Hat Linux, you will usually assign the file system type as Linux native (using the ext3 type). Reasons to use other types include needing a file system that allows particularly long filenames or many inodes (each file consumes an inode).
For example, if you set up a news server, it can use many inodes to store news articles. Another reason for using a different file system type is to copy an image backup tape from another operating system to your local disk (such as one from an OS/2 or Minix operating system).
If you have only used Windows operating systems before, you probably had your whole hard disk assigned to C: and never thought about partitions. With Red Hat Linux, you can do a Server class of install (and have Linux erase the whole disk, take it over, and partition it) or a Personal Desktop or Workstation class (and have Linux keep separate partitions for Windows 9x/2000 and Linux). With the latest version of Red Hat Linux, you also have the opportunity to view and change the default partitioning for the different installation types.
During installation, Red Hat enables you to partition your hard disk using the Disk Druid utility (a graphical partitioning tool) . The following sections describe how to use Disk Druid (during installation) or fdisk (when Red Hat Linux is up and running). See the section "Tips for creating partitions" for some ideas for creating disk partitions.
Partitioning with Disk Druid during installation
During installation, you are given the opportunity to change how your hard disk is partitioned. Red Hat recommends using the Disk Druid. The Disk Druid screen is divided into two sections. The top shows general information about each hard disk. The bottom shows details of each partition. Figure 2-2 shows an example of the Disk Druid window.
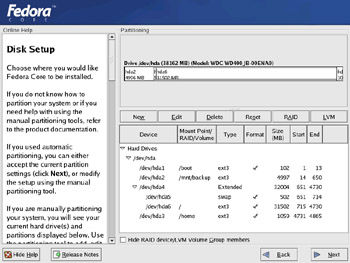
Figure 2-2: Partition your disk during installation from the Disk Setup window.
For each of the hard disk partitions, you can see:
-
Device — The device name is the name representing the hard disk partition in the /dev directory. Each disk partition device begins with two letters: hd for IDE disks, sd for SCSI disks, ed for ESDI disks, or xd for XT disks. After that is a single letter representing the number of the disk (disk 1 is a, disk 2 is b, disk 3 is c, and so on). The partition number for that disk (1, 2, 3, and so on) follows that.
-
Mount Point/Raid/Volume — The directory where the partition is connected into the Linux file system (if it is). You must assign the root partition (/) to a native Linux partition before you can proceed. If you are using RAID or LVM, the name of the RAID device or LVM volume appears here.
-
Type — The type of file system that is installed on the disk partition. In most cases, the file system will be Linux (ext3), Win VFAT (vfat), or Linux swap. However, you can also use the previous Linux file system (ext2), physical volume (LVM), or software RAID.
-
Format — Indicates whether (check mark) or not (no check mark) the installation process should format the hard disk partition. Partitions marked with a check are erased! So, on a multiboot system, be sure your Windows partitions, as well as other partitions containing data are not checked!
-
Size (MB) — The amount of disk space allocated for the partition. If you selected to let the partition grow to fill the existing space, this number may be much larger than the requested amount.
-
Start/End — Represents the partition's starting and ending cylinders on the hard disk.
In the top section, you can see each of the hard disks that are connected to your computer. The drive name is shown first. The Geometry section (Geom) shows the numbers of cylinders, heads, and sectors, respectively, on the disk. That's followed by the model name of the disk. The total amount of disk space, the amount used, and the amount free are shown in megabytes.
Reasons for partitioning
There are different opinions about how to divide up a hard disk. Here are some issues:
-
Do you want to install another operating system? If you want Windows on your computer along with Linux, you will need at least one Windows (Win95 FAT16 or VFAT type), one Linux (Linux ext3), and one Linux swap partition.
-
Is it a multiuser system? If you are using the system yourself, you probably don't need many partitions. One reason for partitioning an operating system is to keep the entire system from running out of disk space at once. That also serves to put boundaries on what an individual can use up in his or her home directory (although disk quotas are good for that as well).
-
Do you have multiple hard disks? You need at least one partition per hard disk. If your system has two hard disks, you may assign one to / and one to /home (if you have lots of users) or /var (if the computer is a server sharing lots of data).
Deleting, adding, and editing partitions
Before you can add a partition, there needs to be some free space available on your hard disk. If all space on your hard disk is currently assigned to one partition (as it often is in DOS or Windows), you must delete or resize that partition before you can claim space on another partition. The section on reclaiming disk space discusses how to add a partition without losing information in your existing single-partition system.
| Caution? |
Make sure that any data that you want to keep is backed up before you delete the partition. When you delete a partition, all its data is gone. |
The Disk Druid is less flexible, but more intuitive, than the fdisk utility. Disk Druid lets you delete, add, and edit partitions.
| Tip? |
If you create multiple partitions, make sure that there is enough room in the right places to complete the installation. For example, most of the Linux software is installed in the /usr directory (and subdirectories), whereas most user data are eventually added to the /home or /var directories. |
To delete a partition in Disk Druid, do the following:
-
Select a partition from the list of Current Disk Partitions on the main Disk Druid window (click it or use the arrow keys).
-
To delete the partition, click Delete.
-
When asked to confirm the deletion, click Delete.
-
If you made a mistake, click Reset to return to the partitioning as it was when you started Disk Druid.
To add a partition in Disk Druid, follow these steps from the main Disk Druid window:
-
Select New. A window appears, enabling you to create a new partition.
-
Type the name of the Mount Point (the directory where this partition will connect to the Linux file system). You need at least a root (/) partition and a swap partition.
-
Select the type of file system to be used on the partition. You can select from Linux native (ext2 or preferably ext3), software RAID, Linux swap (swap), physical volume (LVM), or Windows FAT (vfat).
Tip? To create a different file system type than those shown, leave the space you want to use free for now. After installation is complete, use fdisk to create a partition of the type you want.
-
Type the number of megabytes to be used for the partition (in the Size field). If you want this partition to grow to fill the rest of the hard disk, you can put any number in this field (1 will do fine).
-
If you have more than one hard disk, select the disk on which you want to put the partition from the Allowable Drives box.
-
Type the size of the partition (in megabytes) into the Size (MB) box.
-
Select one of the following Additional Size Options:
-
Fixed size — Click here to use only the number of megabytes you entered into the Size box when you create the partition.
-
Fill all space up to (MB) — If you want to use all remaining space up to a certain number of megabytes, click here and fill in the number. (You may want to do this if you are creating a VFAT partition up to the 2048MB limit that Disk Druid can create.)
-
Fill to maximum allowable size — If you want this partition to grow to fill the rest of the disk, click here.
-
-
Optionally select Force to Be a Primary Partition if you want to be sure to be able to boot the partition or Check for Bad Blocks if you want to have the partition checked for errors.
-
Select OK if everything is correct. (The changes don't take effect until several steps later when you are asked to begin installing the packages.)
To edit a partition in Disk Druid from the main Disk Druid window, follow these steps:
-
Click the partition you want to edit.
-
Click the Edit button. A window appears, ready to let you edit the partition definition.
-
Change any of the attributes (as described in the add partition procedure). For a new install, you may need to add the mount point (/) for your primary Linux partition.
-
Select OK. (The changes don't take effect until several steps later, when you are asked to begin installing the packages.)
Note? If you want to create a RAID device, you need to first create at least two RAID partitions. Then click the RAID button to make the two partitions into a RAID device. For more information on RAID, refer to Chapter 10 or the Red Hat Linux Customization guide. The latter is available from any Red Hat mirror site (such as ftp.redhat.com) here: pub/redhat/linux/current/en/doc/RH-DOCS/rhl-cg-en-9/*. To create an LVM volume group, you must create at least one partition of type "physical volume (LVM)."
Partitioning with fdisk
The fdisk utility does the same job as Disk Druid, but it's no longer offered as an option during Red Hat installation. (If you are old school, however, you could press Ctrl+Alt+F2 during the installation process and run fdisk from the shell to partition your disk.)
The following procedures are performed from the command line as root user.
| Caution? |
Remember that any partition commands can easily erase your disk or make it inaccessible. Back up critical data before using any tool to change partitions! Then be very careful about the changes you do make. Keeping an emergency boot disk handy is a good idea, too. |
The fdisk command is one that is available on many different operating systems (although it looks and behaves differently on each). In Linux, fdisk is a menu-based command. To use fdisk to list all your partitions, type the following (as root user):
# fdisk –l
???
Disk /dev/hda: 40.0 GB, 40020664320 bytes
255 heads, 63 sectors/track, 4865 cylinders
Units = cylinders of 16065 * 512 = 8225280 bytes

   Device Boot    Start       End    Blocks   Id  System
/dev/hda1   *         1        13    104391   83  Linux
/dev/hda2            14      4833  38716650   83  Linux
/dev/hda3          4834      4865    257040   82  Linux swap
To see how each partition is being used on your current system, type the following:
# df –h
Filesystem            Size  Used Avail Use% Mounted on
/dev/hda2              37G  5.4G   30G  16% /
/dev/hda1              99M  8.6M   86M  10% /boot
none                   61M     0   61M   0% /dev/shm
From the output of df, you can see that the root of your Linux system (/) is on the /dev/hda2 partition and that the /dev/hda1 partition is used for /boot.
| Note? |
If this had been a dual-boot system (with Windows 98), you might have seen a Windows partition from fdisk that looked like the following: /dev/hda1??????*?????????1??????????83?????????????666666+???????b???Win95 FAT32 You could mount that partition in Linux (to get to your Windows files when Linux is booted) by typing: # mkdir /mnt/win # mount -t vfat /dev/hda1 /mnt/win |
| Caution? |
Before using fdisk to change your partitions, I strongly recommend running the df –h command to see how your partitions are currently being defined. This will help reduce the risk of changing or deleting the wrong partition. |
To use fdisk to change your partitions, begin (as root user) by typing:
# fdisk device
where device is replaced by the name of the device you want to work with. For example, here are some of your choices:
|
/dev/hda |
For the first IDE hard disk; hdb, hdc, and so on for other IDE disks. |
|
/dev/sda |
For the first SCSI hard disk; sdb, sdc, and so on for other SCSI disks. |
|
/dev/rd/c0d0 |
For a RAID device. |
|
/dev/ida/c0d0 |
Also for a RAID device. |
After you have started fdisk, type m to see the options. Here is what you can do with fdisk:
-
Delete a partition — Type d and you are asked to enter a partition number on the current hard disk. Type the partition number and press Enter. For example, /dev/sda2 would be partition number 2. (The deletion won't take effect until you write the change. Until then, it's not too late to back out.)
-
Create a partition — If you have free space, you can add a new partition. Type n and you are asked to enter l for a logical partition (5 or over) or p for a primary partition (1–4). Enter a partition number from the available range. Then choose the first cylinder number from those available. (The output from fdisk –l shown earlier will show you cylinders being used under the Start and End columns.)
Next, enter the cylinder number the partition will end with (or type the specific number of megabytes or kilobytes you want: for example, +50M or +1024K). You just created an ext3 Linux partition. Again, this change isn't permanent until you write the changes.
-
Change the partition type — Press t to choose the type of file system. Enter the partition number of the partition number you want to change. Type the number representing the file system type you want to use in hexadecimal code. (Type L at this point to see a list of file system types and codes.) For a Linux file system, use the number 83; use 82 for a Linux swap partition. For a windows FAT32 file system, you can use the letter b.
-
Display the partition table — Throughout this process, feel free to type p to display (print on the screen) the partition table as it now stands.
-
Saving and quitting — If you don't like a change you make to your partitions, press q to exit without saving. Nothing will have changed on your partition table.
Before you write your changes, display the partition table again and make sure that it is what you want it to be. To write your changes to the partition table, press w. You are warned about how dangerous it is to change partitions and asked to confirm the change.
An alternative to the fdisk command is sfdisk. The sfdisk command is command-line–oriented. Type the full command line to list or change partitions. (See the sfdisk man page for details.)
Tips for creating partitions
Changing your disk partitions to handle multiple operating systems can be very tricky. Part of the reason is that each different operating system has its own ideas about how partitioning information should be handled, as well as different tools for doing it. Here are some tips to help you get it right.
-
If you are creating a dual-boot system, particularly for Windows ME or Windows XP, try to install the Windows operating system first. Otherwise, the Windows installation may make the Linux partitions inaccessible.
-
The fdisk man page recommends that you use partitioning tools that come with an operating system to create partitions for that operating system. For example, the DOS fdisk knows how to create partitions that DOS will like, and the Red Hat Linux fdisk will happily make your Linux partitions. Once your hard disk is set up for dual boot, however, you should probably not go back to Windows-only partitioning tools. Use Linux fdisk or a product made for multi-boot systems (such as Partition Magic).
-
You can have up to 63 partitions on an IDE hard disk. A SCSI hard disk can have up to 15 partitions. You won't need nearly that many partitions.
If you are using Red Hat Linux as a desktop system, you probably don't need a lot of different partitions within your Red Hat Linux system. There are, however, some very good reasons for having multiple partitions for Red Hat Linux systems that are shared by a lot of users or are public Web servers or file servers. Multiple partitions within Red Hat Linux offer the following advantages:
-
Protection from attacks — Denial-of-service attacks sometimes take action that tries to fill up your hard disk. If public areas, such as /var, are on separate partitions, a successful attack can fill up a partition without shutting down the whole computer. Because /var is the default location for Web and FTP servers, and therefore might hold a lot of data, often entire hard disks are assigned to the /var file system alone.
-
Protection from corrupted file systems — If you have only one file system (/), corruption of that file system can cause the whole Red Hat Linux system to be damaged. Corruption of a smaller partition can be easier to correct and can often allow the computer to stay in service while the corruption is fixed.
Here are some directories that you may want to consider making into separate file system partitions.
-
/boot — Sometimes the BIOS in older PCs can access only the first 1024 cylinders of your hard disk. To make sure that the information in your /boot directory is accessible to the BIOS, create a separate disk partition (of only a few MB) for /boot and make sure that it exists below cylinder 1024. Then, the rest of your Linux system can exist outside of that 1024-cylinder boundary if you like. Even with several boot images, there is no need for /boot to be larger than 64MB. For newer hard disks, you can sometimes avoid this problem by selecting "linear mode" during installation. Then the boot partition can be anywhere on the disk.
-
/usr — This directory structure contains most of the applications and utilities available to Red Hat Linux users. Having /usr on a separate partition lets you mount that file system as read-only after the operating system has been installed. This prevents attackers from replacing or removing important system applications with their own versions that may cause security problems. A separate /usr partition is also useful if you have diskless workstations on your local network. Using NFS, you can share /usr over the network with those workstations.
-
/var — Your FTP (/var/ftp) and Web-server (/var/www) directories are, by default, stored under /var. Having a separate /var partition can prevent an attack on those facilities from corrupting or filling up your entire hard disk.
-
/home — Because your user account directories are located in this directory, having a separate /home account can prevent an indiscriminate user from filling up the entire hard disk. (Disk quotas, see Chapter 10, represent another way of controlling disk use.)
-
/tmp — Protecting /tmp from the rest of the hard disk by placing it on a separate partition can ensure that applications that need to write to temporary files in /tmp are able to complete their processing, even if the rest of the disk fills up.
Although people who use Red Hat Linux casually rarely see a need for lots of partitions, those who maintain and occasionally have to recover large systems are thankful when the system they need to fix has several partitions. Multiple partitions can localize deliberate damage (such as denial-of-service attacks), problems from errant users, and accidental file system corruption.
Reclaiming disk space from existing partitions
Chances are that your PC came with a Windows operating system already installed on the entire disk. Installing Red Hat while keeping Windows on your hard disk presents a problem. Red Hat Linux and Windows operating systems are put on separate disk partitions, and right now there is only one partition (and it isn't for Red Hat Linux).
If you are in this predicament, but you have a lot of unused space in your Windows partition (at least 1GB or more), follow this procedure to reclaim the disk space.
| Cross-Reference? |
If, instead of adding Linux to an existing Windows computer, you want to add Windows to your Linux computer, refer to the Linux+Windows+Grub HOWTO. For information on installing Windows NT and Linux on the same computer, refer to the Linux+Windows NT mini-HOWTO.These and other Linux HOWTOs are available from the Linux Documentation Project (www.tldp.org). |
Before you begin
Read this section before you begin resizing your Windows partitions!
FIPS is a well-tested utility for resizing DOS FAT and VFAT file systems so that space can be made available to install Linux. To find out what kind of file system is being used on your Windows computer, do the following while Windows is running:
-
Double-click the My Computer icon.
-
Right-click the hard-disk (C:) icon and select Properties.
-
Look at the File system line. If it shows the file system type as FAT or FAT32 the disk partition can be resized with FIPS.
If you are using a Windows 95, Windows 98, or Windows ME computer, providing that you have enough free disk space on the partition, you can probably use FIPS to resize it. If, however, you have a Windows 2000, Windows NT, or Windows XP computer with an NTFS file system, you will have to use some other tools to resize it. Here are some of your choices:
| Caution? |
I have not extensively tested the utilities in the following list. I recommend that before deciding to commit to using any of these tools you research them carefully. |
-
parted command — A Red Hat Linux utility called parted can be used to resize NTFS file systems. Because it runs in Linux, you need to be able to run it from a boot disk if you currently have a Windows-only system. You can download a boot disk image from the following location and create a boot disk with that image using the boot-disk–creation descriptions in this chapter:
ftp://ftp.gnu.org/gnu/parted/bootdisk/
The README file in this directory describes which boot image to use and how to use it. Documentation of this utility is available from /usr/share/doc/parted*/USER.
-
Partition Magic — I've heard good reports from people using Partition Magic (www.partitionmagic.com/partitionmagic) to resize NTFS partitions. Partition Magic also helps you create new partitions and manage them. It supports Windows XP Professional/Home, Windows 95b-98SE, Windows Me, Windows 2000 Professional, and NT 4.0 workstation (SP6a). The cost is currently $70.
-
Acronis OS Selector — This is another well-regarded product for managing, creating, and resizing partitions. It supports a variety of file system types, including FAT12, FAT16, FAT32, NTFS, and Linux partition types (ext2, ext3 and Linux ReiserFS). It also supports the same Windows platforms that Partition Magic does. The cost is currently $45 from www.acronis.com.
As I mentioned earlier, if your Windows partition is FAT or VFAT you can continue with the procedure in the next session to resize your hard disk.
Backing up and repartitioning
One way to divide a disk that is currently totally used for DOS (DOS, Windows 9x/2000, and so on) is not very complicated, but it can take some time. The method is to do a full system backup of your data, erase the whole disk, repartition the disk, restore your Windows 9x/2000 operating system to the hard disk (on a smaller partition), and add Red Hat Linux to the hard disk (using new partitions). Whew!
The problem with the backup/repartition approach is that it can be a pain. If your backup device is a 1.44MB floppy disk and your hard disk holds a gigabyte or more, a full backup is not a pleasant prospect. Alternatively, there is a DOS utility called FIPS.
Using the FIPS utility
The FIPS utility came about to solve the problem of a would-be Linux user with a monolithic DOS/Windows hard disk. With FIPS, you can change the size of your DOS partition without erasing it. Though this process is risky, and nobody recommends it without major "buyer beware" warnings, many use it safely and save a lot of time and effort.
FIPS works by changing the values in the partition table and boot sector. Space is gained by changing the partition table that is used to create a new primary DOS partition. After that, the new DOS partition can be converted to Linux partitions.
| Caution? |
Warnings that come with FIPS documentation have mostly to do with older, nonstandard hard disks. I recommend reading the warnings that come with this documentation. You can find them on the Red Hat Linux installation CD #1 in the dosutils/fipsdocs directory. Especially read fips.doc. |
Split your DOS (Windows) disk into separate DOS and Linux partitions as follows:
-
Check your Windows/DOS partition.
In a DOS window, run chkdsk to check for disk errors. The output shows how your disk space is used, as well as errors found and corrected. Next, run scandisk in Windows 9x/2000. Scandisk deals with lost file fragments, invalid filenames, and cross-linked files. It also scans for disk surface errors. The point is to correct hard disk errors encountered.
-
Create a bootable FIPS floppy.
You need to create a bootable floppy disk. Insert a blank, 3.5-inch floppy disk in drive A. Then, from DOS (or a DOS window), type the following to create a boot floppy:
format a:/s
After creating the boot floppy, copy the following files from the first Red Hat Linux installation CD (CD #1) to this bootable floppy: restorrb.exe, fips.exe, and errors.txt. (These files are located in the dosutils/fips20 directory.) To make sure that the bootable floppy is working properly, insert the floppy disk into a PC that has a DOS (Windows 9x/2000) partition and reboot the computer. Now make sure that you can access the partition by typing dir C:\ at the prompt.
-
Defragment your hard disk.
Reboot your PC so that Windows 9x/2000 starts up. To defragment your disk, so that all of your used space is put in order on the disk, open My Computer, right-click your hard disk icon (C:), select Properties, click Tools, and select Defragment Now.
Defragmenting your disk can be a fairly long process. The result of defragmentation is that all the data on your disk are contiguous, creating a lot of contiguous free space at the end of the partition. There are cases where you will have to do the following special tasks to make this true:
-
If the Windows swap file is not moved during defragmentation, you must remove it. Then, after you defragment your disk again and run FIPS, you will need to restore the swap file. To remove the swap file, open the Control Panel, open the System icon, and then click the Performance tab and select Virtual Memory. To disable the swap file, click Disable Virtual Memory.
-
If your DOS partition has hidden files that are on the space you are trying to free up, you need to find them. In some cases, you won't be able to delete them. In other cases, such as swap files created by a program, you can safely delete those files. This is a bit tricky because some files should not be deleted, such as DOS system files. You can use the attrib -s -h command from the root directory to deal with hidden files.
-
-
Reboot (FIPS boot disk).
Before you reboot to the FIPS disk, you want to make sure that nothing is written to the hard disk when DOS/Windows shuts down. Look for programs in config.sys and autoexec.bat that write to disk. When you are satisfied, insert the boot floppy and reboot.
-
Run FIPS.
With your computer now booted in DOS (with C: drive accessible), run the FIPS program by typing:
# fips
You can quit FIPS at any time by pressing Ctrl+C. If you have more than one hard disk, FIPS will ask which one you want to use. FIPS then displays the partition table and asks you the number of the partition you want to split:
-
Type the number of the partition you want to split. FIPS checks the partition for free space and asks if you want to make a copy of your root and boot sector before you go on (this is recommended).
-
Type Y to backup your root and boot sector. FIPS asks if you have your FIPS bootable floppy in the drive.
-
Make sure the floppy is in the drive and type Y. FIPS copies a file called rootboot.000 to your A: drive. Then FIPS determines how much free space is available on the partition. If FIPS can't find at least one cylinder free, it probably means that you need to remove a mirror or image file (after you do that, you will have to defragment the drive again before you can rerun FIPS). If all goes well, you will see output that looks similar to the following:
 Old partition       Cylinder       New Partition
      2753.3 MB            351           35393.2 MB
Note? If the New Partition doesn't show enough disk space, you may need to go back and remove some files until there is enough free space.
-
Use Right Arrow and Left Arrow keys to choose what cylinder the new partition should start on. As you press those keys, you can see the sizes of the old and new partitions change. When the partitions are the sizes you want, press Enter.
-
When the new partition table appears, you can accept it or re-edit the table.
-
Press C to continue if everything is okay. You are asked if you are ready to write the new partition table to disk.
-
Press Y to proceed. When FIPS is done, it will say Bye! and exit.
-
-
Reboot (FIPS boot disk) and test.
Reboot from the DOS/FIPS disk again. Then run the fips command again, but this time in test mode as follows:
# fips -t
If the partition table looks okay, exit FIPS by pressing Ctrl+C. You can also use a program such as chkdsk to be sure the old partition is still working.
Caution? If the partitions are not correct, you can restore your original partitioning by running the restorrb command from the FIPS floppy disk.
-
Restart your computer.
At this point, you can restart your computer as you would normally (remove the FIPS boot disk). Try using the Windows 9x/2000 system to make sure that everything is working okay.
With partitioning done, you can install Red Hat Linux using the reclaimed space. (Don't assign the free disk space to anything yet. Just go ahead and install Red Hat Linux and assign the Linux partitions you need during installation.)
If you have a problem with FIPS, its creator asks that you make a transcript of the FIPS session (using the -d option) and send it to schaefer@rbg.informatik.th-darmstadt.de. The transcript will appear in the fipsinfo.dbg file.
Creating install floppy disks
There are several cases in which you need to have one or more floppy disks to install Red Hat Linux. In general, you need an install disk any time the computer you are installing on doesn't have a built-in CD-ROM. This includes network installs and PCMCIA device installs, such as external CD-ROM drives or network adapters on laptops.
Each disk that you may need is available as an image file on the first CD in your Red Hat Linux distribution. If you need to create a disk, copy the image file from the CD to a blank, formatted 1.44MB 3.5-inch floppy disk (using a program that can copy raw data).
The image files are available from the images directory on CD #1 (if the CD were mounted in Red Hat Linux, images are probably in the /mnt/cdrom/images directory). Here is a list of the boot images and what each is used for:
-
Boot (bootdisk.img) — Use this boot image as the primary boot image for all install methods.
-
Block drivers (drvblock.img) — Use this disk if the block device you are installing to is not detected by the boot disk.
-
Network drivers (drvnet.img) — Use this disk if the network card on your computer is not detected by the boot disk.
-
PCMCIA support (pcmciadd.img) — Use this image if you need to use a PCMCIA adapter (such as a LAN card on your laptop).
Create the install/boot disks in DOS or Linux. The rawrite command for copying the images from DOS to floppy is on Red Hat Linux CD #1. In Linux, use the dd command. There are also other image files you can use to create disks to support different types of hardware. These image files include the following:
-
Block Devices (drvblock.img) — Use this image to support special types of hard disks and other block devices.
-
Network Devices (drvnet.img) — Use this image to support different types of network interface cards and other network devices.
-
PCMCIA Devices (pcmciadd.img) — Use this image if you need support for a PCMCIA adapter to install Red Hat Linux that isn't detected by the boot disk.
Creating a floppy disk in Linux
Using the dd command, you can copy data from one device to another in Linux (or other UNIX system). To copy a disk image from the installation CD to a disk, you need:
-
A blank 3.5-inch floppy disk (formatted).
-
Write permission to the disk drive (probably drive A, which in Red Hat Linux is /dev/fd0). The root user should have write permission, but root would have to open write permission to allow another user to write to floppy disk.
-
An available copy of the disk image to be copied. (The best way to get access to this in Red Hat Linux is by inserting the CD and typing mount /dev/cdrom, then typing cd /mnt/cdrom/images.)
To copy the bootdisk.img file from the images directory on the CD, type the following:
# dd if=bootdisk.img of=/dev/fd0 bs=1440k
Replace bootdisk.img with the name of any other image file you want to copy.
Creating a disk in DOS
The Red Hat CD has both image files and DOS utilities needed to create the installation disks while you are in DOS or Windows. From a DOS prompt, do the following:
-
Insert Red Hat CD #1 into the drive and change to the CD's drive letter (D: or E:).
-
Insert a blank, formatted 3.5-inch floppy disk into drive A.
-
Change to the dosutils directory (cd \dosutils).
-
Run the rawrite command as follows:
C:\> rawrite Enter disk image source file name: D:\images\bootdisk.img Enter target diskette drive: a: Please insert a formatted diskette into drive A: and press -Enter- : -
Press Enter. The image is written to the disk. Remove the disk and mark it.
Using GRUB or LILO boot loaders
A boot loader lets you choose when and how to boot the bootable operating systems installed on your computer's hard disks. GRUB is the only boot loader that comes with the Fedora Core distribution of Red Hat Linux. Earlier versions of Red Hat Linux and the current Red Hat Enterprise Linux also include the LILO boot loader. The following sections describe both GRUB and LILO boot loaders.
Booting your computer with GRUB
With multiple operating systems installed and several partitions set up, how does your computer know which operating system to start? To select and manage which partition is booted and how it is booted, you need a boot loader. The boot loader that is installed by default with Red Hat Linux is called the GRand Unified Boot loader (GRUB).
GRUB is a GNU software package (www.gnu.org/software/grub) that replaced the LILO boot loader by default in Red Hat Linux 7.2. GRUB offers the following features:
-
Support for multiple executable formats.
-
Support for Multiboot operating systems (such as Red Hat Linux, FreeBSD, NetBSD, OpenBSD, and other Linux systems).
-
Support for non-Multiboot operating systems (such as Windows 95, Windows 98, Windows NT, Windows ME, Windows XP, and OS/2) via a chain-loading function. Chain-loading is the act of loading another boot loader (presumably one that is specific to the proprietary operating system) from GRUB to start the selected operating system.
-
Support for multiple file system types.
-
Support for automatic decompression of boot images.
-
Support for downloading boot images from a network.
For more information on how GRUB works, type man grub or info grub. The info command contains more details about GRUB.
Booting with GRUB
When you install Red Hat Linux, information needed to boot your computer (with one or more operating systems) is automatically set up and ready to go. Simply restart your computer. When you see the GRUB boot screen (it says GRUB at the top and lists bootable partitions below it), do one of the following:
-
Default: If you do nothing, the default operating system will boot automatically after a few seconds.
-
Select an operating system: Use the up and down arrow keys to select any of the operating systems shown on the screen. Then press Enter to boot that operating system.
-
Edit the boot process: If you want to change any of the options used during the boot process, use the arrow keys to select the operating system you want and type e to select it. Follow the next procedure to change your boot options temporarily.
If you want to change your boot options so that they take effect every time you boot your computer, see the section on permanently changing boot options. Changing those options involves editing the /boot/grub/grub.conf file.
Temporarily changing boot options
From the GRUB boot screen, you can select to change or add boot options for the current boot session. First, select the operating system you want (using the arrow keys) and type e (as described earlier). You will see a graphical screen that contains information like the following:
GRUB version 0.93 (639K lower / 128768K upper memory)

root (hd0,0)
kernel /boot/vmlinuz-2.4.22-1 ro root=LABEL=/ hdc=ide-scsi
initrd /boot/initrd-2.4.22-1.img

Use the ( and ( keys to select which entry is highlighted.
Press 'b' to boot, 'e' to edit the selected command in the
boot sequence, 'c' for a command-line, 'o' to open a new line
after ('O' for before) the selected line, 'd' to remove the
selected line, or escape to go back to the main menu.
There are three lines in the example of the GRUB editing screen that identify the boot process for the operating system you chose. The first line (beginning with root) shows that the entry for the GRUB boot loader is on the first partition of the first hard disk (hd0,0). GRUB represents the hard disk as hd, regardless of whether it is a SCSI, IDE, or other type of disk. You just count the drive number and partition number, starting from zero.
The second line of the example (beginning with kernel) identifies the boot image (/boot/vmlinuz-2.4.22-1) and several options. The options identify the partition as initially being loaded ro (read-only) and the location of the root file system on a partition with the label LABEL=/. The third line (starting with initrd) identifies the location of the initial RAM disk, which contains the minimum files and directories needed during the boot process.
If you are going to change any of the lines related to the boot process, you would probably change only the second line to add or remove boot options. Here is how you do that:
-
Position the cursor on the kernel line and type e.
-
Either add or remove options after the name of the boot image. You can use a minimal set of bash shell command-line editing features to edit the line. You can even use command completion (type part of a filename and press Tab to complete it). Here are a few options you may want to add or delete:
-
Boot to a shell:???If you forgot your root password or if your boot process hangs, you can boot directly to a shell by adding init=/bin/sh to the boot line. (The file system is mounted read-only, so you can copy files out. You need to remount the file system with read/write permission to be able to change files.)
-
Select a run level:???If you want to boot to a particular run level, you can add the word linux, followed by the number of the run level you want. For example, to have Red Hat Linux boot to run level 3 (multiuser plus networking mode), add linux 3 to the end of the boot line. You can also boot to single-user mode (1), multi-user mode (2), or X GUI mode (5). Level 3 is a good choice if your GUI is temporarily broken.
-
-
Press Enter to return to the editing screen.
-
Type b to boot the computer with the new options. The next time you boot your computer, the new options will not be saved. To add options so they are saved permanently, see the next section.
Permanently changing boot options
You can change the options that take effect each time you boot your computer by changing the GRUB configuration file. In Red Hat Linux, GRUB configuration centers around the /boot/grub/grub.conf file.
The /boot/grub/grub.conf file is created when you install Red Hat Linux. Here is an example of a grub.conf file.
# grub.conf generated by anaconda
#
# Note that you do not have to rerun grub after making
# changes to this file
# NOTICE: You have a /boot partition.  This means that
#         all kernel and initrd paths are relative to /boot/, eg.
#         root (hd0,0)
#         kernel /vmlinuz-version ro root=/dev/hda3
#         initrd /initrd-version.img
#boot=/dev/hda
default=0
timeout=10
splashimage=(hd0,4)/grub/splash.xpm.gz
title Red Hat Linux (2.4.22-1)
     root (hd0,4)
     kernel /vmlinuz-2.4.22-1 ro root=LABEL=/
     initrd /initrd-2.4.22-1.img
title Windows XP
     rootnoverify (hd0,0)
     chainloader +1
The default=0 line indicates that the first partition in this list (in this case Red Hat Linux) will be the one that is booted by default. The line timeout=10 causes GRUB to pause for ten seconds before booting the default partition. (That's how much time you have to press e if you want to edit the boot line, or to press arrow keys to select a different operating system to boot.)
The splashimage line looks in the fifth partition on the first disk (hd0,4) for the boot partition (in this case /dev/hda5, which is the /boot partition). GRUB loads splash.xpm.gz as the image on the splash screen (/boot/grub/splash.xpm.gz). The splash screen appears as the background of the boot screen.
| Note? |
GRUB indicates disk partitions using the following notation: (hd0,0). The first number represents the disk, and the second is the partition on that disk. So, (hd0,1) is the second partition (1) on the first disk (0). |
The two bootable partitions in this example are Red Hat Linux and Windows XP. The title lines for each of those partitions are followed by the name that appears on the boot screen to represent each partition.
For the Red Hat Linux system, the root line indicates the location of the boot partition as the second partition on the first disk. So, to find the bootable kernel (vmlinuz-2.4.22-1) and the initrd initial RAM disk boot image that is loaded (initrd-2.4.22-1.img), GRUB looks in the root of hd0,4 (which is represented by /dev/hda5 and is eventually mounted as /boot). Other options on the kernel line set the partition as read-only initially (ro) and set the root file system to /dev/hda6.
For the Windows XP partition, the rootnoverify line indicates that GRUB should not try to moun


