Using the GNOME Desktop
Using the GNOME Desktop
GNOME (pronounced guh-nome) provides the desktop environment that you get by default when you install Red Hat Linux. This desktop environment provides the software that is between your X Window System framework and the look-and-feel provided by the window manager. GNOME is a stable and reliable desktop environment, with a few cool features in it.
The new GNOME 2.4 desktop comes with the most recent version of Red Hat Linux. For GNOME 2.4, enhancements include a CD-burning feature in the Nautilus file manager, improved panels, and accessibility features to improve ease-of-use for people with disabilities
To use your GNOME desktop, you should become familiar with the following components:
-
Metacity (Window Manager) — The default window manager for GNOME in Red Hat Linux is Metacity. The window manager provides such things as themes, window borders, and window controls.
-
Nautilus (File Manager/Graphical Shell) — When you open a folder (for example, by clicking the Home icon on your desktop), the Nautilus window opens and displays the contents of the selected folder. Nautilus can also display other types of content, such as shared folders from Windows computers on the network (using SMB).
-
GNOME Panel (Application/Task launcher) — This panel, which lines the bottom of your screen, is designed to make it convenient for you to launch the applications you use, manage running applications, and work with multiple virtual desktops. By default, the panel contains the main menu (represented by a red hat), desktop application launchers (Mozilla browser, Evolution e-mail, and a set of OpenOffice applications), a workspace switcher (for managing four virtual desktops), window list, and a clock.
-
Desktop Area — The windows and icons you use are arranged on the desktop area. The desktop area supports such things a drag-and-drop between applications, a desktop menu (right click to see it), and icons for launching applications.
Besides the components just described, GNOME includes a set of Preferences windows that let you configure different aspects of your desktop. You can change backgrounds, colors, fonts, keyboard shortcuts, and other features relating to the look and behavior of the desktop. Figure 3-7 shows how the GNOME desktop environment appears the first time you log in, with a few windows added to the screen.
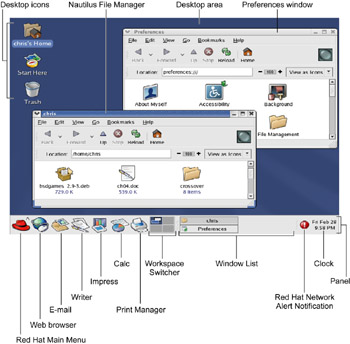
Figure 3-7: In the GNOME desktop environment, you can manage applications from the panel.
The following sections provide details on using the GNOME desktop.
Using the Metacity window manager
The Metacity window manager seems to have been chosen as the default window manager for GNOME in Red Hat Linux because of its simplicity. The creator of Metacity refers to it as a "boring window manager for the adult in you" — then goes on to compare other window managers to colorful, sugary cereal while Metacity is characterized as Cheerios.
There really isn't much you can do with Metacity (except get your work done efficiently). Assigning new themes to Metacity, changing colors and window decorations, is done through the GNOME preferences (and is described later). A few Metacity themes exist, but expect the number to grow.
Basic Metacity functions that might interest you are keyboard shortcuts and the workspace switcher. Table 3-1 shows keyboard shortcuts to get around the Metacity window manager.
|
Actions |
Keystrokes |
|---|---|
|
Window focus
|
Alt+Tab |
|
cycle backwards, with pop-up icons |
Alt+Shift+Tab |
|
cycle forward, without pop-up icons |
Alt+Esc |
|
cycle backwards, without pop-up icons |
Alt+Shift+Esc |
|
Panel focus
|
Alt+Ctrl+Tab |
|
cycle backwards among panels |
Alt+Ctrl+Shift+Tab |
|
Workspace focus
|
Ctrl+Alt+right arrow |
|
cycle to previous workspace |
Ctrl+Alt+left arrow |
|
Minimize/unminimize all windows |
Ctrl+Alt+D |
|
Show window menu |
Alt-Spacebar |
|
Close menu |
Esc |
Another Metacity feature that may interest you is the workspace switcher. Four virtual workspaces appear in the workspace switcher on the GNOME panel. Here are some things to do with the workspace switcher:
-
Choose current workspace — Four virtual workspaces appear in the workspace switcher. Click on any of the four virtual workspaces to make it your current workspace.
-
Move windows to other workspaces — Click any window, each represented by a tiny rectangle in a workspace, to drag and drop it to another workspace.
-
Add more workspaces — Right-click the workspace switcher, and select Preferences. You can add workspaces (up to 32).
-
Name workspaces — Right-click the workspace switcher and select Preferences. Click in the Workspaces pane to change names of workspaces to any names you choose.
You can view and change information about Metacity controls and settings using the gconf-editor window (type gconf-editor from a Terminal window). As the window says, it is not the recommended way of changing preferences. So, when possible, you should change the desktop through GNOME preferences. However, gconf-editor is a good way to see descriptions of each Metacity feature.
From the gconf-editor window, select apps ? metacity. Then choose from general, global_keybindings, keybindings_commands, window_keybindings and workspace_names. Click each key to see its value, along with short and long descriptions of the key.
Using the GNOME panel
The GNOME panel is intended to be the place from which you manage your desktop. From this panel you can start applications (from buttons or menus), see what programs are active, and monitor how your system is running. There are also many ways to change the panel — by adding applications or monitors, or by changing the placement or behavior of the panel, for example.
Click any open space on the panel to see the Panel menu. The Panel menu appears as shown in Figure 3-8.
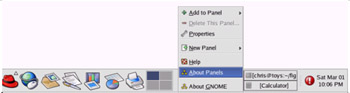
Figure 3-8: Left-click any open spot on the GNOME Panel to see the Panel menu.
From the GNOME Panel menu, you can perform a variety of functions, including:
-
Use the Red Hat menu — Displayed on the Red Hat menu are most of the applications and system tools you will use from the desktop.
-
Add to panel — You can add an applet, menu, launcher, drawer, or button.
-
Delete This panel — You can delete the current panel.
-
Properties — Change position, size, and background of the panel.
-
New panel — You can add panels to your desktop in different styles and locations.
There also ways of working with items on a panel. These include:
-
Moving — To move items on a panel, simply drag-and-drop them to a new postion.
-
Resizing — Some elements, such as the Window List, can be resized by clicking an edge and dragging it to the new size.
-
Window List — Tasks running on the desktop appear in the Window List area. Click a task to have that task minimized or maximized.
The following sections describe some things you can do with the GNOME panel.
Use the Red Hat menu
Click the Red Hat on the panel and you see categories of applications and system tools that you can select. Click the application you want to launch. To add an item to launch from the panel — and to view its properties — right-click it. There is currently no way to add or remove applications to or from this menu from the GUI in GNOME. However, you can manually add items to your GNOME menus.
To add to the red hat menu, create a .desktop file in the /usr/share/applications directory. The easiest way to do that is copy an existing .desktop file that is on the menu you want and modify it. For example, to add a video player to the Sound & Video menu, you could do the following (as root user):
# cd /usr/share/applications
# cp gnome-cd.desktop vidplay.desktop
Next use any text editor to change the contents of the vidplay.desktop file you created by adding a comment, file to execute, icon to display, and application name. After you save the changes, the new item will immediately appear on the menu (no need to restart anything).
| Cross-Reference? |
There is a graphical way of modifying your main menu if you are using the KDE desktop. See the Menus bullet in the "Changing panel attributes" section later in this chapter for details. |
Adding an applet
-
There are several small GNOME applications, called applets, that you can run directly on the GNOME panel. These applets can show information you may want to see on an ongoing basis or may just provide some amusement. To see what applets are available and to add applets that you want to your panel, perform the following steps:Right-click on an open space in the panel so that the panel menu appears.
-
Select Add to Panel.
-
Select an applet from one of the following categories:
-
Accessories — Has clock, dictionary lookup, stock ticker, and weather report applets.
-
Amusements — Includes a fortune-telling fish and eyes that follow your mouse (geyes).
-
Internet — Contains an e-mail Inbox monitor and modem lights monitor.
-
Multimedia — Includes an applet for playing CDs and a volume control.
-
Utility — Includes applets for monitoring battery levels, inserting special characters, running a command line, mounting floppy drives, monitoring systems load, and performing other useful tasks.
-
-
Select the applet to add from the category you selected. The applet appears on the panel, ready for you to use. Figure 3-9 shows, from left to right, geyes, system monitor, CD player, stock ticker, e-mail Inbox monitor, and dictionary lookup applets.

Figure 3-9: Applets let you monitor activities, play CDs, watch your mail, or look up dictionary words.
After an applet is installed, right-click it to see what options are available. For example, select Preferences for the stock ticker, and you can add or delete stocks whose prices you want to monitor. If you don't like the applet's location, right-click it, click Move, slide the mouse until the applet is where you want it (even to another panel), and click to set its location.
If you no longer want an applet to appear on the panel, right-click it, and then click Remove From Panel. The icon representing the applet will disappear. If you find that you have run out of room on your panel, you can add a new panel to another part of the screen, as described in the next section.
Adding another panel
You can have several panels on your GNOME desktop. You can either add edge panels (that run along the entire bottom, top, or side of the screen) or a corner panel (that only expands as needed to show the applets it contains). To add a panel, do the following:
-
Right-click an open space in the panel so that the Panel menu appears.
-
Select New Panel.
-
Select from the following menu items:
-
Corner panel — Adds a panel in the corner that stretches out only as far as is required to display the applets it contains.
-
Edge panel — Creates a panel along the edge of the screen (top, sides, or bottom).
-
Floating panel — Adds a panel that begins from the middle of the edge of a display (instead of from a corner).
-
Sliding panel — Creates a panel that stretches out only as far as required to display the applets it contains. When you hide/unhide the panel, it closes in the middle of the display instead of just at the edges.
-
Menu panel — Places a menu bar across the top of the screen.
-
After you've added a panel, you can add applets or application launchers to it as you did to the default panel. To remove a panel, right-click it and select Delete This Panel.
Adding an application launcher
Icons on your panel represent a Web browser and several office productivity applications. You can add your own icons to launch applications from the panel as well. To add a new application launcher to the panel, do the following:
-
Right-click in an open space on the panel.
-
Select Add to Panel ? Launcher from the menu. All application categories from your main desktop menu (the one under the red hat) appear.
-
Select the category of application you want; then select the application. An icon representing the application appears.
To launch the application you just added, single-click it.
If the application you want to launch is not on your red hat menu, you can build one yourself as follows:
-
Right-click in an open space on the panel.
-
Select Add to Panel ? Launcher. The Create Launcher window appears.
-
Provide the following information for the application that you want to add:
-
Name — A name to identify the application (this appears in the tool tip when you mouse is over the icon).
-
Generic Name — A name to identify the type of application.
-
Comment — A comment describing the application. Like with Name, this information appears when you later move your mouse over the launcher.
-
Command — The command line that is run when the application is launched. You should use the full path name, plus any required options.
-
Type — Select Application (to launch an application). (Other selections include Link, to open a Web address in a browser or FSDevice to open a file system.)
-
Run in Terminal — If it is a character-based or ncurses application. (Applications written using the curses library run in a Terminal window but offer screen-oriented mouse and keyboard controls.)
-
-
Click the Icon box (it may say No Icon). Select one of the icons shown and click OK. Alternatively, you can browse the Red Hat Linux file system to choose an icon.
Note? Icons available to represent your application are contained in the /usr/share/pixmaps directory. These icons are either in png or xpm formats. If there isn't an icon in the directory you want to use, create your own and assign it to the application.
-
Click OK.
The application should now appear in the panel. Click it to start the application.
Adding a drawer
By adding a drawer to your GNOME panel, you can add several applets and launchers and have them take up only one slot on your panel. You can use the drawer to show the applets and launchers as though they were being pulled out of a drawer icon on the panel.
To add a drawer to your panel, right-click the panel and then select Add to Panel ? Drawer. The drawer should appear on the panel. The drawer behaves just like a panel. Right-click the drawer area, and add applets or launchers to it as you would to a panel. Click the drawer icon to retract the drawer.
Figure 3-10 shows a portion of the panel that includes an open drawer. This example includes icons for launching a Terminal window, the GIMP, and the Ethereal window.
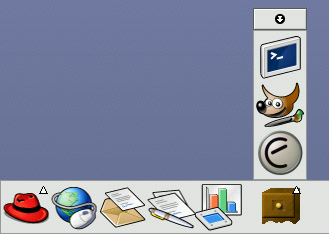
Figure 3-10: Add launchers or applets to a drawer on your GNOME panel.
Changing panel properties
Properties you can change that relate to a panel are limited to the position, size, hiding policy, and background. To open the Panel properties window that applies to a specific panel, right-click on an open space on the panel, then choose Properties. The Panel properties window that appears includes following values:
-
Panel Type — You can see whether the panel is an Edge, Aligned, Sliding, or Floating panel (you can't change this value).
-
Position — Depending on the type of panel, you can move it to different locations on the screen by clicking on a new position.
-
Size — You can select the size of your panel, from XX Small (12 pixels) to XX Large (128 pixels).
-
Autohide — You can select whether or not a panel is automatically hidden (appearing only when the mouse pointer is in the area).
-
Show hide buttons — You can choose whether or not the Hide/Unhide buttons (with pixmap arrows on them) appear on the edges of the panel.
-
Arrows on hide buttons — If you select "Show hide buttons" you can select to either have arrows on those buttons or not.
-
Background — From the Background tab, you can assign a color to the background of the panel, assign a pixmap image, or just leave the Default (sort of gray). Click the Background Type box, if you want to select an Image for the background, then select an image, such as a tile from /usr/share/backgrounds/tiles or other directory.
Tip? I usually turn on the AutoHide feature and turn off the Hide buttons. Using AutoHide gives you more space to work with on your desktop. When you move your mouse to the edge where the panel is, it pops up — so you don't need Hide buttons.
Using the Nautilus file manager
At one time, file managers did little more than let you run applications, create data files, and open folders. These days, as the information a user needs expands beyond the local system, file managers are expected to also display Web pages, access FTP sites, and play multimedia content. The Nautilus file manager, which is the default GNOME file manager, is an example of just such a file manager.
When you open the Nautilus file manager window (from the GNOME main menu or by opening the Home icon or other folder on your desktop), you see the name of the location you are viewing (such as the folder name) and what that location contains (files, folders, and applications). Figure 3-11 is an example of the file manager window displaying the home directory of a user named chris (/home/chris).
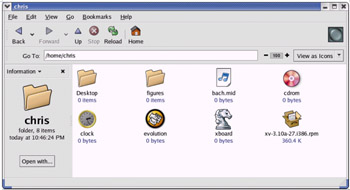
Figure 3-11: Move around the file system, open directories, launch applications, and open Samba folders.
Icons on the toolbar of the Nautilus window let you move forward and back among the directories and Web sites you visit. To move up the directory structure, click the up arrow. To refresh the view of the folder or Web page, click the Refresh button. The Home button takes you to your home page and the Web search button lets you search the Web.
| Note? |
One note about viewing HTML content (in other words, Web pages). The version of Nautilus that originally came with GNOME 2.4 did not properly display HTML content. Depending on how the fix for this problem falls out, HTML content may not be displayed in the Nautilus window. Instead, you might have the option of launching an external window (such as Mozilla or Epiphany) to display that content. |
Icons in Nautilus often indicate the type of data that a particular file contains. The contents or file extension of each file can determine which application is used to work with the file. Or, you can right-click an icon to open the file it represents with a particular application or viewer.
Some of the more interesting features of Nautilus are described below:
-
Sidebar — Click on View ? Side Pane to have a sidebar appear in the left column of the screen. From the sidebar, you can click on tabs that represent different types of information you can select. The Tree tab shows a tree view of the directory structure, so you can easily traverse your directories.
The Notes tab lets you add notes that become associated with the current Directory or Web page. The History tab displays a history of directories and Web sites you have visited, allowing you to click those items to return to the sites they represent. Right-click in the sidebar to choose which of the sidebar tabs are displayed.
-
Windows File and Printer Sharing — If your computer is connected to a LAN on which Windows computers are sharing files and printers, you can view those resources from Nautilus. Type smb: in the location box to see available workgroups. Click a workgroup to see computers from that workgroup that are sharing files and printers. Figure 3-12 shows an example of Nautilus displaying icons representing Windows computers in a workgroup called estreet (smb://estreet).
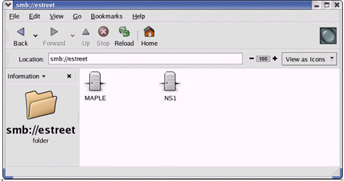
Figure 3-12: Display shared Windows file and printer servers (SMB) in Nautilus. -
MIME types and file types — To handle different types of content that may be encountered in the Nautilus window, you can set applications to respond based on MIME type and file type. With a folder being displayed, right-click a file for which you want to assign an application. Click either Open With an Application or Open With a Viewer. If no application or viewer has been assigned for the file type, click Associate Application to be able to select an application. From the Add File Types window, you can add an application based on the file extension and MIME type representing the file.
Cross-Reference? For more information in MIME types, see the description of MIME types in the "Changing GNOME preferences" section later in this chapter.
-
Drag-and-Drop — You can use drag-and-drop within the Nautilus window, between the Nautilus and the desktop, or between multiple Nautilus windows. As other GNOME-compliant applications become available, they are expected to also support the GNOME drag-and-drop feature.
If you need more information on the Nautilus file manager, visit the GNOME Web site (www.gnome.org/nautilus).
Changing GNOME preferences
There are many ways to change the behavior, look, and feel of your GNOME desktop. Most GNOME preferences can be modified from windows you can launch from the main red hat menu or from the Preferences folder. You can open that folder from the red hat menu by clicking Preferences ? Control Center (or typing preferences: in the Nautilus location box).
Unlike earlier versions of GNOME for Red Hat Linux, boundaries between preferences relating to the window manager (Metacity), file manager (Nautilus), and the GNOME desktop itself have been blurred. Preferences for all of these features are in the Preferences window. Figure 3-13 shows the Preferences window, with icons that represent features you can change.
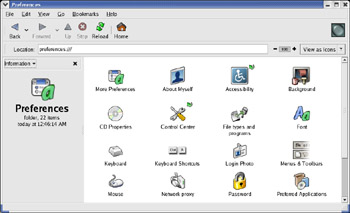
Figure 3-13: Change the look-and-feel of your desktop from the Preferences window.
The following items highlight some of the preferences you might want to change:
-
Accessibility — If you have difficulty operating a mouse or keyboard, the Keyboard Accessibility Configuration window lets you adapt mouse and keyboard settings to make those devices more accessible. From the Preferences window, open Accessibility.
-
Background — From Background Preferences, you can choose a single solid color, a two-color gradient (shading from top to bottom or left to right), or an image to use as wallpaper. If you choose a solid color (under Background Style), click the Color box, choose a color from the palette, and select OK. To have the color fade into another color, click Vertical or Horizontal Gradient, and then select the second color. Choosing Vertical has the colors transform from top to bottom, while Horizontal causes the colors to change from left to right.
To use wallpaper for your background, open a folder containing the image you want to use. Then drag the image into the Background Preferences window. You can choose from a variety of images in the /usr/share/nautilus/patterns and /usr/share/backgrounds/tiles directories. Then, choose to have the image as wallpaper (repeated pattern), centered, scaled (in proportion), or stretched (using any proportion to fill the screen).
-
CD Properties — Even if you don't change CD properties, it is important to know what happens when you insert a Data CD, Audio CD, Blank CDs, or DVD (video) disk. These properties are associated with a feature called "magicdev, " which is a bit controvertial.
For Data CDs , the CD is mounted when it is inserted, any auto-run program on the CD is run, and a file manager window opens for the CD you inserted. If you would rather mount and open the CD as you choose, you can turn off any or all of these preferences.
For Audio CDs, the gnome-cd player is launched and the CD begins playing. You can type in a different CD player, if you like, or turn off "Run command when CD is inserted" so that you can choose which player to use later.
For Blank CDs, a CD-burning utility is launched. After that, you can burn audio files or data to the blank CD.
For DVD (Video), the DVD is not set to play automatically. If you have a player installed that can play the content of DVDs that you have, turn on this feature and add the command to run the player into the Command box.
-
File Types and Programs — The File Types and Programs preferences can help you understand the different types of data files that GNOME knows about. Double-click this icon to see data types (audio, documents, images, information, and so on) that have definitions in GNOME. Then choose a particular data type (such as Audio, ogg audio).
From the Edit file type window that appears, you can see the information assigned to the file type. So, for example, when data that ends with a .ogg extension appears in a Nautilus window, you can see the icon that will represent the file, the mime type assigned to the file, and the action (if any) is taken when you open the file.
You can modify any file type that appears in these preferences windows. You can choose what applications are run and and what icons represent data of this type. You can even create your own data types.
-
Screensaver — You can choose from dozens of screensavers from the Screensaver Preferences window. Select Random Screensaver to have your screen saver chosen randomly, or select one that you like from the list. Next, choose how long your screen must be idle before the screensaver starts (default is 10 minutes). You can also choose to require a password or to enable power management to shut down your monitor after a set number of minutes (Advanced Tab). Figure 3-14 shows Screensaver preferences.

Figure 3-14: Select specific or random screen savers from Screensaver Preferences. -
Theme Selector — You can choose to have an entire theme of elements be used on your desktop. A desktop theme affects not only the background, but also the way that many buttons and menu selections appear. There are only a few themes available for the window manager (Metacity) in the Red Hat Linux distribution. You can get a bunch of other Metacity themes from themes.freshmeat.net (click on Metacity).
Click Install theme; then click the Window Border tab to select from different themes that change the title bar and other borders of your windows. Click the Icons tab to choose different icons to represent items on your desktop. Themes change immediately as you click or when you drag a theme name on the desktop.
Exiting GNOME
When you are done with your work, you can either log out from your current session or shut down your computer completely. To exit from GNOME, do the following:
-
Click the Red Hat menu button.
-
Select Log Out from the menu. A pop-up window should appear, asking if you want to log out, shut down, or restart the computer.
Tip? At this point, you can also select to save your session by clicking Save current setup. This is a great way to have the applications that you use all the time restart the next time you log in. Make sure you save your data before you exit, however. Most applications do not yet support the data-saving feature.
-
Select Logout from the pop-up menu. This will log you out and return you to either the graphical login screen or to your shell login prompt. If, instead, you select Shut Down, the system is shut down; if you select Reboot, the system is restarted.
-
Select OK to finish exiting from GNOME.
If you are unable to get to the Log out button (if, for example, your Pager was deleted by mistake), there are two other exit methods. Try one of these two ways, depending on how you started the desktop:
-
If you started the desktop by typing startx from your login shell, press Ctrl+Alt+F1 to return to your login shell. Then type Ctrl+C to kill the desktop.
-
If you started the desktop from a graphical login screen, first open a Terminal window (right-click the desktop and then select New Terminal). In the Terminal window, type ps x | more to see a list of running processes. Look for a command named GNOME-session and determine its number under the PID column. Then type kill PID, where PID is replaced by the PID number. You should see the graphical login screen.
Although these are not the most graceful ways to exit the desktop, they work. You should be able to log in again and restart the desktop.


