Working with the Red Hat Linux File System
Working with the Red Hat Linux File System
The Red Hat Linux file system is the structure in which all the information on your computer is stored. Files are organized within a hierarchy of directories. Each directory can contain files, as well as other directories.
If you were to map out the files and directories in Red Hat Linux, it would look like an upside-down tree. At the top is the root directory, which is represented by a single slash (/). Below that is a set of common directories in the Linux system, such as /bin, /dev, /home, /lib, and /tmp, to name a few. Each of those directories, as well as directories added to the root, can contain subdirectories.
Figure 4-1 illustrates how the Linux file system is organized as a hierarchy. To illustrate how directories are connected, Figure 4-1 shows a /home directory that contains subdirectories for three users: chris, mary, and tom. Within the chris directory are subdirectories: briefs, memos, and personal. To refer to a file called inventory in the chris/memos directory, you could type the full path of /home/chris/memos/inventory. If your current directory were /home/chris/memos, you could refer to the file as simply inventory.
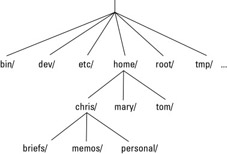
Figure 4-1: The Red Hat Linux file system is organized as a hierarchy of directories.
Some of the Red Hat Linux directories that may interest you include the following:
-
/bin — Contains common Linux user commands, such as ls, sort, date, and chmod.
-
/boot — Has the bootable Linux kernel and boot loader configuration files (GRUB).
-
/dev — Contains files representing access points to devices on your systems. These include terminal devices (tty*), floppy disks (fd*), hard disks (hd*), RAM (ram*), and CD-ROM (cd*). (Users normally access these devices directly through the device files.)
-
/etc — Contains administrative configuration files.
-
/home — Contains directories assigned to each user with a login account.
-
/mnt — Provides a location for mounting devices, such as remote file systems and removable media (with directory names of cdrom, floppy, and so on).
-
/root — Represents the root user's home directory.
-
/sbin — Contains administrative commands and daemon processes.
-
/tmp — Contains temporary files used by applications.
-
/usr — Contains user documentation, games, graphical files (X11), libraries (lib), and a variety of other user and administrative commands and files.
-
/var — Contains directories of data used by various applications. In particular, this is where you would place files that you share as an FTP server (/var/ftp) or a Web server (/var/www). It also contains all system log files (/var/log).
The file systems in the DOS or MS Windows operating systems differ from Linux's file structure. See the sidebar on the Linux file system versus MS file systems.
Creating files and directories
As a Red Hat Linux user, most of the files you save and work with will probably be in your home directory. Here are commands you use to create and use files and directories:
-
cd — Change to another current working directory
-
pwd — Print the name of the current working directory
-
mkdir — Create a directory
-
chmod — Change the permission on a file or directory
-
ls — List the contents of a directory
The following procedure steps you through creating directories within your home directory, moving among your directories, and setting appropriate file permissions:
-
First, go to your home directory. To do this, simply type cd. (For other ways of referring to your home directory, see the sidebar on identifying directories.)

Although similar in many ways, the Linux file system has some striking differences from file systems used in MS-DOS and Windows operating systems. Here are a few:
-
In MS-DOS and Windows file systems, drive letters represent different storage devices (for example, A: is a floppy drive and C: is a hard disk). In Linux, all storage devices are fit into the file system hierarchy. So, the fact that all of /usr may be on a separate hard disk or that /mnt/rem1 is a file system from another computer is invisible to the user.
-
Slashes, rather than backslashes, are used to separate directory names in Linux. So, C:\home\chris in an MS system is /home/chris in a Linux system.
-
Filenames almost always have suffixes in DOS (such as .txt for text files or .doc for word-processing files). Although at times you can use that convention in Linux, three-character suffixes have no required meaning in Linux. They can be useful for identifying a file type.
-
Every file and directory in a Linux system has permissions and ownership associated with it. Security varies among Microsoft systems. Because DOS and MS Windows began as single-user systems, file ownership was not built into those systems when they were designed. Later releases added features such as file and folder attributes to address this problem.
-
-
To make sure that you got to your home directory, type pwd. When I do this, I get the following response (yours will reflect your home directory):
$ pwd
/home/chris
-
Create a new directory called test in your home directory, as follows:
$ mkdir test
-
Check the permissions of the directory by typing:
$ ls -ld test
drwxr-xr-x  2 chris  sales   1024  Jan 24 12:17 test
Notice that this listing says that test is a directory (d), the owner is chris, the group is sales, and the file was most recently modified on Jan 24 at 12:17 p.m. Suppose that you want to prevent everyone else who uses this computer from using or viewing the files in this directory. The permissions for the directory are rwxr-xr-x. I explain what these permissions mean later in this section.
Note? When you add a new user in Red Hat Linux, by default, the user is assigned to a group of the same name. For example, in the preceding text, the user chris would be assigned to the group chris. This approach to assigning groups is referred to as the user private group scheme. For more information on user private groups, refer to Chapter 11.
-
For now, type the following:
$ chmod 700 test
This step changes the permissions of the directory to give you complete access and everyone else no access at all. (The new permissions should read like rwx------.)
-
Next, make the test directory your current directory as follows:
$ cd test
When you need to identify your home directory on a shell command line, you can use the following:
-
$HOME — This environment variable stores your home directory name.
-
~ — The tilde (~) represents your home directory on the command line.
You can also use the tilde to identify someone else's home directory. For example, ~chris would be expanded to the chris home directory (probably /home/chris).
Other special ways of identifying directories in the shell include the following:
-
. — A single dot (.) refers to the current directory.
-
.. — Two dots (..) refers to a directory directly above the current directory.
-
$PWD — This environment variable refers to the current working directory.
-
$OLDPWD — This environment variable refers to the previous working directory before you changed to the current one.
Using metacharacters and operators
To make more efficient use of your shell, the bash shell lets you use certain special characters, referred to as metacharacters and operators. Metacharacters can help you match one or more files without typing each file completely. Operators let you direct information from one command or file to another command or file.
Using file-matching metacharacters
To save you some keystrokes and to be able to refer easily to a group of files, the bash shell lets you use metacharacters. Anytime you need to refer to a file or directory, such as to list it, open it, or remove it, you can use metacharacters to match the files you want. Here are some useful metacharacters for matching filenames:
-
* — This matches any number of characters.
-
? — This matches any one character.
-
[...] — This matches any one of the characters between the brackets, which can include a dash-separated range of letters or numbers.
To try out some of these file-matching metacharacters, go to an empty directory (such as the test directory described in the previous section) and create some files. Here's an example of how to create some empty files:
$ touch apple banana grape grapefruit watermelon
The next few commands show you how to use shell metacharacters to match filenames so they can be used as arguments to the ls command. Using metacharacters shown below, you can match the filenames you just created with the touch command. Type the following commands and see if you get the same responses:
$ ls a*
apple
$ ls g*
grape
grapefruit
$ ls g*t
grapefruit
$ ls *e*
apple grape grapefruit watermelon
$ ls *n*
banana watermelon
The first example matches any file that begins with an a (apple). The next example matches any files that begin with g (grape, grapefruit). Next, files beginning with g and ending in t are matched (grapefruit). Next, any file that contains an e in the name is matched (apple, grape, grapefruit, watermelon). Finally, any file that contains an n is matched (banana, watermelon).
Here are a few examples of pattern matching with the question mark (?):
$ ls ????e
apple grape
$ ls g???e*
grape grapefruit
The first example matches any five-character file that ends in e (apple, grape). The second matches any file that begins with g and has e as its fifth character (grape, grapefruit).
Here are a few examples of using braces to do pattern matching:
$ ls [abw]*
apple banana watermelon
$ ls [agw]*[ne]
apple grape watermelon
In the first example, any file beginning with a, b, or w is matched. In the second, any file that begins with a, g, or w and also ends with either n or e is matched.
Using file-redirection metacharacters
Commands receive data from standard input and send it to standard output. Using pipes (described earlier), you can direct standard output from one command to the standard input of another. With files, you can use less than (<) and greater than (>) signs to direct data to and from files. Here are the file redirection characters:
-
< — Direct the contents of a file to the command.
-
> — Direct the output of a command to a file, deleting the existing file.
-
>> — Direct the output of a command to a command, adding the output to the end of the existing file.
Here are some examples of command lines where information is directed to and from files:
$ mail root < ~/.bashrc
$ man chmod | col -b > /tmp/chmod
$ echo "I finished the project on $(date)" >> ~/projects
In the first example, the contents of the .bashrc file in the home directory are sent in a mail message to the computer's root user. The second command line formats the chmod man page (using the man command), removes extra back spaces (col -b) and sends the output to the file /tmp/chmod (erasing the previous /tmp/chmod file, if it exists). The final command results in the following text being added to the user's project file:
I finished the project on Sat Oct 25 13:46:49 PST 2003
Understanding file permissions
After you've worked with Linux for a while, you are almost sure to get a "Permission denied" message. Permissions associated with files and directories in Linux were designed to keep users from accessing other users' private files and to protect important system files.
The nine bits assigned to each file for permissions define the access that you and others have to your file. Permission bits appear as rwxrwxrwx. The first three bits apply to the owner's permission, the next three apply to the group assigned to the file, and the last three apply to all others. The r stands for read, the w stands for write, and the x stands for execute permissions. If a dash appears instead of the letter, it means that permission is turned off for that associated read, write, or execute.
You can see the permission for any file or directory by typing the ls -ld command. The named file or directory appears as those shown in the following example:
$ ls -ld ch3 test
-rw-rw-r--  1 chris  sales     4983  Jan 18 22:13 ch3
drwxr-xr-x  2 chris  sales     1024  Jan 24 13:47 test
The first line shows a file (ch3) that has read and write permission on for the owner and the group. All other users have read permission, which means they can view the file but cannot change its contents or remove it. The second line shows a directory (indicated by the letter d before the permission bits). The owner has read, write, and execute permission, while the group and other users have only read and execute permissions. As a result, only the owner can add, change, or delete files in that directory. Any other user, however, can only read the contents, change to that directory, and list the contents of the directory.
If you own a file, you can change the permission on it as you please. You can do this with the chmod command. For each of the three sets of permission on a file (read, write, and execute), the r is assigned to the number 4, w to 2, and x to 1. So to make permissions wide open for yourself as owner, you would set the first number to 7 (4 plus 2 plus 1). The same would be true for group and other permission. Any combination of permissions can result from 0 (no permission) through 7 (full permission).
Here are some examples of how to change permission on a file and what the resulting permission would be:
chmod 777 files  (  rwxrwxrwx
chmod 755 files  (  rwxr-xr-x
chmod 644 files  (  rw--r—-r-
chmod 000 files  (  ---------
When you try to create a file, by default it is given the permission rw-r--r--. A directory is given the permission rwxr-xr-x. These default values are determined by the value of umask. Type umask to see what your umask value is. For example:
$ umask
022
The umask value masks the permissions value of 666 for a file and 777 for a directory. The umask of 022 results in permission for a directory of 755 (rwxr-xr-x). That same umask results in a file permission of 644 (rw-r--r--). (Execute permissions are off by default for regular files.)
| Tip? |
Here's a great tip for changing the permission for lots of files at once. Using the -R options of chmod, you could change the permission for all of the files and directories within a directory structure at once. For example, if you wanted to open permissions completely to all files and directories in the /tmp/test directory, you could type the following: $ chmod -R 777 /tmp/test This command line runs chmod recursively (-R) for the /tmp/test directory, as well as any files or directories that exist below that point in the file system (for example, /tmp/test/hat, /tmp/test/hat/caps, and so on). All would be set to 777 (full read/write/execute permissions). |
| Caution? |
The -R option of chmod works best if you are opening permissions completely or adding execute permission (as well as the appropriate read/write permission). The reason is that if you turn off execute permission recursively, you close off your ability to change to any directory in that structure. For example, chmod -R 644 /tmp/test turns off execute permission for the /tmp/test directory, then fails to change any files or directories below that point. |
Moving, copying, and deleting files
Commands for moving, copying, and deleting files are fairly straightforward. To change the location of a file, use the mv command. To copy a file from one location to another, use the cp command. To remove a file, use the rm command. Here are some examples:
$ mv abc def
$ mv abc ~
$ cp abc def
$ cp abc ~
$ rm abc
$ rm *
Of the two move (mv) commands, the first moves the file abc to the file def in the same directory (essentially renaming it), whereas the second moves the file abc to your home directory (~). The first copy command (cp) copies abc to the file def, whereas the second copies abc to your home directory (~). The first remove command (rm) deletes the abc file; the second removes all the files in the current directory (except those that start with a dot).
| Note? |
For the root user, the mv, cp, and rm commands are aliased to each be run with the -i option. This causes a prompt to appear asking you to confirm each move, copy, and removal, one file at a time. This is done to prevent the root user from messing up a large group of files by mistake. |


