Viewing TV and Webcams
Viewing TV and Webcams
Getting TV cards, Webcams, and other video devices to play in Linux is still a bit of an adventure. Most manufacturers of TV cards and Webcams are not losing sleep to produce Linux drivers. As a result, most of the drivers that bring video to your Linux desktop have been reverse-engineered (that is, they were created by software engineers who watched what the video device sent and received, rather than seeing the actual code that runs the device).
The first, and probably biggest, trick is to get that TV card or Webcam that is supported in Linux. Once you are getting video output from that device (typically available from /dev/video0) you can try out a couple of applications to begin using it. This section describes the Xawtv program for watching television and the GnomeMeeting program for video conferencing.
Watching TV with Xawtv
The Xawtv program lets you display video output, in particular television channels, on your desktop. You can change the channels, adjust volume, and fine-tune your picture. Added features let you grab still images in PBM or JPEG formats, or capture video clips in AVI.
The Xawtv will display, by default, any device producing video on the /dev/video0 device. Therefore, you can use Xawtv to view Webcams as well as receive television channels. The following sections describe how to choose a TV capture card and use Xawtv to watch television on your desktop.
Getting a supported TV card
Video4Linux is the video interface included with Red Hat Linux. It supports a variety of TV capture cards and cameras. For TV capture cards, Video4Linux relies on the bttv driver.
To see a list of supported TV cards that you can use with Xawtv, refer to the Cards file. To view that file, you need to have the kernel-source package installed. You'll find the Cards file in the following location on your Linux system:
/usr/src/linux*/Documentation/video4linux/bttv/Cards
Also in that directory are the CARDLIST and Insmod-options files. The CARDLIST file lists the card number associated with each supported card. The Insmod-options file describes options you may want to add to the TV card driver when you load it.
Video4Linux is designed to autodetect your TV capture card and load the proper modules to activate it. So install the TV-card hardware (with the appropriate connection to your TV reception), restart Red Hat Linux, and run the xawtv command as described in the next section. You should be able to see video displayed on your Xawtv window.
If your card appears not to be working, here are a few things you can try:
-
To see if your TV card was properly seated in its slot and detected by Linux, type the following:
$ lspci
This will show you a list of all valid PCI cards on your computer. If nothing shows up for the card, you probably have a hardware problem.
-
It is possible that the card is there, but the right card type is not being detected. Improper detection is most likely if you have a card for which there are several revisions, with each requiring a different driver. If you think your card is not being properly detected, find your card in the CARDLIST file. Then add the appropriate line to the /etc/modules.conf file. For example, to add a Prolink PV-BT878P, revision 9B card, add the following line to /etc/modules.conf:
options bttv card=72
You can also add other options listed in the Insmod-options file. If you are still having problems getting your card to work, a mailing list is available on which you can ask questions about Video4Linux issues. The location is:
http://listman.redhat.com/mailman/listinfo/video4linux-list
One other possible reason that you don't see any video when you try to run Xawtv or other video applications is that the permission of /dev/video0 is not open. By default, that device is only open to the root user. To open the permissions on your computer so that any user can view video, type the following as root user from a Terminal window:
# chmod 777 /dev/video0
Running xawtv
To start up the Xawtv viewer, simply type the following from a Terminal window on your desktop:
$ xawtv &
A video screen should appear in a window on the desktop. Click the left mouse button on the window to see a list of stations. Click the right mouse button to see the Settings window.
If you are in the United States, the first thing you should probably do is set the TV norm from PAL to NTSC. Then click Channel Editor and identify the names and channel numbers of each TV station. Click Update and save to make the changes permanent.
Figure 8-5 shows an example of the Xawtv window with the control window on the left and the list of stations on the right.
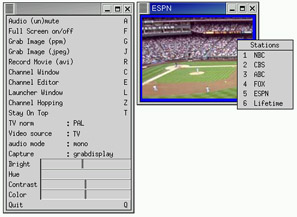
Figure 8-5: Watch TV from a TV capture card using Xawtv.
Here are a few things you can now do with your TV window:
-
Change channels — Use the up and down arrows to change channels.
-
Set up stations — Assign names to different channels so they appear in the channel list when you press the E key. You can change the name (Station ID) and Hotkey for each channel.
-
Grab an image — If you see an image you like on the screen, press J. A JPEG image (beginning with the word snap) appears in the directory where you started Xawtv.
-
Adjust picture and audio — Use function keys F6–F12 to change the picture quality. Use the plus (+) and minus (-) keys to raise or lower the volume, respectively.
Table 8-2 contains a list of the keys you can use for different functions with Xawtv.
|
Keystroke |
Description |
|---|---|
|
A |
Audio. Mutes and unmutes audio. |
|
F |
Full Screen. Toggles between standard size and full screen. |
|
G |
Grab PPM. Captures the current image in PPM format. (Use Ctrl+G to grab the video size and not the whole window in PPM.) |
|
H |
Get Help. Brings up the Help screen that appears the first time you open xawtv. |
|
J |
Grab JPEG. Captures the current image in JPEG format. (Use Ctrl+J to grab the video size and not the whole window in JPG.) |
|
R |
Record Movie. Brings up the window that enables you to capture video clips in AVI format. |
|
O |
Settings Window. Opens the Settings window, enabling you to select options with the mouse instead of by using keystrokes. |
|
C |
Channel Window. Opens the Channel window so you can change channels. |
|
E |
Channel Editor. Opens Channel Editor so you can add stations and hotkeys. |
|
Z |
Channel Hopping. Hops to a new station every few seconds. |
|
T |
Top. Keeps display window on top. |
|
Up/Down arrows |
Channel Change. Changes channels up or down. |
|
Left/Right arrows |
Tune. Fine-tunes the image. |
|
Page Up/Page Down |
Favorites. Changes channels up and down based on a list of favorite stations saved in your configuration file. |
|
Function keys (F5–F12) |
Picture. Adjusts the brightness (F5 and F6), hue (F7 and F8), contrast (F9 and F10), and color (F11 and F12). |
|
+/- |
Volume. Adjusts the volume up or down. |
|
Enter |
Mute. Turns the volume on or off. |
|
Q |
Quit |
Settings that you change in the course of using Xawtv are stored in your $HOME/.xawtv file. To create a listing of channels you can run the scantv command. It will ask about your TV and frequency tables, and then scan for channels and create a .xawtv file from its findings.
Video conferencing with GnomeMeeting
The GnomeMeeting window lets you communicate with other people over a network through video, audio, and typed messages. Because GnomeMeeting supports the H323 protocol, you can use it to communicate with people using other popular video-conferencing clients, such as Microsoft NetMeeting, Cu-SeeMe, and Intel VideoPhone.
To be able to send video, you need a Webcam that is supported in Linux. Although not all Webcams are supported in Linux, you still have a few dozen models to choose from. The following sections show you how to set up your Webcam and use GnomeMeeting for video conferencing.
Getting a supported Webcam
As with support for TV capture cards, Webcam support is provided through the video4linux interface. Some of the supported cameras have a parallel-port interface, although most Webcams currently supported in Linux require a USB port.
To see if your Webcam is supported, check the /usr/src/linux*/Documentation directory. A few parallel-port video cameras are described in the video4linux subdirectory; however, the bulk of the supported cameras are listed in the usb directory.
| Tip? |
After doing some research myself, I purchased a Logitech QuickCam Pro 3000. The driver for this Webcam was made for a Philips USB Webcam, but it also works for Webcams from Logitech, Samsung, Creative Labs, and Askey. Before making the purchase, I checked out the description of the driver at www.smcc.demon.nl/webcam. |
Supported USB cameras should be autodetected, so that when you plug them in the necessary modules are automatically loaded. Just start up the gnomemeeting or xawtv commands, and if everything is working you should see video from your Webcam on your Linux desktop. Here are a few things I typed to check that my Webcam was working properly:
# lsmod
pwc                     43392     1
videodev                 5120     2  [pwc]
usbcore                 59072     1  [audio pwc usb-uhci]
The output from lsmod shows that the pwc driver was loaded and associated with the videodev module and usbcore module. To see information about the pwc module (which is specific to this Webcam), I typed the following modinfo command:
# modinfo –p pwc
filename:    /lib/modules/2.4.20-2.48/kernel/drivers/usb/pwc.o
description: "Philips USB webcam driver"
author:      "Nemosoft Unv. <nemosoft@smcc.demon.nl>"
license:     "GPL"
parm:        size string, description "Initial image size. One of
             sqcif, qsif, qcif, sif, cif, vga"
parm:        fps int, description "Initial frames per second. Varies
             with model, useful range 5-30"
parm:        fbufs int, description "Number of internal frame buffers
             to reserve"
parm:        mbufs int, description "Number of external (mmap()ed)
             image buffers"
parm:        trace int, description "For debugging purposes"
parm:        power_save int, description "Turn power save feature in
             camera on or off"
parm:        compression int, description "Preferred compression
             quality. Range 0 (uncompressed) to 3 (high compression)"
parm:        leds int array (min = 2, max = 2), description "LED on,off
             time in milliseconds"
parm:        dev_hint string array (min = 0, max = 10), description
             "Device node hints"
The output shows that pwc is a Philips USB Webcam driver. It also shows options that you can set with the pwc module in order to change the image size, frames per second, and debugging level, among other things. The information about options for your Webcam driver can be useful later if you want to tune the behavior of your Webcam or track down a problem.
Running GnomeMeeting
To start GnomeMeeting from a Terminal window, type gnomemeeting&. If it is not installed, you can install the gnomemeeting package from the second Red Hat installation CD (CD #2). The first time you run GnomeMeeting, the GnomeMeeting Configuration Assistant starts. The assistant lets you enter the following information:
-
Personal Data — Your first name, last name, e-mail address, comment, and location. You can also select whether or not you want to be listed in the GnomeMeeting ILS directory.
-
Connection Type — Indicate the speed of your Internet connection (56K modem, ISDN, DSL/Cable, T1/LAN or Custom).
Figure 8-6 shows the GnomeMeeting window with the history log to the right and the address book behind.
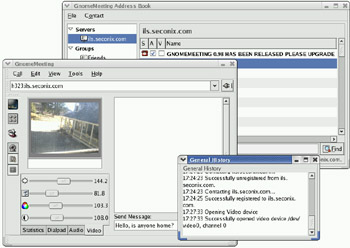
Figure 8-6: Connect to ILS servers to video-conference with GnomeMeeting.
In the GnomeMeeting window that opens you can click on the book icon to open a search window (shown to the upper right in Figure 8-6). The search window enables you to connect to an ILS directory. By typing a name into the search filter, you can search for people who might be connected to that server by first name, last name, e-mail address, or location. Select a person from the list that appears and, if he or she accepts your call, you can begin video-conferencing.
Tabs beneath the video window let you adjust your audio levels and video appearance. The History tab shows a log of your activities.


