Browsing the Web
Browsing the Web
Although the Internet has been around since the 1960s, the Web is a relatively new technology (it was created in 1985). The Web places an additional framework over Internet addresses that were once limited to host names and domain names. Before the Web, finding resources on the Internet was difficult. However, the Web now provides several features that make it much easier to access these resources:
-
Uniform Resource Locators (URLs) — URLs identify the location of resources on the Web. Besides identifying the domain and host on which a resource resides, they can also identify the type of content and the specific location of the content.
-
Hypertext Markup Language (HTML) Web pages — When people talk about a Web page, they are generally referring to information that is presented in HTML format. HTML changed the Internet from a purely plain-text-based resource to one that could present graphics and font changes. An HTML page can also contain hypertext links. Links are the threads that join together the Web, enabling someone viewing a Web page to be immediately transported to another Web page (or other content) by simply selecting a linked text string or image in the page.
The primary tool for displaying HTML Web pages is the Web browser. Mozilla is the most popular Web browser for Red Hat Linux. It displays HTML (Web pages) as well as other types of Web content. Now, even file managers, made for displaying local files and folders, have been extended to be able to display Web content (see the description of Konqueror file manager in Chapter 3).
This section contains general information about the Web and some specific hints for using Mozilla to browse the Web from your Red Hat Linux system.
Uniform Resource Locators
To visit a site on the Internet, you either type a URL into the Location box on your browser or click on a link (either on a Web page or from a menu or button on the browser). Although URLs are commonplace these days — you can find them on everything from business cards to cereal boxes — you may not know how URLs are constructed. The URL form is as follows:
protocol://host-domain/path
The protocol identifies the kind of content that you are requesting. By far, the most common protocol you come across is Hypertext Transfer Protocol (HTTP). HTTP is the protocol used to request Web pages. In addition to HTTP, however, there are other protocols that might appear at the beginning of a Web address. Instead of showing you a Web page, these other types of protocols may display different kinds of information in your browser, or open a completely different application for working with the content.
Table 9-1 lists some of the protocols that can appear in a Web URL.
|
Protocol Name |
Description |
|---|---|
|
http |
Hypertext Transfer Protocol. Used to identify HTML Web pages and related content. |
|
file |
Identifies a file on a specific host. Most often used to display a file from your local computer. |
|
ftp |
File Transfer Protocol. Identifies a location where there are file archives from which you might want to download files. |
|
gopher |
Gopher Protocol. Provides databases of text-based documents that are distributed across the Internet. (Gopher is nearly obsolete.) |
|
mailto |
Electronic Mail Address. Identifies an e-mail address, such as mailto://joe@example.com. (Usually opens a mail composer.) |
|
news |
USENET newsgroup. Identifies a newsgroup, such as news://news.myisp.com/comp.os.linux.networking. If you type this address into Mozilla, a window appears with the newsgroup displayed from the news server you identified. |
|
nntp |
USENET news using nntp protocol. |
|
telnet |
Log in to a remote computer and begin an interactive session. An example of a telnet address is telnet://localhost. (Replace localhost with any host or IP address that allows you to log in.) |
|
wais |
Wide Area Information Server protocol. A WAIS address might look like the following: wais://handsonhistory.com/waisdb. (Like gopher, WAIS databases are nearly obsolete.) |
The first part of a URL is the protocol. You don't always have to type the protocol. Most browsers are good at guessing the content you are looking for (mostly it guesses HTTP). If the address you type starts with www, it assumes HTTP; if it starts with ftp, it assumes FTP.
The second part of a URL takes you to the computer that is hosting the Web content. By convention, Web servers begin with www (or sometimes home). However, if you type the correct protocol (usually http), you will be directed to the right service at the host computer. The next piece of this name is just the host.domain style of Internet address that is always used with the Internet (such as redhat.com, linuxtoys.net, or whitehouse.gov). An optional port number can be tacked on to the host.domain name. For example, to request the port used for HTTP services (port 80) from the host called www.linuxtoys.net, you can type http://www.linuxtoys.net:80.
| Tip? |
You can identify a specific port number to request the service attached to the port on the computer you request. A port number is a lot like a telephone extension in a big company. A main telephone number (like the host.domain name) gets you to a company switchboard. The telephone extension (like the port number) connects you to the right person (like the service associated with a port). |
The third part of a URL identifies the location of the content on the host computer. Sections in a Web page can be identified with a pound sign (#) and an identifier following the Web page location. For example, the craft section of the bsched.htm page at handsonhistory.com would appear as http://www.handsonhistory.com/bsched.htm#craft. The filename extension (such as .htm or .html) further identifies the content type.
Web pages
If you look at the HTML source code that produces Web pages, you see that it consists of a combination of information and markup tags, all of which are in plain-text format. The idea was to have Web pages be very portable and flexible. You can create a Web page with vi, emacs, Notepad, or any text editor on any computing platform. Or simplified front-end programs can be used to provide WYSIWYG (What You See Is What You Get) interfaces that let you see what you are creating as you go.
HTML tags are set apart by right and left angle brackets. Tags come in pairs, with a beginning tag, the information, and then an ending tag. The beginning tag contains the tag name, while an ending tag contains a forward slash (/) and the tag name. Here is a minimal HTML page:
<HTML>
<HEAD>
<TITLE>Greetings from Washington</TITLE>
</HEAD>
<BODY>
Here we are in beautiful Tacoma.
</BODY>
</HTML>
You can see that the document begins and ends with HTML tags (<HTML> and </HTML>). The beginning part of the Web page is contained within the HEAD tags. The body of the page is contained within the BODY tags. The title of the page is set apart by TITLE tags.
Between the beginning and ending BODY tags, you can add all kinds of stuff. You can have different types of bulleted or numbered lists. You can have headings, images, and text. More complex pages can include forms, dynamic HTML (which changes the content as you move or select items), or special data. Figure 9-1 is an example of a Web page as it appears in Mozilla.
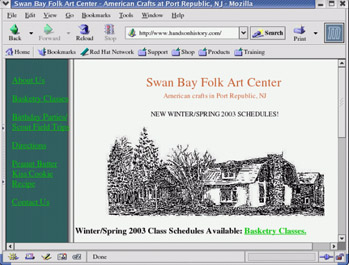
Figure 9-1: Many Web pages contain text, images, headings, and links.
Some of the HTML code that was used to create the Web page shown in Figure 9-1 is shown here. The title of the Web page appears between two TITLE tags.
<TITLE>Swan Bay Folk Art Center - American Crafts
in Port Republic, NJ</TITLE>
The following code is used to create a link that opens a new mail message window:
A HREF="mailto:webmaster@handsonhistory.com">Contact Us</A>;
The text Contact Us is a link to an e-mail address. When someone clicks on that link, a new message window appears, allowing that person to send e-mail to that address.
<FONT FACE="Copperplate Gothic Bold"><A HREF=" bsched.htm">
Basketry Classes</A></FONT>
A special font face was used for the words Basketry Classes, with the words pointing to a link to another HTML page. If someone were to click on those words, the bsched.htm page would appear.
Web browsing with Mozilla
During the early 1990s, Netscape Navigator was the most popular Web browser. When it became apparent that Netscape was losing its lead to MS Internet Explorer, the source code for Netscape was released to the world as open-source code.
Mozilla.org was formed to coordinate the development of the new browser from that code. The result was the Mozilla browser that is now available with Red Hat Linux, as well as with many other computing platforms. Recently, the Mozilla Foundation was formed (www.mozillafoundation.org), to gain nonprofit status for the Mozilla project going forward.
At the center of Mozilla, of course, is the Navigator Web browser. Mozilla also includes the following features:
-
Mail and Newsgroups — A full-featured program for sending, receiving, and managing e-mail, as well as for using newsgroups. (The mozilla-mail RPM must be installed.)
-
IRC Chat — An Internet Relay Chat (IRC) window, called ChatZilla, for participating in online, typed conversations. (The mozilla-chat package must be installed.)
-
Composer — A Web page (HTML) composer application.
-
Address Book — An application to manage names, addresses, and telephone numbers. (This feature is also part of the mozilla-mail RPM package.)
You can click the Mozilla Web Browser icon directly on the desktop panel to start Mozilla. Or you can open Mozilla from the desktop menu (beginning from the red hat) by selecting Internet ? Mozilla Web Browser. Figure 9-2 shows an example of the Mozilla browser as it displays the Mozilla home page (www.mozilla.org).
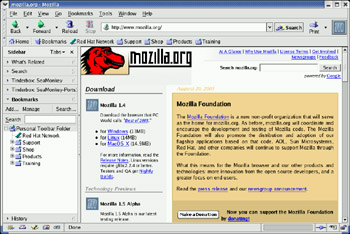
Figure 9-2: Mozilla is the open-source Web browser created from Netscape source code.
Mozilla has all the basic features you need in a Web browser and a few special features. The following sections describe how to get the most out of your Mozilla Navigator Web browser.
Setting up Mozilla Navigator
There are many things you can do to configure Mozilla to run like a champ. The following sections describe some ways to customize your browsing experience in Mozilla Navigator.
Setting Navigator preferences
You can set your Mozilla Navigator preferences in the Preferences window. To open Mozilla preferences, click Edit ? Preferences. The Preferences window appears, as shown in Figure 9-3.
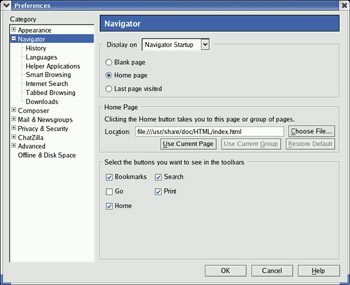
Figure 9-3: Change settings for navigating the Web from Mozilla's Preferences window
Here are some Navigator preferences that you might want to change:
-
Navigator — Besides selecting the location to use as your home page, you can choose which buttons you see on the toolbar.
-
History — Choose how long to store addresses of pages you visit. You can also select to clear your history and/or the sites you have typed in your location bar.
-
Languages — Set a list of preferences for the particular language a Web page should be displayed in, if the page is available in several languages.
-
Helper Applications — Set up applications to use to handle different types of data that may be encountered while browsing the Web.
-
Smart Browsing — Choose to do keyword searches when you type partial addresses in the Location box. Smart browsing is off by default, so typing netscape would cause Mozilla to look for www.netscape.com instead of searching for netscape links.
-
Internet Search — Select which search engine to use for Internet searches. You can also change how the Search tab is used with searches.
-
Tabbed Browsing — Use these selections to have search results appear in tabs on the Mozilla Navigator window, as opposed to appearing in the full screen.
-
Download — Choose what you see during downloads from the Internet (a download manager, a progress dialog, or nothing).
The Advanced Preferences can be used to fine-tune your Web browsing experience, as well as make decisions on what content you open can and can't do on your computer. Here are some Advanced Preferences that might interest you:
-
Scripts & Plugins — The Web content you choose can try to open, move, resize, raise and lower windows. It can request to change your images, status bar text, or bits of information stored in what are called "cookies." These preferences let you restrict what the content you request can do.
-
Cache — By default, the most recent 4MB of Web pages you visit are stored in RAM and the most recent 50MB of pages you visit are stored on your hard disk. If a page is not out-of-date, caching makes it possible to return to a page quickly, without needing to reload from the original Web server. Cache preferences let you change how much information is cached, where hard disk cache is located. Other cache preferences let you clear all memory and disk cache immediately.
-
Proxies — If you have direct access to the Internet, you don't need to change any proxy settings. However, if you need to access the Internet via a proxy server, you can identify the location of that server (or servers) here. To access the Web via proxy servers, you must explicitly identify the proxy server to use for each type of content you request (HTTP, SSL, FTP, Gopher, and SOCKS).
-
HTTP Networking — If you are using a proxy server, that proxy server may require that you make HTTP requests using either HTTP/1.0 or HTTP/1.1 standards (1.1 is the default).
-
Software Installation — When a request for Web content results in that content trying to install software on your computer, you can either allow that to happen (with prompting) or not allow any software updates, based on how this preference is set.
-
Mouse Wheel — If your mouse has a wheel, you can change how Mozilla behaves when you use that wheel. By default, the mouse wheel scrolls a line at a time.
-
DOM Inspector — Turn this on to check the structure of a Web page (for debugging).
Adding helper apps
Although the main type of content provided by Web pages is HTML, many other content types can be displayed, played, or presented by a Web browser. Most additional data encountered by Mozilla is handled in one of two ways: plug-ins or helper apps.
Plug-ins are self-contained programs that allow data to play within the Mozilla window. A helper app can be any program that is available on your Red Hat Linux system. It is up to you to identify the plug-in or helper app to launch when a certain type of data is encountered.
Mozilla determines what helper app or plug-in to launch based on the following criteria:
-
Suffixes — If the browser is reading a file that has a particular suffix attached to the filename (such as exe for an application or gz for a compressed zip file), it can use that suffix to determine the file's contents. When a file's suffix matches a suffix configured for a particular helper app or plug-in, the helper app or plug-in is used to play or display the data.
-
MIME type — Because data may come to the browser in a stream or have no suffix, Mozilla can use the MIME type attached to the data to determine which plug-in or helper app to use. (MIME stands for Multipurpose Internet Mail Extensions.)
You can add your own helper app to automatically handle a particular type of data in your browser. Here's how:
-
Choose Edit ? Preferences. The Mozilla Preferences window appears.
-
Click the plus next to the Navigator category, and select Helper Applications.
-
Click New Type. A dialog box appears that enables you to add information about the helper app and the data that it can handle.
-
Type in a description of the data, the MIME type, and the file suffixes (if any) on files that contain that type of data.
Note? When you add the suffix, don't include the dot .
-
Choose an application to handle the data type. If the application needs a Terminal window to run, type xterm -e, followed by the command line you need to enter. This executes the command in an xterm window, reading in data as needed.
-
Click OK when you are done.
The next time you open data in Mozilla of the type you just added, a pop-up window will ask you if you want to use the application you just entered to open the data.
Adding plug-ins
There are not many plug-ins available for use in the version of Mozilla that comes with Red Hat Linux. To see a list of plug-ins associated with your Mozilla browser, choose Help ? About Plug-ins. You will probably see one plug-in: Plugger. If Plugger isn't installed, you can install it from CD #3. Plugger (http://fredrik.hubbe.net/plugger.html) is a multimedia plug-in that handles QuickTime, MPEG, MP2, AVI, SGI-movie, Tiff, DL, IFF-anim, MIDI, Soundtracker, AU, WAV, and Commodore 64 audio files by relying on external programs to play the data. Recently, Plugger has also added support for displaying a variety of Microsoft file types.
Here is a list of some free plug-ins available for Mozilla that work with Red Hat Linux.
-
Adobe Acrobat Plug-in (www.adobe.com/support/downloads) — Displays PDF (Portable Document Format) files from Adobe Systems.
-
Cult3D Plug-in (www.cult3d.com) — Displays high-quality, interactive real-time 3D images on the Web. This plug-in is from Cycore Computers. (Click Download to find the plug-in. There is a cult3d RPM available that requires tailoring to work in Mozilla.)
-
DjVu Plug-in (djvu.sourceforge.net) — Displays images in DjVu image compression technology. This plug-in is from AT&T.
-
Real Audio (www.real.com) — Plays Real Audio and Video content. (To use the Real Play plug-in in Mozilla, you need the RealPlayer and realplay-nplugin RPMs, available by searching rpmfind.net).
-
Macromedia Flash Player (www.macromedia.com/) — Displays multimedia vector graphics and animation. This plug-in is from Macromedia, Inc. The Flash Player is available for Red Hat Linux, but Macromedia's Shockwave plug-in is not yet available for Linux.
-
Xswallow (www.csn.ul.ie/~caolan/docs/Xswallow.html) — Allows X window programs to be used as an inline viewer.
More plug-ins may be added in the future for use with Red Hat Linux. Mozilla now offers a great new Web site for getting plug-ins for Linux that run in Mozilla: http://plugindoc.mozdev.org/linux.html. The site contains links to download plug-ins and instructions for installing them.
When you download a plug-in, follow the instructions that come with the plug-in for installing it. If the plug-in comes in an RPM file, install it as you would any other software package in Red Hat Linux (rpm -iv package command). Otherwise, probably just copy the plug-in file (a .so file) to the system plug-in directory (probably /usr/lib/mozilla/plugins) or your personal plug-ins directory (probably $HOME/.mozilla/plugins). When you restart Mozilla, the plug-ins will automatically be picked up from those locations.
| Note? |
The CrossOver Plugin is a commercial product that lets you use many Windows plug-ins in Mozilla. See the section "Adding a CrossOver Plugin" later in this chapter for details. |
Using Mozilla Navigator controls
If you have used a Web browser before, the controls are probably as you might expect: location box, forward/back buttons, file and edit menus, and so on. There are a few controls with Mozilla, however, that you might not be used to seeing. Here are some examples:
-
Using the sidebar — Press the F9 function key to toggle the sidebar on and off. Click a What's Related, Search, Bookmarks, or History tab (or add your own tab as described earlier). Add your own bookmarks, return to pages from your history list, or search for Web content.
-
Sending Web Content — You can send an e-mail containing either the current Web page (File ? Send Page) or the URL of the current Web page (File ? Send Link) to selected recipients.
-
Searching the Internet — You can search the Internet for a keyword phrase in many different ways. Choose Tools ? Search the Web to open a Netscape Web site that lets you search the Internet. Or type one or more keywords in the Location box, and click Search. Then, of course, you can use the sidebar for searches as described earlier.
-
Viewing Information about a Page — You can view information about the location of a Web page, the location of each of its components, the dates the page was modified, and other information by choosing View ? Page Info. Figure 9-4 shows the Page Info window for a Web page. Click the Links tab to see links on that page to other content on the Web. Click the Security tab to see information about verification and encryption used on the page.
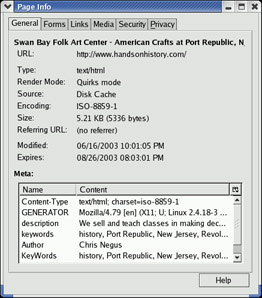
Figure 9-4: Display information about a Web page by selecting Page Info.
Improving Mozilla browsing
Every Web site you visit with Mozilla is not going to play well. Some sites don't follow standards, use unreadable fonts, choose colors that make it hard to see, or demand that you use a particular type of browser to view their content. To improve your browsing experience, there are several things you can add to Mozilla.
Adding a CrossOver Plugin
QuickTime 5 movies, Shockwave Director multimedia content, and various Microsoft movie, file, and data formats simply will not play natively in Mozilla Navigator. Using software built on WINE, CodeWeavers (www.codeweavers.com) created the CrossOver Plugin. Although it costs a few dollars ($24.95 U.S. for a one-user-at-a-time type license), the CrossOver Plugin lets you play some content that you simply could not otherwise use in Linux.
After you install the CrossOver Plugin, you see a nice Plugin Setup window that lets you selectively install plug-ins for QuickTime 6, Windows Media Player 6.4, Shockwave 8.5, Flash 6, and Microsoft Word, Excel, and PowerPoint viewers. You can also install other multimedia plug-ins, as well as a variety of fonts to use with those plug-ins.
| Tip? |
Although I have had CrossOver Plugin running well in earlier versions of Red Hat Linux, at the time of this writing it was not yet working in the current version of Red Hat Linux. Check with CodeWeavers to see if they have corrected CrossOver Plugin to run in the latest Red Hat Linux. |
Adding a Preferences toolbar
Did you ever run into a Web page that required you to use a particular type or version of a browser or had fonts or colors that made a page unreadable? The Mozilla Preferences Toolbar lets you try to spoof Web sites into thinking you are running a different browser. It also lets you choose settings that might improve colors, fonts, and other attributes on difficult-to-read pages.
You can install the neat little toolbar from the Mozdev.org site (prefbar.mozdev.org). Click the Install link; then, after it is installed, restart Mozilla. Figure 9-5 shows an example of the Preferences Toolbar that has been installed in Mozilla.

Figure 9-5: Change colors, fonts, and browser types on the fly with Mozdev.org Preferences Toolbar.
The default set of buttons let you do the following:
-
Colors — Change between default colors and those set on the Web page.
-
Images — Toggle between having images loaded or not loaded on pages you display.
-
JavaScript — Allow or disallow JavaScript content to play in Mozilla Navigator.
-
Clear Cache — Deletes all cached content from memory and disk.
-
Kill Flash — Kills all embedded Flash content on the current page.
-
Real UA — Choose to have your browser identified as itself (current version of Mozilla) or any of the following: Mozilla 1.0 (in Windows 98), Netscape Navigator 4.7 (in Macintosh), Netscape 6.2 (in Linux), Internet Explorer 5.0 (in Macintosh), or Internet Explorer 6.0 (in Windows XP)
Click the Customize button to add other buttons to the Preferences Toolbar. You can add buttons to clear your History or Location bar entries. You can even add a Popups button to prevent a page from opening a pop-up window from Mozilla.
Many of the preferences take effect immediately. Others may require you to restart Mozilla.
Adding Java support
If you want to display some Java content, but you only see a broken puzzle piece and a failure message that says you need a plug-in to view application/x-java-whatever content, you can install the software you need from Sun Microsystems (www.sun.com). Here's how:
-
Download the Java 2 Runtime Environment package from java.sun.com/download. (Look for a Java 2 Platform, Standard Edition that runs on Linux, then download the Java 2 Runtime Environment package. I used j2re-1_4_2-linux-i586-rpm.bin.)
-
Make the package executable and execute it to extract the RPM, as follows:
# chmod 755 j2re*-rpm.bin
# ./j2re*-rpm.bin
-
Install the j2re3 package (as root user), just as you would any software RPM package.
# rpm -iv j2re*rpm
-
Change to the java plug-in directory and create a link from the java plug-in to the Mozilla plug-ins directory. (Instead of *, you could type the whole j2re directory name.)
$ cd /usr/java/j2re*/plugin/i386/ns610/
$ ln -s libjavaplugin_oji.so /usr/lib/mozilla/plugins/
-
Close any open Mozilla windows, then open a new Mozilla window.
-
Click Help ? About Plug-ins. You should see a listing for the Java plug-in and lots of supported Java MIME types.
-
To see if the Java plug-in is working, you could try out some games from the Java Software Showcase (http://java.sun.com/getjava/showcase.html).
Doing cool things with Mozilla
There are some neat bells and whistles built into Mozilla that can make your browsing more pleasant. Here are a few of those features that you can try out:
Using tabbed browsing
If you go back and forth among several Web pages, you can use the tabbed browsing feature to hold multiple pages in your browser window at once. You can set up tabbed browsing to work from a Web page or from the Location box. Here's how:
-
Click Edit ? Preferences. The Preferences window appears.
-
Click Tabbed Browsing under the Navigator category.
-
Click one or both of these boxes, depending on how you want to use tabbed browsing:
-
Middle-click, Control+click or Control+Enter on links in a Web page — Selecting this box lets you open a link to another Web page in a new tab. For this to work, click the middle mouse button on a link, hold the Ctrl key while you click the left mouse button on a link, or (with the link highlighted) hold the Ctrl key and press Enter.
-
Control+Enter in the Location bar — After you type a Web address (URL) into the Location box, hold the Ctrl key and press Enter to open the new page in a tab.
-
-
Click OK. You can begin using the tabbed browser feature from your Mozilla Navigator.
A tab for each tabbed page appears at the top of the Navigator pane. To close a tab, create a new tab, bookmark a group of tabs, or reload tabs, right-click one of the tabs at the top of the pane. A drop-down menu lets you choose the function you want.
Using the DOM Inspector
If you are debugging a Web page that you are creating, the Document Object Model (DOM) Inspector can be useful for checking out the structure of your page. To open the DOM inspector, from the Mozilla window click Tools ? Web Development ? DOM Inspector.
From the DOM Inspector window, type the URL to the Web page you want to check out. The nodes, representing the head, body, tables, fonts, and so on, appear in the left column. Values for each node appear in the right column. Click a node name and the selected area is highlighted on the page below, with the node value appearing to the right.
Resizing the Web page
There is a nice keyboard shortcut that lets you quickly resize the text on most Web pages in Mozilla. Hold the Ctrl key and press plus (+) or minus (-) keys. The text on the Web page will (in most cases) get larger or smaller, respectively. That page with the insanely small type font is suddenly readable.
Using text-based Web browsers
If you become a Linux administrator or power user, over time you will inevitably find yourself working on a computer from a remote login or where there is no desktop GUI available. At some point while you are in that state, you will probably want to check an HTML file or a Web page. To solve the problem, Red Hat Linux includes several text-based Web browsers.
With text-based Web browsers, any HTML file available from the Web, your local file system, or a computer where you're remotely logged in can be accessed from your shell. There's no need to fire up your GUI or read pages of HTML markup if you just want to take a peek at the contents of a Web page. Besides letting you call up Web pages, move around with those pages, and follow links to other pages, some of these text-based browsers even display graphics right in a Terminal window!
Which text-based browser you use is a matter of which you are more comfortable with. Browsers that are available include:
-
links — With links, you can open a file or a URL, and then traverse links from the pages you open. Use search forward (/string) and back (?string) features to find text strings in pages. Use up and down arrows to go forward and back among links. Then press Enter to go to the current link. Use right and left arrows to go forward and back among pages you have visited. Press Esc to see a menu bar of features to select from.
-
lynx — The lynx browser has a good set of help files that come with it (press the ? key). Step through pages using the Spacebar. Though lynx can display pages containing frames, it cannot display them in the intended positioning. Use arrow keys to display the selected link (right arrow), go back to the previous document (left arrow), select the previous link (up arrow), and select the next link (down arrow).
-
w3m — The w3m text-based Web browser can display HTML pages containing text, links, frames, and tables. It even tries to display images (though it is a bit shaky). There are both English and Japanese help files available (press H with w3m running). You can also use w3m to page through an HTML document (for example, cat index.html | w3m). Use Page Up and Page Down to page through a document. Press Enter on a link to go to that link. Search forward and back for text using / and ? keys, respectively.
The w3m command seems the most sophisticated of these browsers. It features a nice default font selection, seems to handle frames neatly, and its use of colors also makes it easy to use. The links browser lets you use the mouse to cut and paste text.
You can start any of these text-based Web browsers by giving it a filename, or if you have an active connection to the network, a Web address. For example, to read the w3m documentation (which is in HTML format) with a w3m browser, you can type the following from a Terminal window or other shell interface:
$ w3m /usr/share/doc/w3m-0*/doc/MANUAL.html
An HTML version of the W3M Manual is displayed. You can also have started links without giving it a filename (in which case, you will have to open one later from the menu). Or you can give w3m a URL to a Web page, such as the following:
$ w3m www.handsonhistory.com
After a page is open, you can begin viewing the page and moving around to links included in the page. Start by using the arrow keys to move around and select links. Use Page Up and Page Down keys to page through text.


