Using a Digital Camera with gtkam and gphoto2
Using a Digital Camera with gtkam and gphoto2
With the gtkam window, you can download and work with images from digital cameras. The gtkam window is front end to gPhoto2, which provides support for dozens of digital cameras in Linux. The gtkam window works by attaching a supported digital camera to a serial or USB port on your computer. You can view thumbnails of the digital images from the camera, view full-size images, and download the ones you select from the camera to your hard disk.
| Note? |
If you have a camera that saves images to a floppy disk, just insert that disk into your disk drive and the contents of the disk should open automatically on your desktop. |
Check the gPhoto2 Web site (http://www.gphoto.org/proj/libgphoto2/support.php) for information on supported cameras as well as other topics related to gPhoto. Here is a list of currently supported digital cameras.
-
Agfa ePhoto — Supported models: 307, 708, 708C, 1280, and CL18.
-
Apple QuickTake — Supported model: 200.
-
Cannon Digital — Suported models: IXUS, IXUS 300, and IXUS v.
-
Cannon PowerShot — Supported models: A5, A5 Zoom, A10, A20, A50, A70, G1, G2, Pro70, Pro90 IS, S10, S100, S110, S300, and S20.
-
Casio QV — Supported models: 10, 10A, 11, 30, 70, 100, 200, 700, and 5000SX.
-
Chinon — Supported model: ES-1000.
-
Epson PhotoPC — Supported models: 500, 550, 600, 700, and 800.
-
Fuji — Supported models: DS-7, DX-5, DX-10, MX-500, MX-600, MX-700, MX-1200, and MX 2700.
-
Hewlett-Packard PhotoSmart — Supported models: 618, C20, C30, and C2000.
-
Kodak DC — Supported models: 120, 20, 25, 200+, 210, 210+ Zoom, 215 Zoom, 220 +, 240, 260, 265, 280, 290, 3200, 3400, and 5000.
-
Konica — Supported models: QM100, QM100V, Q-EZ, Q-M100, Q-M100V, Q-M200.
-
Leica — Supported model: Digilux Zoom.
-
Minolta — Supported model: Dimage V.
-
Mustek — Supported model: MDC 800 v2.
-
Nicon CoolPix — Supported models: 100, 300, 600, 700, 800, 880, 900, 900S, 910, 950, 950S, and 990.
-
Olympus — Supported models: D-100Z, D-200L, D-220L, D-300L, D-320L, D-330R, D-340L, D-340R, D-400L Zoom, D-450Z, D-500L, D-600L, D-620L, C-400L, C-410L, C-800L, C-820L, C-830L, C-840L, C-900 Zoom, C-900L Zoom, C-1000L, C-1400L, and C-2000Z.
-
Panasonic — Supported models: Coolshot KXL-600A and KXL-601A, and NV-DCF5E, and DC1000 and DC1580.
-
Philips — Supported models: ESP60 and ESP 80.
-
Polaroid — Supported models: PDC 640 and DC700.
-
Ricoh RDC — Supported models: 300, 300Z, 4200, 4300, and 5000.
-
Samsung — Supported models: Kenox SSC-350N and Digimax 800K.
-
Sanyo VPC — Supported models: G210, G200, G200EX, G250, X300, and X350.
-
Sony — Supported models: DSC-F1, DSC-F55, DSC-F505, Memory Stick Adapter, and MSAC-SR1 and DCR-PC100.
-
Toshiba — Supported model: PDR-M1.
Downloading digital photos with gtkam
The following procedure describes how to download images from your digital camera.
-
Using a cable provided with your digital camera, connect your camera to the USB or COM port on your computer. (I had better luck with the USB port.)
-
Set your camera to be in Send and Receive mode.
-
From the main Red Hat desktop menu, choose Graphics ? Digital Camera Tool. The gtkam window appears.
-
Click Camera ? Add Camera. The Select Camera window appears.
-
Click the down arrow next to the Model box, select your camera, and click Detect.
-
Click Apply, then OK. Your camera model should be listed in the gtkam window.
-
To begin downloading images from your digital camera, click the camera name that appears in the left column, and then select the folder containing the images from that camera. After the images download (which can take a while), thumbnails appear in the main gtkam window, as shown in Figure 8-8.
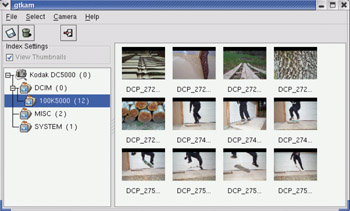
Figure 8-8: Download images from digital cameras from the gtkam window. -
Select the images you are interested in, and click the Save Selected Photos button to save the selected images. The Save Photos window that appears lets you choose a directory to save them to. You can rename the images or just use the names assigned by the camera.
-
Choose images you want to delete, and click the Delete button to delete them.
Using your camera as a storage device
Instead of using gtkam or gphoto to download pictures to Linux, some digital cameras let you treat them like a storage device to manage pictures. By mounting a digital camera as a USB mass storage device, you can view, copy, delete, and move the pictures on your camera as you would files on a hard disk or CD (just at a lower speed).
The following is a partial list of digital cameras that can be used as a USB storage device:
-
Casio — Supported models: QV-2400UX, QV-2x00, QV-3x00, QV-4000 and QV-8000.
-
Fuji — FinePix 1300, 1400Zoom, 2300Zoom, 2400Zoom, 2800Zoom, 4200Z, 4500, 4700 Zoom, 4900 Zoom, 6800 Zoom, A101, A201, and S1 Pro.
-
HP — PhotoSmart 315, 318xi, 618, and C912,
-
Konica — KD200Z, KD400Z, and Revio KD300Z.
-
Kyocera — Finecam s3.
-
Leica — Digilux 4.3.
-
Minolta — Dimage 5, Dimage 7, and Dimage X.
-
Nikon — CoolPix 2500, 885, 5000, 775, and 995.
-
Olympus — Brio Zoom D-15, C-100, C-200Z, C-2040, C-220Z, C-2Z, C-3020Z, C-3040Z, C-4040Zoom, C-700, C-700UZ, C-860L, D-510, D-520Z, E-10, and E-20.
-
Pentax — EI2000, Optio 330, and Optio 430.
-
Sony — DSC-F505, DSC-F505V, DSC-F707, DSC-P1, DSC-P20, DSC-P5, DSC-P71, DSC-S30, DSC-S70, DSC-S75, DSC-S85, MVC-CD300, and MVC-FD92
-
Vivitar — Vivicam 3550
-
Yashica — Finecam s3
To Linux, the USB mass storage camera appears as a SCSI drive containing a VFAT file system with image files on it. Here's a procedure for using your digital camera as a USB storage device:
-
Using a cable provided with your digital camera, connect your camera to a USB port on your computer and turn it on so it is ready to send and receive data.
-
Boot your computer to Red Hat Linux.
-
Open the /etc/fstab file as root user and see if an entry was created for your digital camera. If you have no other SCSI devices on your computer, the camera will probably be detected as /dev/sda1 device. Here is what the entry might look like:
/dev/sda1 /mnt/camera auto defaults, user,noauto 0 0
If no such entry appears, create the entry, possibly using vfat instead of auto. Create the mount point directory (as root user, type mkdir /mnt/camera).
-
As root user, type the mount command to mount the camera: mount /mnt/camera.
-
Open the /mnt/camera as you would any other directory from the shell or from a file manager. Copy, delete, move, and rename files as you would any files on your hard disk.
-
When you are done, be sure to unmount the camera as follows (as root user from a Terminal window).
# umount /mnt/camera
Caution? If you unplug your camera without unmounting the file system, it could damage the files on your camera.
You can follow the procedure above to use other USB mass storage devices (CD drives, keychains, and so on) in Linux. Use different mount directories (such as /mnt/keychain) and check which SCSI device is being assigned to the USB storage device.
To see if your USB storage device can be seen by Linux, you can check the /var/log/dmesg file or run the usbview command. Either of those places will tell you if the device is being detected properly by Linux.


