Getting Familiar with the Desktop
Getting Familiar with the Desktop
Desktop refers to the presentation of windows, menus, panels, icons, and other graphical elements on your computer screen. Originally, computer systems such as Linux operated purely in text mode — no mouse, no colors, just commands typed on the screen. Desktops provide a more intuitive way of using your computer.
If you are working on a PC, and you are the only one using your Linux computer, you may wonder why you need a user account and password. Unlike Windows, Linux (as its predecessor UNIX) was designed from the ground up to be a multiuser system. Here are several good reasons why you should use separate user accounts:
-
Even as the only person using Linux, you want a user name besides root for running applications and working with files so you don't change critical system files by mistake during everyday computer use.
-
If several people are using a Linux system, separate user accounts let you protect your files from being accessed or changed by others.
-
Networking is probably the best reason for using a Linux system. If you are on a network, a unique user name is useful in many ways. Your user name can be associated with resources on other computers: file systems, application programs, and mailboxes to name a few. Sometimes a root user is not allowed to share resources on remote Linux systems.
-
Over time, you will probably change personal configuration information associated with your account. For example, you may add aliases, create your own utility programs, or set properties for the applications you use. By gathering this information in one place, it's easy to move your account or add a new account to another computer in the future.
Like most things in Linux, the desktop is built from a set of interchangeable building blocks. The building blocks of your desktop, to use a car analogy, are:
-
The X Window System (which is like the frame of the car),
-
The KDE or GNOME desktop environment (which is like a blueprint of how the working parts fit together)
-
The Metacity window manager (which provides the steering wheel, seat upholstery, and fuzzy dice on the mirror).
-
The Bluecurve desktop theme (the paint job and the pin stripe).
Once Red Hat Linux is installed (see Chapter 2) and you have logged in (see the previous section), you should see either the GNOME or KDE desktop with the Red Hat look-and-feel. At this point, I'll take you on a tour of the desktop and step you through some initial setup to get your desktop going.
Figure 3-2 shows an example of the Red Hat Linux default desktop (GNOME).
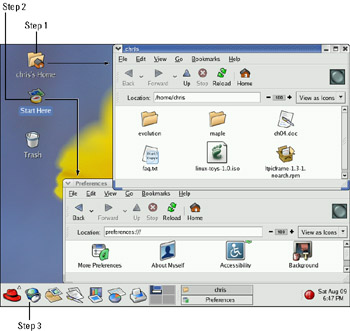
Figure 3-2: After login, Red Hat Linux starts you off with a GNOME desktop by default. Steps 1, 2, and 3 are explained in the following section.
Because GNOME is the default desktop for Red Hat personal desktop and workstation installs, I'll start by walking you around the GNOME desktop. As indicated in Figure 3-2, the tour steps you through trying out your home folder, changing some preferences, and configuring your panel.
To understand how Red Hat has created a common look-and-feel for the GNOME and KDE environments, refer to the sidebar, "The Red Hat Look-and-Feel."
Touring your desktop
If you are unfamiliar with the Red Hat desktop, I suggest you take this quick tour to familiarize yourself with its features:
Step 1: Checking out your home folder
Double-click the "user's Home" icon on the desktop (it should say something like "bill's Home" or "julie's Home," depending on your user name). The window that appears shows your file manager window (Nautilus in GNOME or Konqueror in KDE) as it displays the contents of your home folder.
The location of the home folder (also referred to as a home directory) on your computer is usually /home/user, where user is replaced by your user name. Here are some things to try out with your home folder:
Red Hat has done a lot in the past few versions to make KDE and GNOME appear to be the same in many ways. Despite the fact that the differences between KDE and GNOME below the surface are quite dramatic, the way icons, menus, panels, and many Red Hat system tools are presented are the same for the two environments.
To provide a common interface in two desktop environments, you will find the following similarities between the KDE and GNOME desktops in Red Hat Linux 10:
-
Main menu — An icon on the far left of the panel (in both KDE and GNOME) represents the main menu used in both desktop environments. The menus in both desktops contain similar content, although GNOME represents this menu with a Red Hat icon and KDE uses a K icon.
-
Panel arrangement — On their panels, both KDE and GNOME start with the same main menu button (just described), the same six desktop applications, a viewer for virtual windows, an area for listed tasks, and a clock.
-
System tools, system settings, and server settings — These three menus listed on the main menu contain most of the same applications for both desktop environments. This is where Red Hat has added many tools from its growing list of administrative GUIs.
-
Icons — Both KDE and GNOME now start with at least Home, StartHere, and Trash icons on the desktop. These desktop icons, as well as icons shown on the panel and menus, are Red Hat Linux–specific. The Red Hat icons add a lot to the similar look of both KDE and GNOME in Red Hat Linux.
Although the two desktops now look very much alike in Red Hat Linux and offer many of the same Red Hat administrative tools, the two desktop environments are very different in other ways. KDE comes with many more integrated applications and offers more tools for configuring desktop preferences. GNOME tends to be more streamlined, offering a fairly simple, efficient desktop experience.
To choose between KDE and GNOME, I recommend you read the sections on the two desktop environments and compare features in their panels, file managers (Konqueror and Nautilus), and configurable preferences.
-
Folders — Create folders and subfolders to store your work (click File ? New Folder, and then name the new folder something like Images, Music, or Packages).
-
Open With — Click the right mouse button on any object in a folder, then select Open With. You should be able to see several programs you can use to open the object. For example, you can choose to open a Web page (.html file) with htmlview, Lynx, or Mozilla (provided each of those tools is installed).
-
Side Pane — Click View ? Side Pane. From the box at the top of this pane, choose Information to show information about the selected folder or file. Next choose History, to see files and folders previously viewed.
-
Backgrounds — Click Edit ? Backgrounds and Emblems. Drag-and-drop patterns or colors you like into the pane on your folder window. (I personally like camouflage.) Click Emblems, then drag-and drop an emblem on a file or folder. Use the emblem to remind yourself of something about the object (such as the fact that it's a personal document or is of an urgent nature).
-
Organize your work — As you create documents, add music, or download images from your camera, organize them into your home folder or any subfolders. Your home folder is not accessible to any other user on the computer except the root user, so you can safely store your work there. With the files you create, you can:
-
Move — Drag-and-drop to move a file to another folder icon or folder window.
-
Delete — Drag-and-drop a file to the Trash icon to delete it.
-
Rename — Right-click on the file, select Rename, and then type the new name.
-
As with any window, with the Folder window you can:
-
Window shade — Double-click in the title bar to roll the window up and down.
-
Minimize/Unminimize — Click the Minimize button (first button, upper-right corner of the title bar) to minimize the window to the window pane. Click the minimized window in the desktop panel to return it to your desktop.
-
Maximize — Click the Maximize button (second button, upper-right corner of the title bar) to have the window go full screen.
-
Delete — Click the X button (upper-right corner of the title bar) to delete the window.
Step 2: Change some preferences
More than 20 different preference categories are available from the GNOME desktop. Double-click the Start Here icon, and then double-click the Preferences icon. Here are a few preferences you might want to modify when you start out (see the GNOME and KDE preferences section later in this chapter for further details):
-
Change background — Double-click the Background icon. The Background Preferences window appears as shown in Figure 3-3.To change the background image, select one of the Picture Options. To change the image, click the Select Picture box (to choose a file from your disk) or drag-and-drop an image onto that box. For example, from a folder window, type /usr/share/backgrounds/images in the Location box. Then drag-and-drop images to the Select Picture box to change the background.
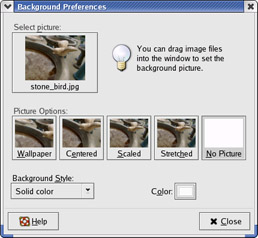
Figure 3-3: Set a colors or pictures for your desktop background. -
Choose browsers and editors — Double-click the Preferred Applications icon. When you open a Web page, text file, or shell from the desktop, this preferences window lets you choose which Web browser, text editor, or Terminal window to open. Mozilla is the default, but you can choose Konqueror (the KDE browser) to run on your GUI. If you want a text-based Web browser, select Lynx or Links. To use a different Web browser, such as epiphany, select Custom and type the name of that browser. For your default text editor, choose the application to open plain-text files from your desktop (by default, OpenOffice is used). The GNOME Terminal is used when you need a shell prompt (you can change that to use a standard xterm Terminal).
Tip? The konsole command starts the Konsole (KDE) terminal window. Programmers who use many terminal windows at once often prefer Konsole over gnome-terminal (finding it to be more efficient and feature-rich). To add Konsole as your default terminal, select Custom Terminal and enter konsole as the command.
-
Add a screensaver — Double-click the Screensaver icon. Try out a few screen savers (all are used randomly, by default). Click "Only One Screen Saver" in the Mode box.
Click different screen savers to see them and click Preview to try them out. Try T3D for a bizarro clock or Rubick to watch how to solve a Rubick's cube.
Tip? Click the Lock Screen After check box and set the number of minutes after which the screen will be locked. This is a good option for an office environment, where you want your screen locked if you wander away for a few minutes. (Be sure to log off of any virtual terminals you may have open.)
-
Change the theme — Double-click the Theme icon. You can change the entire theme (colors, icons, borders, and so on) for your desktop. The Bluecurve theme is the default theme used by Red Hat Linux. Try any of the others to find one that suits you. Click Theme Details to mix-and-match attributes from different themes. Figure 3-4 shows the window for selecting a theme.
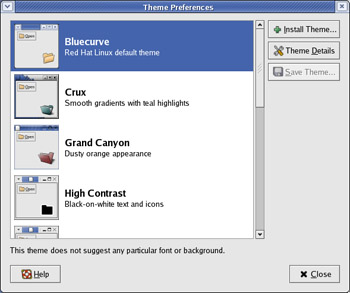
Figure 3-4: Change from the default Bluecurve theme.
Step 3: Configure your panel
Most people manage their desktops from the panel that appears at the bottom of the screen. This panel provides a natural way to:
-
Launch applications
-
Change workspaces
-
Add useful information (clocks, news tickers, CD players, and so on)
Step through the following procedure to learn about the Red Hat (GNOME) panel:
-
Red Hat Menu — Click the red hat in the panel. Most useful GUI applications and system tools that come with Red Hat Linux are available from the menus and submenus of this main Red Hat menu. Here are a few cool things to do from this menu:
-
Start an application — Click Accessories, Games, Graphics, Internet, Office, or Sound & Video menu items, then select any application to run.
-
Change your settings — Click the Preferences menu item to change preferences or the System Settings or System Tools menu items to change system-wide settings.
-
Log out or shutdown — Click the Logout menu item to log out from your current desktop session, shut down, or reboot your computer.
-
-
Launch applications — Red Hat places icons for popular desktop applications right on the panel. Click any of the icons shown in Figure 3-5 to launch a Web browser (Mozilla), e-mail reader (Evolution), word processor (OpenOffice Writer), presentation creator (OpenOffice Impress), spreadsheet (OpenOffice Calc), or print manager, respectively.

Figure 3-5: Launch popular desktop applications with one click. -
Use workspaces — Click different panels in the Workspace Switcher. Open an application, then click on another workspace panel. Workspaces are a great way to have multiple windows and still keep your desktop uncluttered. Notice that there are tiny representations of each window you open on the workspace panel it is in. Drag and drop the tiny windows to move them to different workspaces, without leaving your workspace.
-
Add cool stuff to your panel — Click on an empty place in the panel so that a panel menu appears. It should say "Add to Panel" at the top. Because real estate is limited on your panel, I recommend adding a drawer, to which you can add some little applications that run in the panel and icons that launch other applications. To begin, click Add to Panel ? Drawer. A Drawer icon appears on your panel (you can drag it where you want it to go. Right-click the drawer, then click Add to Panel. Here are a few things I suggest adding to your panel:
-
Terminal — From the drawer menu, click Add to Panel ?Launcher from menu ? System Tools ? Terminal. Now, when I ask you to type something into a Terminal window, you can launch one from this drawer.
Note? Throughout this book, I give examples that require you to use a Terminal window. Neither the new KDE nor GNOME desktops have a Terminal window launcher on the panel or desktop. I strongly suggest that you add a Terminal window to your desktop or panel in order to launch it easily.
-
Weather report — From the drawer menu, click Add to Panel ?Accessories ? Weather Report. Right-click on the temperature icon that appears and choose Preferences. Click the Location tab and select your country, state, and city from the list. Now, whenever you double-click the temperature icon in your drawer, you can see weather conditions and a forecast for your city.
-
Volume control — From the drawer menu, click Add to Panel ? Multimedia ? Volume Control. The volume control that appears lets you control audio levels to your sound card (when you play a CD, for example).
-
Popular folder or Web site — Folders or Web sites that you visit often should be easily accessible. Click Add to Panel ? Launcher. From the Create Launcher window, select Link (as the Type) and type a URL or Application, and then type nautilus folder (where folder is replaced by the folder you want to open). Click Icon and choose an icon to represent the item. For example, when I write a book, I have a folder containing chapter files. To add a launcher for that file, I select Application from Launcher Properties (nautilus /home/chris/rhlbible). Then I assign an icon (an image of the book cover) to the launcher. Figure 3-6 shows an example of a drawer, with the launchers I just described added to it.
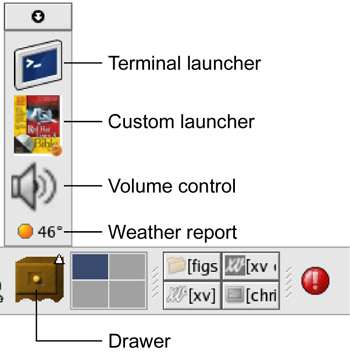
Figure 3-6: A drawer is a great way to contain personal utilities and launchers.
-
You can do much more with the desktop and the panel. To learn more about configuring your desktop, you can check out the specific descriptions of the GNOME and KDE desktops later in this chapter.
Tips for configuring your desktop
Now that you have experimented with a few things on the desktop, you should configure certain features to get Red Hat Linux really working well for you. Most of the tips I describe here will help you get Red Hat Linux working well on the network.
| Note? |
Some of the tips described here should be carried out by the system administrator. They apply to you if you are the system administrator for your organization, or if you are configuring your own home or office network. |
-
Register with Red Hat Network — If you see a blinking red exclamation point icon, it means that updates are available to your Red Hat Linux system. I strongly recommend that you register with Red Hat Network to get notifications of updates and perhaps have those updates automatically installed. These updates can patch dangerous security holes in a timely fashion. At the time of this printing, Red Hat was offering a $60/year subscription plan that I would recommend for anyone who has a Red Hat Linux computer connected all the time to a public network (such as the Internet). It is a small price to pay for piece of mind.
Cross-Reference? Refer to Chapters 2 and 10 for more information on Red Hat Network and the up2date facility.
-
Set up your network — You may have already configured your network interfaces (dial-up or LAN) during installation. If not, refer to Chapter 15 for setting up a LAN and Chapter 16 for setting up an Internet connection.
-
Configure e-mail — You must identify information about your e-mail account in order to use e-mail. Click the Evolution E-mail icon in the panel to start the process of configuring e-mail. Refer to Chapter 9 for information on setting up and using e-mail.
-
Configure the Web browser — Open the Mozilla Web Browser from the panel. Although it should work fine at browsing the Internet once you have a network connection set up, there are a few things you should do to tune your browser. These include choosing a home page (click Edit ? Preferences, then type a home page location); setting the browser window's appearance (from the Preferences window, click Appearance and select a topic); and importing bookmarks (click Bookmarks ? Manage Bookmarks, then select Tools ? Import from the Bookmark Manager window).
Note? If you are coming from a Windows environment, you may find that some Web content doesn't work well in Mozilla. Refer to Chapter 9 for suggestions on ways to enhance Mozilla to change the appearance of some Web pages and improve the ability to play certain multi-media content.
The sections that follow provide more details on using the GNOME and KDE desktops.


