Configuring a Virtual Private Network Connection
Configuring a Virtual Private Network Connection
Sometimes the people and offices that have to work closely together are not physically close together. For example, you may have:
-
Two branch offices that need to constantly share sales databases, or
-
An employee who needs to access office computers, printers, and files from home.
Rather than purchase expensive leased lines from a phone company, you want to use an inexpensive network medium, like the Internet, to let the two sides communicate. The problem is that you don't want to open up access to file sharing, print sharing, and other private services to the Internet. You also don't want communication between these sites to be exposed to anyone who is watching Internet traffic. One solution is to set up a virtual private network.
A virtual private network (VPN) provides a way to set up secure communications over an otherwise insecure network. With a VPN connection in place, the two sides of a connection can communicate as safely as they do on the same corporate LAN. To do this, a VPN usually offers the following features:
-
Authentication — Using passwords or other techniques, two ends of a communication can prove that they are who they say they are before accepting a connection. Once the connection is in place, communications can flow in both directions across it.
-
Encryption — By encrypting all data being sent between the two points on the public network, you can be assured that even if someone could see the packets you send, they couldn't read them. This technique is known as tunneling.
There are several ways of going about setting up VPN connections in Linux:
-
Internet Protocol SECurity (IPSEC) — IPSEC is a standard developed by the Internet Engineering Task Force (IETF) as the required method of encryption when the IP version 6 becomes the standard Internet protocol (right now IPV4 is the standard). There are several software packages available today for Linux that implement IPSEC over IPV4. IPSEC includes powerful encryption tools, but is a bit harder so set up in Red Hat Linux than some other methods. If you are interested in IPSEC for your VPN, check out the FreeS/WAN project (www.freeswan.org).
-
PPP over OpenSSH — With this method, using software that is already in Red Hat Linux, you can configure a PPP interface (as you would a regular dial-up connection) to use SSH to encrypt all data that goes across the PPP interface. While this method is not too difficult to configure, it can provide poor performance. To see how to create a PPP over OpenSSH VPN, refer to the VPN PPP-SSH HOW-TO (search www.tldp.org).
-
Crypto IP Encapsulation (CIPE) — Using this method, IP packets are routed across selected IP interfaces as encrypted UDP packets. CIPE is easy to set up and carries less overhead than PPP over OpenSSH, so you should get better performance. One drawback is that, because it is not a standard VPN, CIPE is not available on all platforms.
In this chapter, I describe how to set up a VPN using CIPE. For us, it's a good choice because an easy CIPE interface is included on the Red Hat Network Configuration window and it's tuned to perform well between Linux systems. There is also a CIPE-Win32 project, which is a port of CIPE for Windows NT and 2000 (http://cipe-win32.sourceforge.net).
Understanding CIPE
The job of CIPE is to set up a secure link between two communications end points. Using CIPE, the link can be authenticated and the data can be encrypted.
Compared to VPN protocols such as IPSEC, CIPE is fairly easy to set up. Both sides of the link (such as computers at two branch offices) have to have public network connections (probably public Internet addresses), be running CIPE, and use the same link key. The link key, which is known only to the two link ends, is used to authenticate the connection and encrypt the data between the two sites. You can create this key during CIPE setup. Both sides of the link need that same key for CIPE to work.
CIPE passes data between its two end points using the UDP protocol. Because CIPE is a network layer protocol, data from any application programs that communicate over that link are encrypted. This makes is safe from anyone on the public network that might be trying to intercept your communications.
When you set up a CIPE link, you identify the IP addresses and port numbers used for the communication. To allow CIPE to work properly, you need to open your firewalls to allow the ports you select to accept UDP traffic. To allow multiple CIPE connections to the same computer, you can configure separate CIPE interfaces, each using different UDP port numbers.
Setting up a CIPE VPN
For our example, two computers, each running the current version of Red Hat Linux, are configured at two locations, each with a connection to the Internet. We start with the following assumptions:
-
Each of the two computers has a connection to the Internet, with at least one of the two having a static IP address.
-
Both computers are running the current Red Hat Linux. (Although this is not required, because you need only the cipe package for the connection to work, I am using the Red Hat Linux GUI in the procedure to configure the connection.)
-
Although the two sides of a CIPE connection are referred to as peers, Peer 1 of the CIPE connection operates in server mode while Peer 2 acts as a client to initiate the CIPE connection.
-
Peer 1 will create the CIPE key and transmit that key (securely) to Peer 2 before Peer 2 begins configuring its CIPE configuration.
Figure 16-2 illustrates a simple example of a CIPE VPN that connects Linux computers between two offices over the Internet.
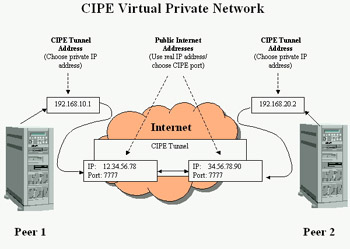
Figure 16-2: A CIPE VPN is configured between two Linux systems over the Internet.
Configuring CIPE Peer 1
To begin, you can use the Network Configuration window (neat command) to create the CIPE configuration. Here's how:
-
Open the Network Configuration window by clicking System Settings ? Network (or type neat& from a Terminal window).
-
Click New to add a new network interface.
-
Click CIPE (VPN) connection and click Forward.
-
Add the following information to the Configure Tunnel window and click Forward when you are done:
-
Device — The name of the CIPE interface on the local computer. The default, which is fine for your first CIPE interface, is cipcb0. (If you intend to have multiple CIPE connections to this computer, they are named cipcb1, cipcb2, and so on.)
-
Tunnel Through Device — This is the name of the IP interface through which the CIPE connection is made. Click the down arrow to see which interfaces are available (eth0, ppp0, and so on). You can either choose a particular interface or simply leave "None - Server Mode" selected. This allows CIPE connections on any interface on which a request comes in for the "Local Port" set in the next field.
-
Local Port — This defines the port number on which CIPE listens for connection requests from the remote CIPE clients. The default is 7777, but you can use any unused port number (as long as the CIPE client knows which one to ask for).
-
Remote Peer Address — As a CIPE server, this can be set to Server Mode (auto). The remote client address is determined at the time the remote client tries to set up the CIPE connection.
-
Remote Peer Port — As with "Remote Peer Address," the Remote Peer Port can be determined when the remote client tries to set up the CIPE connection.
-
Remote Virtual Address — This is where you set the remote IP address for the CIPE client that is connecting to you on the virtual network you are creating. Choose IP addresses from private network addresses that you haven't used for any of your other local networks. These are the IP addresses used by your CIPE tunnel.
-
Local Virtual Address — This is the local IP address for the virtual network connection you are setting up for your CIPE server. It cannot be the same IP address as the address representing your regular connection to the Internet (in other words, the IP address of your eth0 or ppp0 connection).
-
Secret Key — Type a string of characters as your secret key or click the Generate button to generate a secret key. This exact key must also be used on the remote computer that connects to you to create the VPN. A 128-bit key is used.
Notice that the box at the bottom of the screen contains the setting you will use to configure the remote side of your CIPE connection. Write down these settings or copy and paste them into a file for later reference.
-
-
Click Forward. The screen asks you to review and accept the CIPE connection you created.
-
Click Apply. You are now back to the main Network Configuration window.
-
Click Apply to apply your new CIPE interface.
-
With the new CIPE interface selected, click Activate to start the CIPE interface.
Note? If you want to start the CIPE interface at boot time, select the interface and click Edit. From the window that appears, click "Activate device when computer starts" and click OK. Then click Apply again from the main Network Configuration window to save the changes.
-
Click Close to close the Network Configuration window.
At this point, the new CIPE interface (probably cipeb0) should be in place. The following is an example of the /etc/sysconfig/network-scripts/ifcfg-cipcb0 file containing settings for the interface you just created:
TYPE=CIPE
DEVICE=cipcb0
ONBOOT=yes
IPADDR=192.168.20.2
MYPORT=7777
ME=34.56.78.90:7777
PTPADDR=192.168.10.1
PEER=12.34.57.78:7777
The settings above show that the connection type is CIPE and the interface name is cipcb0. The interface is started at boot time (ONBOOT=yes). The IP addresses for the CIPE tunnel you create are 192.168.20.2 (on your side) and 192.168.10.1 (on the remote side). Notice that these are private IP addresses representing different networks (192.168.20 and 192.168.10). (Don't use public IP addresses for IPADDR or PTADDR!)
The PEER value indicates that the remote peer will connect to you from IP address 12.34.56.78 on port number 7777. The ME value identifies the IP address of your real connection to the Internet. Replace 12.34.56.78 and 34.56.78.90 with the real, public IP address of the remote peer and your local computer, respectively! The port numbers can be any unused UDP ports you choose. They don't have to be the same (though they are here), but each side does need to know which ports the other side is using.
Although once the other side is up, you should be able to ping each other across the connection, to make the connection useful, you may need to do some additional work:
-
Turn on IP forwarding. If you want the remote CIPE to forward requests to other interfaces on your computer (permanently), add this to the /etc/sysctl.conf file:
net.ipv4.ip_forward = 1
To have IP forwarding take effect immediately, type the following as root user:
# echo 1 > /proc/sys/net/ipv4
-
Open your firewall for CIPE. At the very least, you need to allow the remote CIPE peer to connect to your UDP port. In our case, we need to open port 7777 on your external LAN interface (for our example, we used 34.56.78.90, although yours will be different).
-
Add routes. Edit the /etc/cipe/ip-up script to include the routes to connect the subnetworks on each side of the connection. For our example, I added the following route so that I could address any computer on the remote LAN (192.168.10.0) from my local CIPE connection:
route add -net 192.168.10.0 netmask 255.255.255.0 gw $5
-
Other ciped options. You can add options to the /etc/cipe/options.cipcb0 file to pass to the ciped-cb daemon. To see available options, type info cipe. Then scroll down and select Parameter List to see a list of all parameters you can set for the daemon. (The options.cipcb0 file is where the link key is stored, so to use a new key you can change it here. Be sure to keep it protected from access by anyone but root!)
Tip? If you want to create multiple VPNs to the same public IP address, you can create multiple CIPE interfaces and assign each one to a different UDP port number.
Configuring CIPE Peer 2
Repeat the configuration you did for Peer 1 on Peer 2. Much of the information, however, will be reversed. Here's an example of /etc/sysconfig/network-scripts/ifcfg-cipcb0 on Peer 2:
TYPE=CIPE
DEVICE=cipcb0
ONBOOT=yes
IPADDR=192.168.10.1
MYPORT=7777
ME=12.34.57.78:7777
PTPADDR=192.168.20.2
PEER=34.56.78.90:7777
Again, be sure to replace the values of ME and PTPADDR with real IP addresses for your locations. The same issues also apply to changing IP forwarding, opening your firewall, adding routes, and adding other ciped options. Remember, you have basically just set up a tunnel between two computers on the Internet. What the packets that cross that interface can do once they arrive at the remote computer is up to you.
Checking your CIPE VPN
If you set your CIPE interfaces to boot automatically, they will be started the next time you reboot the computer. (Or, start them now by typing /etc/init.d/network restart.) If your connections to the Internet are up on both sides, the CIPE tunnel should start and connect across your Internet interfaces.
To check that the CIPE tunnel is active, simply use the ping command. For example, in our sample you could type from Peer 1 to Peer 2:
# ping 192.168.20.1
If the ping is successful, you can use the ethereal window to check that the tunnel is actually working properly. For example, if your tunnel were communicating over the eth0 interface on Peer 1, capturing packets on that interface with ethereal while you were pinging the remote CIPE would result in lines that look like the following:
34.56.78.90   12.34.56.78  UDP Source port: 7777 Destination port: 7777
12.34.56.78   34.56.78.90  UDP Source port: 7777 Destination port: 7777
Because the ping requests are encrypted, all you see traveling across the interface are UDP packets between ports 7777 on the two IP addresses representing the Internet interfaces being used by the CIPE tunnel.
If you need to communicate across the peer to another computer, make sure that you have set the routes up to do that. In particular, if you are creating a CIPE connection over a PPP dial-up connection directly to your company, and are routing from there to the Internet, make sure that the remote CIPE computer knows to route data back to your CIPE interface.


