Learning about Administrative GUI Tools, Commands, Configuration Files, and Log Files
Learning about Administrative GUI Tools, Commands, Configuration Files, and Log Files
Red Hat Linux has advanced enough in recent releases that you can now do most system administration from your desktop GUI, bypassing the shell altogether. Whether you administer Red Hat Linux from the GUI or from a shell, however, underlying your activities are many administrative commands, configuration files, and log files.
There may be times when an X GUI is running on Red Hat Linux as a non-root user and you want to run a graphical administration program. In most cases, the GUI administration program will simply prompt you for the root password to continue. However, if the program fails, saying that you don't have permission to run the command, here is what you can do:
First, open a Terminal window on the X desktop.
Then, open permission to the X window display to everyone on the local computer (this is just a temporary measure) by typing:
$ xhost +localhost
Type the following and enter the root password when prompted, to become super user:
$ su -
Password: ******
#
Next, type the following to see the current display value:
# echo $DISPLAY
If the value is something like :0 or :0.0, any X command you run from that shell will appear on the console terminal for the computer. If you are at the console and that's what you see, then you can skip the next step. If you see no value (which is quite possible) or the wrong value, you must set the DISPLAY variable.
Type the following (assuming you are using a bash or sh shell):
# export DISPLAY=:0
At this point, you can run any administrative X command (such as neat or redhat-config-packages) and have it appear on your X desktop. If you are running an administrative command from a remote computer and you want it to appear on your local desktop, you can set the DISPLAY to host:0, where host is replaced by the name of your computer.
When you are done, be sure to exit the application you are running. Then restore the security of your X desktop by typing the following:
$ xhost –
Understanding where GUI tools, commands, and files are located and how they are used will help you effectively maintain your Red Hat Linux system. Although most administrative features are intended for the root user, other administrative users (described later in this section) have limited administrative capabilities.
Using Red Hat graphical administration tools
The trend over the past few versions of Red Hat Linux has been to steer clear of the massive administrative interfaces (such as linuxconf and Webmin) and instead to offer graphical windows that perform individual administrative tasks. Instead of sharing one monolithic interface, they share common menus. Individual graphical windows for configuring a network, adding users, or setting up printers can be launched from that menu.
To administer your Red Hat Linux system through the GNOME or KDE desktops, Red Hat has provided a common menu (Red Hat calls it the Main Menu; I refer to it as the Red Hat menu). In GNOME click the red hat; in KDE, click the K icon in the lower-left corner of the desktop.
Because these administrative tasks require root permission, if you are logged in as a regular user you must enter the root password before the GUI application's window opens. For example, if you launch the System Logs window (System Tools ? System Logs) from the GNOME menu as a regular user, you see the pop-up window shown in Figure 10-1.
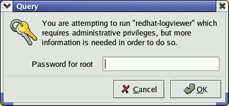
Figure 10-1: Enter the root password to open system administration windows from a regular user's GUI.
After you have entered the root password, most of the Red Hat configuration tools will open without requiring you to retype the password during this login session. Look for a "keys" icon in the lower right corner of the panel, indicating that you have root authorization. Click the keys to open a pop-up window that lets you remove authorization. Otherwise, authorization goes away when you close the GUI window.
| Note? |
As you configure different features on your Red Hat Linux system, you are asked to launch different individual graphical windows. In general, if you have a choice of tools for configuring a server or adding a feature, I recommend that you use the tool provided by Red Hat. That's because the Red Hat GUI tools more often integrate closely with the way Red Hat stores and manages its configuration information. |
The following list describes many of the GUI-based windows you can use to administer your Red Hat Linux system. Start these windows from the Server Settings or System Tools submenus on your Red Hat menu:
-
Server Settings — This submenu accesses the following server configuration windows:
-
Domain Name Service — Create and configure zones if your computer is acting as a DNS server.
-
HTTP— Configure your computer as an Apache Web server.
-
NFS— Set up directories from your system to be shared with other computers on your network using the NFS service.
-
Samba— Configure Windows (SMB) file sharing. (To configure other Samba features, you can use the SWAT window. From the Red Hat menu, click System Settings? Server Settings ? More Server Settings ? Samba Configuration.)
-
Services — Lets you display and change which services are running on your Red Hat Linux system at different run levels.
-
-
Add/Remove Applications — Manage software packages in the Red Hat distribution.
-
Authentication — Lets you change how users are authenticated on your system. Usually, Shadow Passwords and MD5 Passwords are selected. However, if your network supports LDAP, Kerberos, SMB, NIS, or Hesiod authentication, you can select to use any of those authentication types.
-
Date & Time — Lets you set the date and time or choose to have an NTP server keep system time in sync. Figure 10-2 shows the Date/Time Properties window.
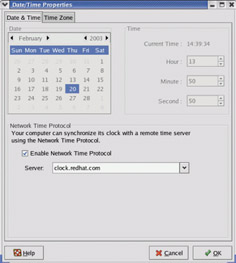
Figure 10-2: Choose an NTP server or set date and time on the Date/Time Properties window. -
Disk Management — Mount and format removable media, such as CDs and floppy disks.
-
Display — Change the settings for your X desktop, including color depth and resolution for your display. You can also choose settings for your video card and monitor.
-
Hardware Browser — View information about your computer's hardware.
-
Internet Configuration Wizard — Create initial configurations for connecting to the Internet via Ethernet, ISDN, modem, and other types of network equipment.
-
Keyboard — Choose the type of keyboard you are using, based on language.
-
Kickstart — Lets you create a Kickstart configuration file that can be used to install multiple Red Hat Linux systems without user intervention.
-
Login Screen — Control how your login screen appears and behaves.
-
Mouse — Configure your mouse.
-
Network — Lets you manage your current network interfaces, as well as add interfaces.
-
Network Device Control — Display the active profile for network devices.
-
Printing Manager — Lets you configure local and network printers.
-
Red Hat Network — Lets you register your computer with the Red Hat Network to get free software updates.
-
Root Password — Change the root password.
-
Security Level — Configure your firewall to allow or deny services to computers from the network.
-
Soundcard Detection — Tries to detect and configure your sound card.
-
System Logs — Displays system log files and lets you search them for keywords. Figure 10-3 shows the Boot Log being displayed in the System Logs window.
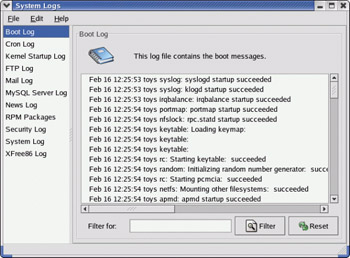
Figure 10-3: Show log files of activities from system boot, FTP, mail, news, and other services. -
System Monitor — Shows information about running processes and resource usage.
-
Task Scheduler — Schedules tasks to be run at set times.
-
Users & Groups — Lets you add, display, and change user and group accounts for your Red Hat Linux system.
Procedures for using the various Red Hat graphical administrative tools are distributed throughout the book.
Administrative commands
Many commands are intended only for root. When you log in as root, your $PATH variable is set to include some directories that contain commands for the root user. These include the following directories:
-
/sbin — This contains commands for modifying your disk partitions (such as fdisk), changing boot procedures (grub), and changing system states (init).
-
/usr/sbin — This contains commands for managing user accounts (such as useradd) and configuring your mouse (mouseconfig) or system services (chkconfig). Commands that run as daemon processes are also contained in this directory. (Look for commands that end in "d" such as sshd, pppd, and crond.)
Some administrative commands are contained in regular user directories (such as /bin and /usr/bin). This is especially true of commands that have some options available to everyone. An example is the /bin/mount command, which anyone can use to list mounted file systems, but only root can use to mount file systems.
To find commands that are intended primarily for the system administrator, check out the section 8 manual pages (usually in /usr/share/man/man8). They contain descriptions and options for most Red Hat Linux administrative commands.
Some third-party applications will add administrative commands to directories that are not in your PATH. For example, an application may put commands in /usr/local/bin, /opt/bin, or /usr/local/sbin. In those cases, you may want to add those directories to your PATH.
Administrative configuration files
Configuration files are another mainstay of Linux administration. Almost everything you set up for your particular computer — user accounts, network addresses, or GUI preferences — is stored in plain-text files. This has some advantages and some disadvantages.
The advantage of plain-text files is that it is easy to read and change them. Any text editor will do. On the downside, however, is that as you edit configuration files, no error checking is going on. You have to run the program that reads these files (such as a network daemon or the X desktop) to find out if you set up the files correctly. A comma or a quote in the wrong place can sometimes cause a whole interface to fail.
Throughout this book, I describe the configuration files you need to set up the different features that make up Red Hat Linux. In terms of a general perspective on configuration files, however, there are several locations in the Red Hat Linux file system where configuration files are stored. Here are some of the major locations:
-
$HOME — All users store information in their home directories that directs how their login accounts behave. Most configuration files in $HOME begin with a dot (.), so they don't appear as a user's directory when you use a standard ls command (you need to type ls -a to see them). There are dot files that define how each user's shell behaves, the desktop look and feel , and options used with your text editor. There are even files (such as .ssh/* and .rhosts) that configure network permissions for each user.
-
/etc — This directory contains most of the basic Linux system-configuration files. The following /etc configuration files are of interest:
-
adjtime — Holds to data to adjust the hardware clock (see the hwclock man page).
-
aliases — Can contain distribution lists used by the Linux mail service.
-
bashrc — Sets system-wide defaults for bash shell users. (By default, it sets the shell prompt to include current user name, host name, current directory, and other values.)
-
cdrecord.conf — Contains defaults used for recording CDs.
-
crontab — Sets cron environment and times for running automated tasks.
-
csh.cshrc (or cshrc) — Sets system-wide defaults for csh (C shell) users.
-
exports — Contains a list of local directories that are available to be shared by remote computers using the Network File System (NFS).
-
fdprm — Sets parameters for common floppy disk formats.
-
fstab — Identifies the devices for common storage media (hard disk, floppy, CD-ROM, etc.) and locations where they are mounted in the Linux system. This is used by the mount command to choose which file systems to mount.
-
group — Identifies group names and group IDs (GIDs) that are defined on the systems. Group permissions in Red Hat Linux are defined by the second of three sets of rwx (read, write, execute) bits associated with each file and directory.
-
gshadow — Contains shadow passwords for groups.
-
host.conf — Sets the locations in which domain names (e.g., redhat.com) are searched for on TCP/IP networks (such as the Internet). By default, the local hosts file is searched, then any nameserver entries in resolv.conf.
-
hosts — Contains IP addresses and host names that you can reach from your computer. (Usually this file is used just to store names of computers on your LAN or small private network.)
-
hosts.allow — Lists host computers that are allowed to use certain TCP/IP services from the local computer.
-
hosts.deny — Lists host computers that are not allowed to use certain TCP/IP services from the local computer (doesn't exist by default).
-
inittab — Contains information that defines which programs start and stop when Red Hat Linux boots, shuts down, or goes into different states in between. This is the most basic configuration file for starting Linux.
-
issue — Contains the lines that are displayed when a terminal is ready to let you log in to Red Hat Linux from a local terminal, or the console in text mode.
-
issue.net — Contains login lines that are displayed to users that try to log in to the Linux system from a computer on the network using the telnet service.
-
lilo.conf — Sets Linux boot loader (lilo) parameters to boot the computer. In particular, it lists information about bootable partitions on your computer. (If you are using grub, which replaced lilo as the default boot manager, the lilo.conf.anaconda file is available. You can copy that file to lilo.conf to switch to LILO.)
-
mail.rc — Sets system-wide parameters associated with using mail.
-
man.config — Used by the man command to determine the default path to the location of man pages.
-
modules.conf — Contains aliases and options related to loadable kernel modules used by your computer.
-
mtab — Contains a list of file systems that are currently mounted.
-
mtools.conf — Contains settings used by DOS tools in Linux.
-
named.conf — Contains DNS settings if you are running your own DNS server.
-
ntp.conf — Includes information needed to run the Network Time Protocol (NTP).
-
passwd — Stores account information for all valid users for the system. Also includes other information, such as the home directory and default shell.
-
printcap — Contains definitions for the printers configured for your computer.
-
profile — Sets system-wide environment and start-up programs for all users. This file is read when the user logs in.
-
protocols — Sets protocol numbers and names for a variety of Internet services.
-
redhat-release — Contains a string identifying the current Red Hat release.
-
resolv.conf — Identifies the locations of DNS name server computers that are used by TCP/IP to translate Internet host.domain names into IP addresses.
-
rpc — Defines remote procedure call names and numbers.
-
services — Defines TCP/IP services and their port assignments.
-
shadow — Contains encrypted passwords for users that are defined in the passwd file. (This is viewed as a more secure way to store passwords than the original encrypted password in the passwd file. The passwd file needs to be publicly readable, whereas the shadow file can be unreadable by all but the root user.)
-
shells — Lists the shell command-line interpreters (bash, sh, csh, etc.) that are available on the system, as well as their locations.
-
sudoers — Sets commands that can be run by users, who may not otherwise have permission to run the command, using the sudo command. In particular, this file is used to provide selected users with root permission.
-
syslog.conf — Defines what logging messages are gathered by the syslogd daemon and what files they are stored in. (Typically, log messages are stored in files contained in the /var/log directory.)
-
termcap — Lists definitions for character terminals, so that character-based applications know what features are supported by a given terminal. Graphical terminals and applications have made this file obsolete to most people. (Termcap was the BSD UNIX way of storing terminal information; UNIX System V used definitions in /usr/share/terminfo files.)
-
xinetd.conf — Contains simple configuration information used by the xinetd daemon process. This file mostly points to the /etc/xinetd.d directory for information about individual services (described later).
-
-
/etc/X11 — Contains subdirectories that each contain system-wide configuration files used by X and different X window managers available with Red Hat Linux. The XF86Config file (which makes your computer and monitor usable with X) and configuration directories containing files used by xdm and xinit to start X are in here.
Directories relating to window managers contain files that include the default values that a user will get if that user starts one of these window managers on your system. Window managers that may have system-wide configuration files in these directories include GNOME (gdm) and Twm (twm).
Note? Some files and directories in /etc/X11 are linked to locations in the /usr/X11R6 directory.
-
/etc/alternatives — Contains links that the alternatives facility uses to enable a system administrator to exchange one service with another in a way that is invisible to users. (Currently, only mail and printing use the alternatives service.)
-
/etc/amanda — Contains files and directories that allow the amanda facility to do network backups of other Linux and UNIX systems.
-
/etc/cipe — Holds if-up and if-down scripts to start a CIPE virtual private network.
-
/etc/cron* — Directories in this set contain files that define how the crond utility runs applications on a daily (cron.daily), hourly (cron.hourly), monthly (cron.monthly), or weekly (cron.weekly) schedule.
-
/etc/cups — Contains files that are used to configure the CUPS printing service.
-
/etc/default — Contains files that set default values for various utilities. For example, the file for the useradd command defines the default group number, home directory, password expiration date, shell, and skeleton directory (/etc/skel) that are used when creating a new user account.
-
/etc/httpd — Contains a variety of files used to configure the behavior of your Apache Web server (specifically, the httpd daemon process).
-
/etc/init.d — Contains the permanent copies of run-level scripts. These scripts are linked to files in the /etc/rc?.d directories to have each service associated with a script started or stopped for the particular run level. The ? is replaced by the run-level number (0 through 6).
-
/etc/mail — Contains files used to configure your sendmail mail service.
-
/etc/pcmcia — Contains configuration files that allow you to have a variety of PCMCIA cards configured for your computer. (PCMCIA slots are those openings on your laptop that allow you to have credit-card-sized cards attached to your computer. You can attach such devices as modems and external CD-ROMs.)
-
/etc/postfix — Contains configuration files for the postfix mail transport agent.
-
/etc/ppp — Contains several configuration files used to set up Point-to-Point protocol (so that you can have your computer dial out to the Internet).
-
/etc/rc?.d — There is a separate rc?.d directory for each valid system state: rc0.d (shutdown state), rc1.d (single-user state), rc2.d (multiuser state), rc3.d (multiuser plus networking state), rc4.d (user-defined state), rc5.d (multiuser, networking, plus GUI login state), and rc6.d (reboot state).
-
/etc/security — Contains files that set a variety of default security conditions for your computer. These files are part of the pam (pluggable authentication modules) package.
-
/etc/skel — Any files contained in this directory are automatically copied to a user's home directory when that user is added to the system. By default, most of these files are dot (.) files, such as .kde (a directory for setting KDE desktop defaults) and .bashrc (for setting default values used with the bash shell).
-
/etc/squid — Contains configuration files for the Squid proxy caching server.
-
/etc/sysconfig — Contains important system configuration files that are created and maintained by various Red Hat applications (including iptables, samba, and most networking services).
-
/etc/uucp — Contains configuration files used with Taylor UUCP (a nonstandard version of the uucp facility that is used to create modem, direct line, and other serial connections with other computers).
-
/etc/xinetd.d — Contains a set of files, each of which defines a network service that the xinetd daemon listens for on a particular port. When the xinetd daemon process receives a request for a service, it uses the information in these files to determine which daemon processes to start to handle the request.
Administrative log files
One of the things that Linux does well is keep track of itself. This is a good thing, when you consider how much can go wrong with a complex operating system. Sometimes you are trying to get a new facility to work and it fails without giving you the foggiest reason why. Other times you want to monitor your system to see if people are trying to access your computer illegally. In any of those cases, you can use log files to help track down the problem.
The main utilities for logging error and debugging messages for Linux are the syslogd and klogd daemons. General system logging is done by syslogd. Logging that is specific to kernel activity is done by klogd. Logging is done according to information in the /etc/syslog.conf file. Messages are typically directed to log files that are usually in the /var/log directory.
Red Hat Linux includes a System Logs window (System Tools? System Logs) you can use to view and search system log files from the desktop. See Chapter 14 for a description of that window and of the log files you can view with it.
Using other administrative logins
You don't hear much about other administrative logins (besides root) being used with Red Hat Linux. It was a fairly common practice in UNIX systems to have several different administrative logins that allowed administrative tasks to be split among several users. For example, a person sitting near a printer could have lp permissions to move print jobs to another printer if they knew a printer wasn't working.
In any case, these administrative logins are available with Linux, so you may want to look into using them. At the very least, because individual software packages such as bind, squid, and amanda set up permissions for their log files and configuration files based on their administrative logins, maintaining those permissions can prevent someone who hacks into one of those services from gaining control of the whole computer.
| Tip? |
Because most Red Hat Linux administrative features are expected to be administered by the root user, e-mail for other administrative accounts is routed to the root user. If you want other administrative users to receive their own e-mail, delete the aliases for those users from the /etc/aliases file. |
Understanding administrative logins
Here are some of the administrative logins that are configured automatically for Linux systems. By tradition, these logins are assigned UID numbers under 100. Here are examples:
| Tip? |
Most administrative logins have no passwords by default. They also typically have /sbin/nologin assigned as their shell, so if you try to login as one of these users, you see a "This account is currently not available" message. That's why you can't use an administrative login separately until you assign it a password and shell (such as /bin/bash): |
-
lp — This user can control some printing features. Having a separate lp administrator allows someone other than the super user to do such things as move or remove lp logs and print spool files. The home directory for lp is /var/spool/lpd.
-
mail — This user can work with administrative e-mail features. The mail group has group permissions to use mail files in /var/spool/mail (which is also the mail user's home directory).
-
uucp — This user owns various uucp commands (once used as the primary method for dial-up serial communications). It is the owner of log files in /var/log/uucp, spool files in /var/spool, administrative commands (such as uuchk, uucico, uuconv, and uuxqt) in /usr/sbin, and user commands (uucp, cu, uuname, uustat, and uux) in /usr/bin. The home directory for uucp is /var/spool/uucp.
-
bin — This user owns many commands in /bin in traditional UNIX systems. This is not the case in Red Hat Linux, because root tends to own most executable files. The home directory of bin is /bin.
-
news — This user could do administration of Internet news services, depending on how you set permission for /var/spool/news and other news-related resources. The home directory for news is /var/spool/news.
Using sudo for assigning administrative privilege
One way to give full or limited root privileges to any non-root user is to set up the sudo facility. That simply entails adding the user to /etc/sudoers and defining what privilege you want that user to have. Then the user can run any command he or she is privileged to use by preceding that command with the sudo command.
The following is an example of how to use the sudo facility to cause any users that are added to the wheel group to have full root privileges:
-
As the root user, edit the /etc/sudoers file by running the visudo command:
# visudo
By default, the file is opened in vi, unless your EDITOR variable happens to be set to some other editor acceptable to visudo (for example, export EDITOR=gedit) The reason for using visudo is that the command will lock the /etc/sudoers file and do some basic sanity-checking of the file to ensure it was edited correctly.
Note? If you are stuck here, refer to the vi tutorial in Chapter 4 for information on using the vi editor.
-
Uncomment the following line to allow users in the group named wheel to have full root privileges on the computer:
%wheel ALL=(ALL) ALL
The previous line causes the user to be prompted for a password to be allowed to use administrative commands. To allow users in the wheel group to have that privilege without using a password, uncomment the following line instead:
%wheel ALL=(ALL) NOPASSWD: ALL
-
Save the changes to the /etc/sudoers file (in vi, type ZZ).
-
Still as root user, open the /etc/group file in any text editor and add the users you want to have root privilege to the wheel line. For example, if you were to add the users mary and jake to the wheel group, the line would appear as follows:
wheel:x:10:root,mary,jake
At this point, the users mary and jake can run the sudo command to run commands, or parts of commands, that are normally restricted to the root user. The following is an example of a session by the user jake after he has been assigned sudo privileges:
[jake]$ sudo umount /mnt/win
???
We trust you have received the usual lecture from the local System
Administrator. It usually boils down to these two things:

        #1) Respect the privacy of others.
        #2) Think before you type.

Password: *********
[jake]$ mount /mnt/win
mount: only root can mount /dev/hda1 on /mnt/win
[jake]$ sudo mount /mnt/win
[jake]$
In the above session, the user jake runs the sudo command so he can unmount the /mnt/win file system (using the umount command). He is given a warning and asked to provide his password (this is jake's password, not the root password).
Notice that even after jake has given the password, he must still use the sudo command to run the command as root (the first mount fails, but the second succeeds). Notice that he was not prompted for a password for the second sudo. That's because after entering his password successfully he can enter as many sudo commands as he wants for the next five minutes without having to enter it again. (You can change the timeout value from five minutes to however long you want by setting the passwd_timeout value in the /etc/sudoers file.)
The preceding example grants a simple all-or-nothing administrative privilege to everyone you put in the wheel group. However, the /etc/sudoers file gives you an incredible amount of flexibility in permitting individual users and groups to use individual applications or groups of applications. I recommend you refer to the sudoers and sudo man pages for information about how to tune your sudo facility.


