Recording Music CDs
Recording Music CDs
Writable CD-ROM drives are fast becoming a standard device on computers. Where once you had to settle for a floppy disk (1.44MB) or a Zip disk (100MB) to store personal data, a CD-ROM burner lets you store more than 600MB of data in a format that can be exchanged with most computers. On top of that, you can create CD music disks!
Both graphical and command-line tools exist for creating CDs in Red Hat Linux. The cdrecord command lets you create audio and data CDs from the command line. Using cdrecord you can write to CD-Recordable (CD-R) and CD-Rewritable (CD-RW) drives. The cdrecord command is described in the next section of this chapter.
Configuring an IDE CD-ROM for recording
If you are using a SCSI drive, you are probably ready to begin recording; CD recording tools in Linux should recognize and be able to use your drive automatically. If you are using an IDE-based drive, however, you may have some work to do.
In most cases, your IDE writable CD drive should be recognized and properly configured when you install Red Hat Linux. The following boot option should automatically appear as an option at the end of the kernel line on your bootloader screen:
hdc=ide-scsi
This shows that IDE disk device "c"(hdc) is set up to do SCSI emulation. If this is working properly, you should be able to type the following to see if the CD drive appears on the list of accessible SCSI devices.
$ cdrecord --scanbus
If your IDE writable CD drive is not working, check that the following basic steps are done: 1) have SCSI emulation built into the kernel; 2) remove the IDE-CD module; and 3) add the IDE-SCSI module. By default, SCSI emulation should be built into your kernel, so unless you remove it, there's nothing you have to do there. Here's how you do the other two steps:
-
To remove the ide-cd module, as root user add the following line to the /etc/modules.conf file (using any text editor).
options ide-cd ignore=hdc
-
In this example, the writable CD-ROM device is located at /dev/hdc. Replace hdc with the location of your CD device. If you are not sure, type dmesg | grep ^hd to see a list of IDE disks on your computer.
-
Restart your computer.
-
To add the ide-scsi module, type the following command:
# modprobe -a ide-scsi
-
To make sure Linux can recognize your CD writer, type the following command:
# cdrecord -scanbus
Cdrecord 1.10 (i686-pc-linux-gnu) Copyright (C) 1995-2001
    J?rg Schilling
Linux sg driver version: 3.1.24
Using libscg version 'schily-0.5'
scsibus0:
    0,0,0   0) 'IDE-CD' 'R/RW 4x4x24 ''1.04' Removable CD-ROM
    0,1,0   1) 'SONY ''CD-ROM CDU701 ''1.0f' Removable CD-ROM
    0,2,0   2) *
    0,3,0   3) *
    0,4,0   4) *
    0,5,0   5) *
    0,6,0   6) *
    0,7,0   7) *
Here you can see that cdrecord has detected two CD drives on SCSI bus 0. A writable CD drive is at 0,0,0 and a read-only CD is located at 0,1,0. You need to remember these numbers later when you use cdrecord to create a CD. Until your CD burners show up on this list, cdrecord cannot write to them.
-
After you have added your CD writer as a SCSI device, it may no longer be available to the CD players described in this chapter. By default, those players play the /dev/cdrom device, which in this case points to an IDE drive. To fix that, type the following as root user:
# cd /dev
# rm cdrom
# ln -s scd0 cdrom
-
If you have two CD drives, repeat this step, replacing cdrom with cdrom1, and scd0 with scd1.
Creating an audio CD with cdrecord
You can use the cdrecord command to create either data or music CDs. You can create a data CD by setting up a separate file system and copying the whole image of that file system to CD. Creating an audio CD consists of selecting the audio tracks you want to copy and copying them all at once to the CD.
This section focuses on using cdrecord to create audio CDs. The cdrecord command can use audio files in .au, .wav, or .cdr format, automatically translating them when necessary. If you have audio files in other formats, you can convert them to one of the supported formats by using the sox command (described previously in this chapter).
| Cross-Reference? |
See Chapter 13 for how to use cdrecord to create data CDs. |
One way to create an audio CD is to copy the music tracks you want to a directory; then copy them to the writable CD. To extract the tracks, you can use the cdda2wav command. Then you write them to CD by using the cdrecord command. Here's an example:
-
Create a directory to hold the audio files, and change to that directory. Make sure the directory can hold up to 660MB of data (or less if you are burning fewer songs). For example:
# mkdir /tmp/cd
# cd /tmp/cd
-
Insert the music CD into your CD-ROM drive. (If a CD player opens on the desktop, close it.)
-
Extract the music tracks you want by using the cdda2wav command. For example:
# cdda2wav -D /dev/cdrom -B
This example reads all of the music tracks from the CD-ROM drive located at SCSI device number 0,0,0. The -B option says to output each track to a separate file. By default, the cdda2wav command outputs the files to WAV audio format.
Instead of extracting all songs, you can choose a single track or a range of tracks to extract. For example, to extract tracks 3 through 5, add the -t3+5 option. To extract just track 9, add -t9+9. To extract track 7 through the end of the CD, add -t7.
Note? If you have a low quality CD drive or an imperfect CD, cdda2wav might not be the best ripping tool. Instead of cdda2wav, you could use cdparanoia -B to extract songs from the CD to hard disk.
-
When cdda2wav is done, insert a blank CD into your writable CD drive.
-
Use the cdrecord command to write the music tracks to the CD. For example:
# cdrecord -v dev=0,0,0 -audio *.wav
The options to cdrecord tell the command to create an audio CD (-audio) on the writable CD device located on 0,0,0. The cdrecord command writes all files from the current directory that end in .wav. The -v option causes verbose output.
If you want to change the order of the tracks, you can type their names in the order you want them written (instead of using *.wav). If your CD writer supports higher speeds, you can use the speed option to double (speed=2) or to quadruple (speed=4) the writing speed.
Once you have created the music CD, indicate the contents of the CD on the front of the CD. The CD should now be ready to play on any standard music CD player.
Ripping CDs with Grip
The Grip window provides a more graphical method of copying music from CDs to hard disk. You can then play the songs directly from your hard disk or burn them back on to a blank CD. Besides just ripping music, you can also compress each song as you extract it from the CD.
You can open Grip from the Red Hat menu by selecting Sound & Video ? More Sound & Video Applications ? Grip (or by typing grip from a Terminal window). Figure 8-9 shows an example of the Grip window.

Figure 8-9: Rip and play songs from the Grip window.
To rip audio tracks from a CD with grip, do the following:
-
With the Grip window open, insert a music CD into your CD drive. If you have an active connection to the Internet and the CD is known to the CD database, then title, artist, and track information appear for the CD.
-
Right-click on each track that you want to rip ( that is, copy to your hard disk). A check mark appears under the Rip column for the song.
-
Click the Config tab at the top of the page, then select Encode.
-
You can select the type of encoder used to compress the music by clicking the Encoder box and selecting an encoder (by default, oggenc compresses files in Ogg Vorbis).
-
Click the Rip tab at the top of the page. The Rip tab appears.
-
Click one of the following:
-
Rip+Encode — This rips the selected songs and (if you did the step above) compresses them in Ogg Vorbis format. You need an Ogg Vorbis player to play the songs after they have been ripped in this format (there are many Ogg Vorbis players for Linux).
-
Rip only — This rips the selected songs in WAV format. You can use a standard CD player to play these songs. (When I tried this, the same song ripped in WAV was twelve times larger than the Ogg Vorbis file.)
Songs are copied to the hard disk in the format you selected. By default, the files are copied into a subdirectory of $HOME/ogg (such as /home/jake/ogg). The subdirectory is named for the artist and CD. For example, if the user jake were ripping the song called High Life by the artist Mumbo, the directory containing ripped songs would be /home/jake/ogg/mumbo/high_life. Each song file would be named for the song (for example, fly_fly_fly.wav).
-
At this point you can play any of the files using a player that can play WAV or Ogg files, such as xmms. Or you can copy the files back to the CD using cdrecord. Because the filenames are the song names, they don't appear in the same order as they appear on the CD. So if you want to copy them back to a writable CD in the same order where they originally appeared, you may have to type each filename on the cdrecord command line. For example:
# cdrecord -v dev=0,0,0 -audio fly_fly.wav big_news.wav about_time.wav
The Grip window can also be used to play CDs. Use the buttons on the bottom of the display to play/pause, skip ahead/back, stop, and eject the CD. The Toggle track display button lets you shrink the size of the display so it doesn't take up much space on the desktop. Click Toggle disc editor to see and change title, artist, and track information.
Creating CD labels with cdlabelgen
The cdlabelgen command can be used to create tray cards and front cards to fit in CD jewel cases. You gather information about the CD and cdlabelgen produces a PostScript output file that you can send to the printer. The cdlabelgen package also comes with graphics (in /usr/share/cdlabelgen) that you can incorporate into your labels.
Here is an example of a cdlabelgen command line that you can use to generate a CD label file in PostScript format. (Type it all on one line or use backslashes, as shown here, to put it on multiple lines.)
cdlabelgen -c "Grunge is Gone" -s "Yep HipHop" \
-i "If You Feed Me%Sockin Years%City Road%Platinum and Copper%Fly Fly \
Fly%Best Man Spins%What A Headache%Stayin Put Feelin%Dreams Do Go \
Blue%Us%Mildest Schemes" -o yep.ps
In this example, the title of the CD is indicated by -c "Grunge is Gone" and the artist by the -s "Yep HipHop" option. The tracks are entered after the -i option, with each line separated by a % sign. The output file is sent to the file yep.ps with the -o option. To view and print the results, you can use the gv command as follows:
$ gv yep.ps
The results of this example are shown in Figure 8-10.
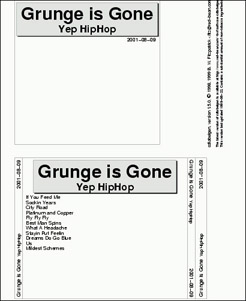
Figure 8-10: Generate CD jewel case labels with cdlabelgen and print them with gv.
You will probably want to edit the command and re-run gv a few times to get the CD label correct. When you are ready to print the label (assuming you have a printer configured for your computer), click Print All to print the label.


