Working with CUPS Printing
Working with CUPS Printing
The Printer configuration window effectively hides the underlying CUPS facility. There may be times, however, when you want to work directly with the tools and configuration files that come with CUPS. The following sections describe how to use some special CUPS features.
Using Web-based CUPS administration
Although the preferred way to configure CUPS printing in Red Hat Linux is with the Printer configuration window, CUPS offers its own Web-based administrative tool. CUPS listens on port 631 to provide access to the CUPS Web-based administrative interface. On the local computer, type the following into your Web browser's location box:
http://localhost:631/admin
You will be prompted for a valid login name and password. Type the root login name and the root user's password. A screen similar to the one shown in Figure 17-2 appears:

Figure 17-2: CUPS enables Web-based administration via port 631.
By default, Web-based CUPS administration is only available from the localhost. To access Web-based CUPS administration from another computer, you must change the /admin section in the /etc/cups/cupsd.conf file. As recommended in the text of this file, you should limit access to CUPS administration from the Web. In the following example, I added an Allow line to allow access from a host from IP address 10.0.0.5 (you must also change the Listen 127.0.0.1:631 line to listen outside of your local host, as described a bit later).
<Location /admin>
AuthType Basic
AuthClass System
Order Deny, Allow
Deny from All
Allow From 127.0.0.1
Allow From 10.0.0.5
</Location>
From the computer at address 10.0.0.5, I typed the same line shown above in my Web browser (substituting the CUPS server's name or IP address for localhost). When prompted, I entered the root user name and password.
Although Red Hat doesn't recommend adding or modifying printers through this interface, you can safely:
-
List print jobs — Click Jobs to see what print jobs are currently active from any of the printers configured for this server. Click Show Completed Jobs to see information about jobs that are already printed.
-
Create a printer class — Click Classes; then click Add Class and identify a name and location for a printer class. Click Continue. Then, from the list of printers configured on your server, select which ones will go into this class.
-
View printers — Without changing printer configurations, you can click Printers and view the printers you have configured. For each printer that appears, you can click Stop Printer (to stop the printer from printing, but still accept print jobs for the queue), Reject Jobs (to not accept any further print jobs for the moment), or Print Test Page (to print a page). Figure 17-3 shows the Printers page.
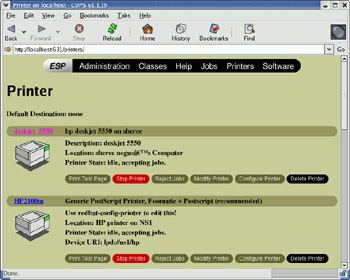
Figure 17-3: Temporarily stop printing or print test pages from the Printers page.
Configuring the CUPS server (cupsd.conf)
The cupsd daemon process listens for requests to your CUPS print server and responds to those requests based on settings in the /etc/cups/cupsd.conf file. The configuration variables in cupsd.conf file are in the same form as those of the Apache configuration file (httpd.conf).
The Printer configuration window adds access information to the cupsd.conf file. You can step through the cupsd.conf file to further tune your CUPS server. Here are a few suggestions:
Classification topsecret
With the classification set to topsecret, you can have Top Secret displayed on all pages that go through the print server. Other classifications you can substitute for "topsecret" include: classified, confidential, secret, and unclassified.
ServerCertificate /etc/cups/ssl/server.crt
ServerKey /etc/cups/ssl/server.key
The ServerCertificate and ServerKey lines can be set up to indicate where the certificate and key are stored, respectively. Activate these two lines if you want to do encrypted connections. Then add your certificate and key to the files noted.
Browsing On
BrowseProtocols cups
BrowseAddress 255.255.255.255
Listen 127.0.0.1:631
Browsing is the feature whereby you broadcast information about your printer on your local network and listen for other print servers' information. Browsing is on by default. Browsing information is also broadcast, by default, on address 255.255.255.255. You can allow or deny incoming CUPS browser information (BrowseAllow and BrowseDeny) for selected addresses. All incoming browser information is allowed, by default.
To allow Web-based CUPS administration, the cupsd daemon listens on port 631 of the local host (127.0.0.1). To allow anyone to access this service from your network (if he or she has the proper login and password), you can change the Listen line shown previously to Listen *:631.
BrowseRelay source-address destination-address
With BrowseRelay on, you can allow CUPS to browse information to be passed among two or more networks. This is a good way to allow users on several connected LANs to discover and use printers on other nearby LANs.
You can allow or deny access to different features of the CUPS server. An access definition for a CUPS printer (created from the Printer configuration window) might appear as follows:
<Location /printers/ns1-hp1>
Order Deny,Allow
Deny From All
Allow From 127.0.0.1
AuthType None
</Location>
Here, printing to the ns1-hp1 printer is only allowed for users on the local host (127.0.0.1). No password is needed (AuthType None). To allow access to the administration tool requires the CUPS be configured to prompt for a password (AuthType Basic).
If you change any of the settings in the cupsd.conf file, you must restart the CUPS service to have the changes take effect. As root user, type chkconfig cupsd restart.
Configuring CUPS printer options
When a new printer is created from the Printer configuration window, that printer is defined in the /etc/cups/printers.conf file. Here is an example of a printer definition in printers.conf:
</Printer hp>
<DefaultPrinter printer>
Info Created by redhat-config-printer 0.6.x
DeviceURI parallel:/dev/lp0
Location HP LaserJet 2100M in hall closet
State Idle
Accepting Yes
JobSheets none none
QuotaPeriod 0
PageLimit 0
KLimit 0
</Printer>
This is an example of a local printer that serves as the default printer for the local system. The most interesting information relates to the DeviceURI, which shows us that the printer is connected to parallel port /dev/lp0. The State is Idle (ready to accept printer jobs) and the Accepting value is Yes (the printer is accepting print jobs by default).
The Device URI has several ways to identify the device name of a printer, reflecting where the printer is connected. Here are some examples listed in the printers.conf file:
DeviceURI parallel:/dev/plp
DeviceURI serial:/dev/ttyd1?baud=38400+size=8+parity=none+flow=soft
DeviceURI scsi:/dev/scsi/sc1d6l0
DeviceURI socket://hostname:port
DeviceURI tftp://hostname/path
DeviceURI ftp://hostname/path
DeviceURI http://hostname[:port]/path
DeviceURI ipp://hostname/path
DeviceURI smb://hostname/printer
The first three examples show the form for local printers (parallel, serial, and scsi). The other examples are for remote hosts. In each case, hostname can be the host's name or IP address. Port numbers or paths identify the locations of each printer on the host.
| Tip? |
If you find that you are not able to print because a particular printer driver is not supported in CUPS, you can set up your printer to accept jobs in raw mode. This can work well if you are printing from WIndows clients that have the correct print drivers installed on those clients. To allow raw printing in CUPS, uncomment the following line from the /etc/cups/mime.types file in Red Hat Linux: application/octet-stream And uncomment the following line from the /etc/cups/mime.convs file: application/octet-stream application/vnd.cups-raw 0 - After that, you can print files as raw data to your printers without using the -oraw option to print commands. |


