Setting Up a Wireless LAN
Setting Up a Wireless LAN
Sometimes it's not convenient to run wires to all the computers on your network. Pulling Ethernet cables through existing walls can be a pain. Dragging wires into your garden so you can sit in a lounge chair and surf the Internet can ruin the ambiance. In many cases, a wireless LAN is an economical solution.
Although you can use wireless LAN cards with other computer systems, you may want to use Linux systems for one or more nodes in your wireless network. For example, the features in Linux can eliminate the need to buy other types of equipment. Some additional features that make Linux a valuable asset on a wireless LAN include:
-
Internet access — You don't need a separate router or gateway machine to attach your wireless LAN to the Internet. Having wired and wireless Ethernet LAN cards on a Linux system enables your wireless clients to access the Internet through your Linux system.
-
Firewall — Owing to some inherent security weaknesses with wireless encryption protocols, you may want to add an extra measure of security to your network by configuring firewalls. With a Red Hat Linux firewall (ipchains or iptables) at the boundaries between your wireless LAN and your larger network, you still have a measure of protection for your larger network if someone cracks your wireless LAN.
-
Monitoring and logging — All the tools you use for monitoring and logging activity on your wired networks in Red Hat Linux are also available for your wireless network.
This chapter describes how to use wireless LAN equipment on computers running Red Hat Linux to create a wireless Ethernet LAN. It focuses on configuring two Red Hat Linux systems for wireless communication; however, once you configure these nodes, you can add Windows, Linux, or other types of systems to your wireless LAN by installing compatible wireless cards on each system.
Understanding wireless networks
Wireless LANs are most appropriate in environments where wires are impractical. Despite some challenges such as security and interference, a wireless LAN provides these advantages:
-
You don't have to run wires in places that are hard to reach. In many cases, a single wireless LAN can extend your network throughout a building or to another building without the need for wires between each node.
-
For the price of a wireless card, you can save the expense of wires, hubs (the air is your hub), and wall repairs (to fix the holes from pulling wires through).
-
You can freely move computers around within the transmission range that your environment allows (distances being limited by such variables as antenna power, obstacles, and rates of transmission).
Although several different wireless networking standards exist, this chapter focuses on the installation of relatively low-cost, standard IEEE 802.11b wireless-networking equipment. An 802.11b wireless network uses space in the spectrum available to the public (in other words, you use space in the air for which no special license is required). The 802.11b standard is often referred to as the Wi-Fi, or Wireless Fidelity, standard.
| Note? |
If you are interested in exploring 802.11a or 802.11g wireless LAN cards, I recommend you check out the MADWIFI project (http://sourceforge.net/projects/madwifi). The project is developing Linux drivers for wireless LAN cards (802.11a/b/g) that contain Atheros chip sets. |
An 802.11b network is characterized by the following:
-
It provides transmission rates of up to 11 Mbps. Transmission rates can also be set (or auto-detected) to 5.5, 2, and 1 Mbps.
-
It uses the 2.4 GHz band of the spectrum. Microwave ovens and some high-end mobile phones also use this band. (Check local regulations if you are setting up an 802.11b network outside the United States.) To reduce congestion, 14 separate channels have been made available within the 2.4 GHz range.
-
It allows transmission over distances as short as a desktop away to as long as several miles away (using special antennas). Greater distances can be gained at lower transmission speeds.
-
Makes connections between multiple clients or clients and a base station (usually referred to as an access point). On the clients, the wireless LAN cards run in Ad-hoc mode, while the base station uses Managed mode.
Note? The Orinoco card, as well as other wireless-network cards supported in Linux, cannot act as an access point because it does not do bridging. Bridging allows a node to receive a frame from one node and forward it to another node without changing the first node's MAC address. (The MAC address uniquely identifies a network card.) A wireless LAN card in Linux, however, can communicate with an access point by running in Managed mode and indicating the MAC address of the access point.
Other 802.11 standards exist (such as 802.11a, which can operate at higher speeds), but for the most part wireless-equipment manufacturers have rallied around the 802.11b standard. Wireless cards and other equipment certified Wi-Fi (802.11b)–compatible by the Wireless Ethernet Compatibility Alliance (WECA) should be able to communicate with each other.
| Cross-Reference? |
To see a complete list of Wi-Fi–certified products, visit the WECA Web site (www.wirelessethernet.org, then click Certified Products). Although these products should be able to communicate with each other, they do not all have drivers that lets them work in Linux. |
After your wireless network has been configured, you can use the wireless connections as you would a regular wired Ethernet connection. For example, you can configure TCP/IP on top of your wireless network so that it acts as a gateway to your network's Internet connection. If you are using Linux as a wireless network client as well, you can take full advantage of firewall, masquerading, network proxy, or other networking features to protect and make full use of your wireless network.
Choosing wireless hardware
To get started with a wireless Linux LAN, you need at least two computers and two wireless LAN cards. The wireless LAN cards described in this chapter are PCMCIA-type cards that you insert into those credit-card–sized slots on laptop computers. If ISA or PCI slots alone are available on your computers, you will need to add an adapter card. You may also want (or need) to add indoor or outdoor antennas to your wireless network.
Selecting wireless cards
Not all wireless LAN cards that you can purchase today will work with Linux. When you select a card, make sure that a Linux driver has been created for the card. You will also want to look for several other features:
-
Card type — Most wireless LAN cards are in PCMCIA (PC-card) form. To use these cards in desktop computers you will probably need an ISA or PCI adapter card.
-
Cost — If you shop around, you can find wireless LAN cards that cost between $29 and $100 (and the prices will probably have gone down by the time you read this). More expensive cards may include external antennas or better encryption (128-bit as opposed to 64-bit).
-
External connector — Different wireless LAN cards have different types of connectors, which can lock you into buying antennas from the manufacturer of the LAN card if you are communicating outside of a small area. People who know such things tell me that it is possible to take apart the cards and hack together your own antenna. However, because I don't want to be responsible for wrecking your card, and because there are legal issues related to antenna usage, I don't recommend this.
-
Configurability — If you really want to fine-tune your wireless LAN, find out how much control you have over configuring a card before you choose it. Descriptions of the iwconfig command later in this chapter will help you understand which wireless extensions you can manipulate. Refer to man pages for individual wireless-card drivers (for example, type man wvlan_cs), for information on specific parameters that you can change.
I chose to use Orinoco wireless PC cards from Proxim Corporation to illustrate how to set up a wireless Linux LAN. Although other wireless cards are supported in Linux, Orinoco cards seem to have particularly good Linux drivers, and many people have reported success using them. The cards are also relatively inexpensive (about $60 to $90 at the time of this writing). Before Proxim acquired the Orinoco line from Agere Systems, Orinoco cards were referred to as WaveLAN cards and were produced by Lucent Technologies (as well as AT&T and NCR).
Other wireless cards supported in Red Hat Linux are listed in the PCMCIA Card Configuration Database file (/etc/pcmcia/config). Table 15-1 shows the wireless-network adapters listed in this file, along with the module required by each.
| Note? |
Just because you don't see your wireless card listed in Table 15-1 doesn't mean that it won't work. The same technology is often referred to by different names. Rather than try to keep track of all the various acquisitions and name-changes in the wireless industry, I refer you to the Linux Wireless LAN HOWTO (http://www.hpl.hp.com/personal/Jean_Tourrilhes/Linux). The Drivers section provides more insight into which drivers work with which cards. |
|
Wireless Network Adapter |
Module |
|---|---|
|
350 Series Wireless LAN Adapter (Cisco Systems) |
airo_cs |
|
Aironet PC4500 (Cisco Systems) |
airo_cs |
|
Aironet PC4800 (Cisco Systems) |
airo_cs |
|
AT&T WaveLAN Adapter |
wavelan_cs |
|
Cabletron RoamAbout 802.11 DS |
wvlan_cs |
|
Compaq WL100 11 Mbps Wireless Adapter |
orinoco_cs |
|
Digital RoamAbout/DS |
wavelan_cs |
|
ELSA AirLancer MC-11 |
wvlan_cs |
|
Lucent Technologies WaveLAN Adapter |
wavelan_cs |
|
Intersil PRISM2 11 Mbps Wireless Adapter |
wvlan_cs |
|
Lucent Technologies WaveLAN/IEEE Adapter |
orinoco_cs |
|
MELCO WLI-PCM-L11 |
orinoco_cs |
|
MELCO WLI-PCM-L11G |
orinoco_cs |
|
NCR WaveLAN Adapter |
wavelan_cs |
|
NCR WaveLAN/IEEE Adapter |
wvlan_cs |
|
Orinoco PC Cards |
orinoco_cs |
|
PLANEX GeoWave/GW-CF110 |
orinoco_cs |
|
RayLink PC Card WLAN Adapter |
ray_cs |
|
Xircom CreditCard Netwave |
netwave_cs |
|
ZCOMAX AirRunner/XI-300 |
orinoco_cs |
The Orinoco PC cards I purchased use the orinoco_cs module. The cards come in two types: Gold Label, which offers 128-bit WEP RC4 encryption, and Silver Label, which offers only 64-bit WEP RC4 encryption. The two cards differ in cost by about $10. Both cards:
-
offer compatibility with earlier WaveLAN/IEEE products.
-
can communicate with other 802.11b wireless LAN equipment that has been Wi-Fi–certified by WECA.
-
enable you to select transmission rates (11, 5.5, 2, or 1 Mbps), select channels (in the 2.4 GHz range), and use power-management features.
Because antennas are built into Orinoco PC cards, you may not need an additional antenna for indoor office environments. As with any wireless card, the distances you can achieve between your wireless nodes depend on transmission rate (lower speeds go farther), receiver sensitivity, and the amount and type of obstacles. At the maximum transmission rate (11 Mbps), the Orinoco card gives you an estimated range of between 80 feet (25 meters) in a closed area and 525 feet (160 meters) in an open area with no additional antenna.
Selecting adapter cards
If the computers on your wireless network are all laptops with PCMCIA slots, you only need to plug in your wireless cards to get started. However, if you are using a desktop computer with only ISA and PCI slots, you will also need an adapter card.
Before you purchase a wireless LAN card for your desktop computer, make sure that you can get a compatible adapter card. Proxim Corp. offers both ISA and PCI Orinoco adapter cards. If you have an ISA slot available, you should get an ISA adapter. The ISA card supports the following I/O addresses: 3E2-3E1 (default) and 3E2-3E3.
The PCI adapter works on computers that have the following features:
-
PCI 2.2 (or higher) BIOS support
-
PC99 compliance
-
PCI slots only
The PCI adapter will not work on some older computers that don't meet the BIOS specifications. To use the PCI adapter in Linux, you may have to perform additional configuration in the operating system.
| Note? |
Although using the Orinoco ISA and PCI adapters with a standard Type II PC is not specifically supported, many Type II PC cards (besides your wireless cards) will work in those adapters. |
Selecting antennas
If you are setting up your wireless LAN among several computers in close proximity to each other, you may not need an additional antenna. To deal with obstructions and longer distances, however, you can add indoor or outdoor antennas to your wireless hardware.
Again, because I have been discussing Orinoco wireless PC cards, I will illustrate different types of indoor and outdoor antennas that are compatible with those cards.
Using indoor antennas
The antennas that are built into wireless LAN cards often work well enough to enable communication among computers in an open area. Additional indoor antennas are useful if the direct line of sight between the wireless LAN cards is blocked. A computer may be locked in a storage closet or stuck under a desk. A pile of papers might inhibit transmission, or a sheet of metal might stop it dead. A small antenna that draws the transmission away from the card might be the answer to these problems.
While most wireless LAN cards don't require a completely unobstructed line of sight, an obstacle can certainly slow reception. To get around this problem, an antenna such as the Orinoco IEEE range-extender can plug directly into an Orinoco Gold or Silver wireless LAN card. A 1.5-meter extension cable can bring the signal out from behind a closed door or out on top of a desk. When you set up the antenna, it is recommended that it be:
-
placed in a central location.
-
mounted vertically.
-
located away from obstructions (metal surfaces in particular, and, to a lesser extent, solid objects such as concrete walls or stacks of papers).
Refer to the instructions that come with your antenna for specific guidelines regarding placing and mounting the antenna.
Using outdoor antennas
Choosing and setting up outdoor antennas for your wireless LAN can be more difficult and expensive than setting them up indoors. Once the outdoor antennas are in place, however, you can save money because you won't need multiple Internet access accounts (monthly fees, DSL/cable modems, and so on).
Although a complete description of the use of outside antennas with your wireless LAN is outside the scope of this chapter, here are some tips that will help you choose the best antennas for your wireless LAN.
-
Point-to-point versus multi-point — If you are creating a point-to-point link between two outdoor locations (for example, to share an Internet connection between two buildings), a directional antenna can help you achieve greater distance and transmission speeds. However, if your antenna is providing multi-point access for several other outdoor antennas or wireless clients (such as students working from laptops on the campus lawn), an omnidirectional antenna may be more appropriate.
-
Clearance — The clearer the line of sight between each outdoor antenna, the greater the distance and transmission speed you can achieve. Placing antennas at the highest possible points can prevent diminished performance caused by trees, cars, buildings, and other objects. The amount of distance between obstacles and the coverage area of your wireless transmission is referred to as the clearance factor, as shown in Figure 15-9.
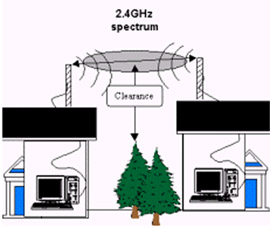
Figure 15-9: The distance of obstructive objects from the wireless signal is called the clearance. -
Distance — Although the actual distances over which antennas can send and receive data varies greatly based on different factors, you can achieve distances of many miles with outdoor antennas. For example, two Orinoco 24 dBi directional parabolic-grid antennas can theoretically achieve distances of up to 52 miles at an 11 Mbps transmission speed with a 180-meter clearance. Reduce that transmission rate to 1 Mbps and you can achieve distances of up to 149 miles with a 1200-meter clearance. Shorter distances are achieved with less expensive equipment, such as the Orinoco 14 dBi directional antenna which can achieve distances of up to 5.3 miles at 11 Mbps with a 13-meter clearance.
-
Cable factor — The distances that transmissions travel on the cables between the wireless cards and the antennas can be a factor in choosing the right antenna. The shorter the cables, the greater the distance and speed you will get on your antenna.
The power of an antenna is rated in terms of gain. Gain is measured in decibels, based on a theoretic isotropic radiator (or dBi). Higher gains offer opportunities for reaching greater distances at greater speeds. However, the ability of the antenna to focus that power (directional versus omnidirectional), greatly affects the speeds and distances that can be achieved.
Installing wireless Linux software
If you did a personal desktop or Everything installation of Red Hat Linux on your computer, the software packages you need to create your wireless LAN may already be installed. Drivers and modules needed to support PCMCIA cards and wireless cards should be in your system.
Besides the wireless drivers, the following software packages contain tools for configuring and working with your wireless LAN cards in Red Hat Linux:
-
kernel-pcmcia-cs — Contains commands and configuration files to support PCMCIA cards.
-
wireless-tools — Contains commands for setting extensions for your wireless LAN interface. Commands include iwconfig (for configuring your wireless interface) and iwlist (for listing wireless statistics).
Once you have established a wireless LAN interface, you can use a variety of Linux software to monitor and control access to that interface. You will need to install the appropriate software packages as well.
Configuring the wireless LAN
Before you begin testing the distances you can achieve with your wireless Linux LAN, I recommend that you configure wireless cards on two computers within a few feet of each other. Once the two computers are communicating, you can change wireless settings to tune the connection and begin experimenting with transmission distances.
The following sections describe the steps you need to take to set up a wireless LAN between two Linux systems. Although only two nodes are described, you can add more computers to your wireless LAN once you know how. This procedure describes how to operate your wireless Linux LAN in two different modes:
-
Ad hoc — All the computers in your wireless LAN are gathered into a single virtual network made up of only one cell. A single cell means that you cannot roam among different groups of wireless nodes and continue your communication invisibly. To do that requires a managed network.
-
Managed — As I noted earlier, many wireless cards supported in Linux cannot operate as access points. A Linux wireless card, however, can operate as a node in a managed network. The wireless-configuration tools that come with Red Hat Linux let you identify the access point for Linux to use by indicating the access point's MAC address.
Choosing equipment
Start with two computers. (You can add more computers later, once you understand how to get your wireless interfaces working.) For this procedure, I used computers that had the following characteristics (you can use different computers and cards, if you like):
-
Computers — One computer was a laptop with an available PCMCIA slot; the other was a desktop system with only PCI slots.
-
Wireless cards — As I mentioned earlier, I purchased two Proxim (Lucent Technologies) Orinoco wireless LAN cards: one Gold Label and one Silver Label. For the desktop computer, I purchased a PCI adapter card because it had no PCMCIA slot. Both cards come with built-in antennas, so I had no need for additional antennas while setting up the two computers (in the same room) for wireless communication.
Note? The only difference between the Gold and Silver Label cards is that the Gold card offers support for more secure encryption, so there was no reason for me to choose two different types of cards. If I had it to do over again, I would have used two Silver cards and saved a few dollars.
-
Red Hat Linux — I installed Red Hat Linux on both machines, selecting a personal desktop install for the laptop and an Everything install for the desktop computer. (The Everything install was not strictly necessary, but I wanted to be able to use the GUI and various server features.)
Because I was using the desktop computer as a gateway to the Internet, that computer also had a wired Ethernet card that was connected to my DSL modem to provide a route to the Internet for any computers on my wired or wireless networks.
Inserting wireless cards
To physically install the wireless cards, follow the directions that come with the cards. For my laptop, I simply inserted one Orinoco card into a PCMCIA slot. For the desktop computer, I powered down, inserted the PCI adapter into a vacant slot, powered up, and inserted the other Orinoco PCMCIA card into the adapter.
Loading the modules
The cardmgr daemon monitors the PCMCIA slots on computers that have them. If a card is recognized and listed in the PCMCIA database when the card is inserted, the appropriate module is loaded. You should also hear two beeps indicating that the card has been recognized.
On my laptop, my Orinoco wireless card was recognized and its modules loaded. On my desktop computer (with the PCI adapter), the card was not recognized, so I had to do some extra configuration.
PCMCIA only
To see what modules are loaded after a card is inserted on a computer that has only PCMCIA slots, type the lsmod command (as root user). In my case, because the Orinoco card uses the orinoco and orinoco_cs modules (along with the hermes helper module), output from the lsmod command included the following lines:
# lsmod
Module            Size Used by      Not tainted
orinoco_cs        5640  1
orinoco          34368  0  [orinoco_cs]
hermes            5344  0  [orinoco_cs orinoco]
ds                8608  1  [orinoco_cs]
yenta_socket     12384  1
pcmcia_core      50752  0  [orinoco_cs ds yenta_socket]
You can see that the orinoco_cs module was loaded and that the referring modules included the orinoco module, the hermes module, the ds (PC Card Driver Services) module, and the pcmcia_core module. If you are using a different card, you may instead see one of the following modules: airo_cs, wavelan_cs, wvlan_cs, ray_cs, or netwave_cs.
PCMCIA with adapter card
If your computer has only ISA or PCI slots, you will need an adapter to use your PCMCIA wireless LAN card. Red Hat Linux detected my adapter card and added the following lines to the /etc/sysconfig/pcmcia file so that the PCI adapter card would be recognized and the PCMCIA service would start automatically at boot time:
PCMCIA=yes
PCIC=yenta_socket
The yenta_socket driver is a PCMCIA controller driver that includes the Yenta register specification. Yenta is used for CardBus bridges made by Cirrus Logic for a variety of manufacturers (Texas Instruments, IBM, Toshiba, and others). The Orinoco PCI adapter was detected as a device using the yenta_socket driver.
Figure 15-10 shows an example of an Orinoco Silver Card using a PCI adapter.
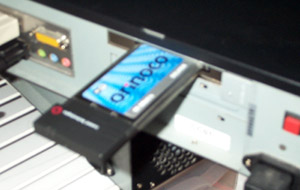
Figure 15-10: The Orinoco Silver wireless LAN card can be used with a PCI adapter (shown here).
Checking that the cards are working
If the modules have been loaded properly, the cardmgr should recognize each card and start up the Ethernet interface for it. To check that this has happened, restart the interface as follows:
# /etc/init.d/pcmcia restart
Shutting down PCMCIA services: cardmgr modules.
Starting PCMCIA services: modules cardmgr.
You should hear a single beep when the card service stops, then two beeps when the adapter and wireless card are properly detected. Check the /var/log/messages file. You should see some messages at or near the end of this file, describing what happened when the PCMCIA interface was shut down and restarted. If the card is detected, you should see modules loaded successfully and a network interface started for the wireless card. Here are some examples:
Feb  9 17:26:33 toys kernel: Linux Kernel Card Services 3.1.22
Feb  9 17:26:33 toys kernel:   options:  [pci] [cardbus] [pm]
Feb  9 17:26:33 toys kernel: PCI: Found IRQ 5 for device 01:09.0
Feb  9 17:26:33 toys kernel: PCI: Sharing IRQ 5 with 00:1f.3
Feb  9 17:26:33 toys kernel: Yenta IRQ list 0000, PCI irq5
Feb  9 17:26:33 toys kernel: Socket status: 10000011
Feb  9 17:26:34 toys cardmgr[2571]: starting, version is 3.1.31
         .
         .
         .
Feb  9 17:26:34 toys kernel: cs: IO port probe 0x0c00-0x0cff: clean.
Feb  9 17:26:34 toys kernel: cs: IO port probe 0x0100-0x04ff: excluding
0x400-0x47f 0x4d0-0x4d7
Feb  9 17:26:34 toys kernel: cs: IO port probe 0x0a00-0x0aff: clean.
Feb  9 17:26:34 toys kernel: cs: memory probe 0xa0000000-0xa0ffffff:
clean.
Feb  9 17:26:34 toys cardmgr[2571]: socket 0: Lucent Technologies
WaveLAN/IEEE Adapter
Feb  9 17:26:34 toys cardmgr[2571]: executing: 'modprobe hermes'
Feb  9 17:26:34 toys cardmgr[2571]: executing: 'modprobe orinoco'
Feb  9 17:26:34 toys cardmgr[2571]: executing: 'modprobe orinoco_cs'
Feb  9 17:26:34 toys cardmgr[2571]: executing: './network start eth1'
Feb  9 17:26:34 toys /etc/hotplug/net.agent: invoke ifup eth1
The preceding code shows that the kernel recognizes the PCI card (at IRQ 5). The cardmgr identifies the Orinoco card as a WaveLAN/IEEE adapter in socket 0. The network script starts an Ethernet interface (eth1).
If the wireless LAN interface started properly, you should be able to see the new interface by using the iwconfig command. The following is an example of output from the iwconfig command:
eth1   IEEE 802.11-DS  ESSID:""  Nickname:"HERMES I"
       Mode:Managed  Frequency:2.457GHz  Access Point: 00:00:00:00:00:00
       Bit Rate:11Mb/s   Tx-Power=15 dBm   Sensitivity:1/3
       Retry limit:4   RTS thr:off   Fragment thr:off
       Encryption key:off
       Power Management:off
If your wireless LAN interface does not appear to be working, refer to the section "Troubleshooting a wireless LAN" later in this chapter. If the interface does seem to be working, you are ready to tune your wireless LAN card interface and set up TCP/IP to be able to use the interface.
Configuring the wireless interface
The Network Configuration window (neat command) can be used to configure wireless Ethernet card interfaces, as well as regular wired Ethernet cards. The following procedure describes how to configure a wireless Ethernet card using the Network Configuration window.
-
Start the Network Configuration. From the Red Hat menu, click System Settings ? Network, or, as root user from a Terminal window, type neat. The Network Configuration window appears.
-
Click the New button. The Select Device Type window appears.
-
Click Wireless connection and Forward. The Select Wireless Device window appears.
-
Click your wireless card from the list of cards shown, and click Forward. The Configure Wireless Connection window appears, as shown in Figure 15-11.
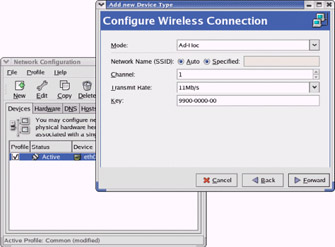
Figure 15-11: Add a wireless interface using the Network Configuration window. -
Add the following information and click Forward:
-
Mode — Indicates the mode of operation for the wireless LAN card. Because I am setting up a wireless LAN consisting of only one cell (in other words, with no roaming to cells set up in other areas), I could set the mode to Ad hoc. Ad hoc mode allows the card to communicate directly with each of its peers. You can use Managed mode if you have multiple cells, requiring your card to communicate directly to an access point. You can also use Managed mode for a point-to-point network, such as when you use the wireless LAN to extend a network from one building to another.
-
Network Name (SSID) — The network name (or Network ID) that identifies cells that are part of the same network. If you have a group of cells (which might include multiple nodes and repeaters among which a client could roam), this name can identify all of those cells as falling under one virtual network. Choose any name you like and then use that name for all computers in your virtual network. (SSID stands for Service Set ID.)
-
Channel — Choose a channel between 1 and 14. You can begin with channel 1; if you get interference on that channel, try changing to other channels.
-
Transmit Rate — Choose the rate of transmission from the following rates: 11M, 5.5M, 2M, 1M, or Auto. Choosing Auto allows the interface to automatically ramp down to lower speeds as needed. Lower speeds allow the interface to transmit over greater distances and deal with noisy channels.
-
Key — You need the same encryption key for all wireless LAN cards that are communicating with each other. It is critical to get this value right. This key is used to encrypt all data transmitted and decrypt all data received on the wireless interface. You can enter the number (up to 10 digits) as XXXXXXXXXX or XXXX-XXXX-XX (where each X is a number), for example, 1234-5678-90.
A Configure Network Settings window appears.
-
-
You can enter the following information:
-
Automatically obtain IP address settings with: If you want to get your IP address from a DHCP server, click this box and the rest of the information is obtained automatically. Otherwise, set the IP address statically using the other options.
-
Host name: If you are using DHCP, you can optionally add a host name to identify this network interface. If none is entered here, the output from the /bin/hostname command is used.
-
Statically set IP addresses: Click here to manually set your IP addresses.
-
Address: If you selected static IP addresses, type the IP address of this computer into the Address box. This number must be unique on your wireless network.
-
Subnet Mask: Enter the netmask to indicate what part of the IP address represents the network. (Netmask is described later in this chapter.)
-
Default Gateway Address: If a computer on your wireless LAN is providing routing to the Internet or other network, type the IP address of the computer here.
-
-
Click Forward to see a listing of the information you just entered.
-
Click Apply to complete the new wireless network interface.
-
Click File ? Save (on the main window) to save the interface.
This procedure creates an interface configuration file in your /etc/sysconfig/network-scripts directory. The name of the configuration file is ifcfg- followed by the interface name (such as eth0, eth1, and so on). So, if your wireless card is providing your only network interface, it would be called ifcfg-eth0.
Using any text editor, open the ifcfg-eth? file as root user. The following is an example of an ifcfg-eth1 file:
# Please read /usr/share/doc/initscripts-*/sysconfig.txt
# for the documentation of these parameters.
USERCTL=no
PEERDNS=no
GATEWAY=10.0.0.1
TYPE=Wireless
DEVICE=eth1
HWADDR=00:02:2d:2e:8c:a8
BOOTPROTO=none
NETMASK=255.255.255.0
ONBOOT=no
IPADDR=10.0.1.1
NAME=
DOMAIN=
ESSID=
CHANNEL=1
MODE=Ad-Hoc
KEY=9900-0000-00
RATE=11Mb/s
NETWORK=10.0.1.0
BROADCAST=10.0.1.255
In this example, the wireless card's hardware (MAC) address is automatically set to 00:02:2d:2e:8c:a8. (Your MAC address will be different.) The interface is not yet set to come up at boot time (ONBOOT=no). The interface device is eth1 (which matches the interface filename ifcfg-eth1), because this particular computer has another Ethernet card on the eth0 interface. The interface type is set to Wireless.
Other information in the file sets standard TCP/IP address information. The NETMASK is set to 255.255.255.0 and the IP address for the card is set to 10.0.1.1. The broadcast address is 10.0.1.255.
You can also set many options that are specific to your wireless network in this file. The following is a list of some additional options that you might want to set:
-
NWID — Identifies the name of this particular computer on the network. The computer's host name (determined from the uname -n command) is used by default if you don't set it with NWID.
-
FREQ — You can choose a particular frequency in which to transmit. No value is required, because selecting a channel implies a certain frequency. If you do enter a frequency, the value must be a number followed by a k (kilohertz), M (megahertz), or G (gigahertz). The default values for the channels you select range from 2.412G (channel 1) to 2.484G (channel 14), with other channels occurring at increments of .005G. The default is 2.422G.
-
SENS —You can select the sensitivity level of the access point. SENS can be set to 1 (low density), 2 (medium density), 3 (high density). The default is 1. The sensitivity threshold has an impact on roaming.
Caution? The encryption algorithm used with 802.11 networks is the Wired Equivalent Privacy (WEP) algorithm. Though using the encryption key is more secure than not using it, some experts feel that WEP has some inherent flaws that might allow a drive-by hacker to decrypt your wireless LAN traffic. For that reason, I strongly recommend using additional techniques to protect your wireless LANs, such as firewalls and diligent log-checking. See the "Wireless Security" sidebar for further information.
Besides those options just shown, you can also pass any valid options to the iwconfig command (which actually interprets these values), by adding an IWCONFIG option to the configuration file. Display the iwconfig man page (man iwconfig) to see all wireless options. Also view the /etc/sysconfig/network-scripts/ifup-wireless script to see how the options you just added are processed.
| Note? |
On the computer that is acting as a gateway from your wireless network to the Internet, you need to turn on IP packet forwarding. Change the value of net.ipv4.ip_forward to 1 in /etc/sysctl.conf. Open that file as the root user with a text editor and change the line as follows: |
net.ipv4.ip_forward = 1
Repeat this procedure for each wireless Red Hat Linux computer on your LAN. At this point, your wireless network should be ready to go. Restart your network, as described in the following steps, to make sure that it is working.
Activating the wireless interfaces
To immediately activate the wireless interface you just configured, click on the Wireless entry on the Network Configuration window and click the Activate button. After a few seconds, the Status should appear as Active.
To have the interface start when you reboot your computer, click the wireless interface from the Network Configuration window and select Edit. From the Wireless Device Configuration window that appears, click the box next to "Activate device when computer starts."
If you want to explicitly enter a Network Name (SSID), click the Wireless Settings tab on the Wireless Device Configuration window. From there, select Specified, type the network name (any name you choose to match others on your wireless network), and click OK.
Be sure to save your changes on the Network Configuration window by clicking File ? Save.
Checking your wireless connection
Your wireless LAN interface should be operating at this point. If another wireless computer is available on your wireless network, try communicating with it using the ping command and its IP address (as described in the " Can you reach another computer on the LAN?" section further in this chapter).
If you are not able to communicate with other wireless nodes or if transmission is slow, you may have more work to do. For example, if you see messages that say "Destination Host Unreachable," instead of the output shown earlier, refer to the section on "Troubleshooting a wireless LAN" for help. If you want to fine-tune your wireless interface, refer to the "Manually configuring wireless cards" section later in this chapter.
The Wireless Ethernet Compatibility Alliance (WECA) has recommended changes in response to security concerns about wireless networks. They did this because, unlike wired networks, which can often be physically protected within a building, wireless networks often extend beyond physical boundaries that can be protected.
The Wireless Equivalent Privacy (WEP) standard adds encryption to the 802.11 wireless standard. WECA refers to WEP as its way of providing "walls" that make wireless Ethernet as secure as wired Ethernet. However, you need to implement WEP, as well as other security methods that would apply to any computer network, in order to make your wireless network secure. Here are WECA's suggestions:
-
Change the default WEP encryption key on a regular basis (possibly weekly or even daily). This prevents casual drive-byhackers from reading your encrypted transmissions.
-
Use password protection on your drives and folders.
-
Change the default Network Name (SSID).
-
Use session keys, if available in your product (session keys are not supported in current Linux wireless drivers).
-
Use MAC address filtering (supported in a limited way in Linux).
-
Use a VPN (Virtual Private Network) system, which can add another layer of encryption beyond that which is available on your wireless network.
For larger organizations requiring greater security, WECA suggests such features as firewalls and user-verification schemes (such as Kerberos). As I mentioned earlier in this chapter, features for protecting from intrusions and restricting services are already built into Red Hat Linux. Refer to the descriptions of security tools in Chapters 14, 15, and 16 for methods of securing your network, its computers, and their services. In particular, you could consider adding a VPN such as CIPE (described in Chapter 16) to further secure all data sent on your wireless LAN.
Testing out distances
Although you may be thrilled to have a wireless LAN working between two computers, you will probably want these computers to be located some distance from each other to make the LAN useful. Getting your wireless LAN to work at the desired distances can be quite a challenge. See the section "Selecting antennas" earlier in this chapter for suggestions on selecting and using antennas to configure the type of wireless LAN you are interested in.
Setting wireless extensions
After the wireless module is loaded, you can change wireless extensions using the iwconfig command. The iwconfig command is the command that is actually used to set the options added to the ifcfg configuration script (for example, for the eth1 interface, the script would be /etc/sysconfig/network-scripts/eth1).
Some of the same options that you set when the module was loaded can be reset using the iwconfig command. The iwconfig command can be useful for testing different settings on an active wireless LAN. The syntax of the iwconfig command is as follows:
# iwconfig interface parameter value
The interface is the name of the wireless interface you want to change, such as eth1 or wvlan0. The parameter is the name of the option, and the value is replaced by its value. For example, to set your network name (ESSID) to Homelan, you could type the following as root user:
# iwconfig eth0 essid "Homelan"
Table 15-2 contains a list of available options for the iwconfig command. Refer to the "Configuring the Wireless Interface" section for further details on these options.
|
Option |
Description |
|---|---|
|
essid name |
Indicates the network name. |
|
ap address |
Indicates that the access point is at a particular MAC address. For low-quality connections, the client driver may return to trying to automatically detect the access point. This setting is only useful in Managed mode. |
|
channel # |
Picks the channel number to operate on. |
|
frag frag_size |
Sets the fragmentation threshold for splitting up packets before they are transmitted. |
|
freq 2.4??G |
Sets the frequency of the channel to communicate on. |
|
key xxxx-xxxx-xx |
Sets the key used for WEP encryption. |
|
mode option |
Sets the mode used for communications to Ad-hoc, Managed, Master, Repeater, Secondary, or Auto. |
|
nick name |
Sets the station name to define this particular computer. |
|
rate XXM |
Defines the transmission rate to use. |
|
rts number |
Sets the RTS/CTS threshold for packet transmission. |
|
retry number |
For cards that support MAC retransmissions, you can use this option to determine how many retries are made before the transmission fails. The value can be a number (indicating number of seconds allotted for retries), or a number followed by an m (for milliseconds) or u (for microseconds). Instead of a number, you can set a number of retries using the limit parameter. For example: retry limit 100 indicates that the transmission can retry up to 100 times. |
|
sens number |
Sets the lowest possible sensitivity threshold for which the wireless interface will try to receive a packet. Raising this level can help block out interference from other wireless LANs that might weakly encroach on your transmission area. |
The best place to add iwconfig options permanently in Red Hat Linux is the configuration file for your wireless interface in the /etc/sysconfig/network-scripts directory.
Options to iwconfig are added to the wireless interface file (such as ifcfg-eth0 or ifcfg-eth1) using the IWCONFIG parameter. For example, to add an encryption-key value of 1234-1234-12 for your wireless LAN card, you could add the following line to your wireless-interface file:
IWCONFIG="key 1234-1234-12"


