Setting Up a Samba File Server in Red Hat Linux
Setting Up a Samba File Server in Red Hat Linux
Samba is a software package that comes with Red Hat Linux that lets you share file systems and printers on a network with computers that use the Session Message Block (SMB) protocol. SMB is the protocol that is delivered with Windows operating systems for sharing files and printers. Although you can't always count on NFS being installed on Windows clients (unless you install it yourself), SMB is always available (with a bit of setup).
On Red Hat Linux, the Samba software package contains a variety of daemon processes, administrative tools, user tools, and configuration files. To do basic Samba configuration, you can start with the Samba Server Configuration window. This window provides a graphical interface for configuring the server and setting directories to share.
Most of the Samba configuration you do ends up in the /etc/samba/smb.conf file. If you need to access features that are not available through the Samba Server Configuration window, you can edit /etc/samba/smb.conf by hand or use SWAT, a Web-based interface to configure Samba.
Daemon processes consist of smbd (the SMB daemon) and nmbd (the NetBIOS name server). smbd is what makes the file sharing and printing services you add to your Red Hat Linux computer available to Windows client computers. The client computers this package supports include:
-
Windows 9x
-
Windows 2000
-
Windows NT
-
Windows ME
-
Windows XP
-
Windows for Workgroups
-
MS Client 3.0 for DOS
-
OS/2
-
Dave for Macintosh Computers
-
Samba for Linux
As for administrative tools for Samba, you have several shell commands at your disposal. You can check your configuration file using the testparm and testprns commands. The smbstatus command tells you which computers are currently connected to your shared resources. Using the nmblookup command, you can query for NetBIOS names (the names used to identify host computers in Samba).
Although Samba uses the NetBIOS service to share resources with SMB clients, the underlying network must be configured for TCP/IP. Although other SMB hosts can use TCP/IP, NetBEUI, and IPX/SPX to transport data, Samba for Linux supports only TCP/IP. Messages are carried between host computers with TCP/IP and are then handled by NetBIOS.
Getting and installing Samba
To see if Samba is installed on your Red Hat Linux system, type the following:
# rpm -qa | grep samba
samba-*
redhat-config-samba
samba-swat-*
samba-common-*
samba-client-*
You should see the name of each of the five packages above, followed by the version number (I represented version numbers with an asterisk). Although not installed with all installation groups in Red Hat Linux, the packages that make up Samba are spread across Red Hat Linux CD #1 and CD #3. To install Samba, mount the first CD and run the following:
# mount /mnt/cdrom
# cd /mnt/cdrom/RedHat/RPMS
# rpm -Uhv samba*
# cd ; umount /mnt/cdrom
Repeat the above procedure for the other CD. Before you start trying to configure Samba, read the README file (probably located in /usr/share/doc/samba*). It provides a good overview of the SMB protocol and Samba.
Configuring a simple Samba server
The Samba Server Configuration window lets you do some basic Samba configuration and then identify which directories you want to share. To make this procedure useful, I'm setting up a particular type of shared environment (which you can modify later if you prefer). Here are the characteristics:
-
A single local area network:???Contains multiple Windows and Linux machines.
-
User level security:???Any user who wants to get to the shared Samba files must have a valid login and password on the Red Hat Linux Samba server.
-
Encrypted passwords:???Many clients use encrypted passwords with Samba (SMB) by default. I'll describe how to turn on encrypted passwords for clients that don't.
-
A guest user account:???The guest user account will be useful later, so you can set up Samba to let users without special accounts use the server's printers via Samba.
The following procedure describes how to configure Samba and create a shared directory in Samba:
-
To open the Samba Server Configuration window, click System Settings ? Server Settings ? Samba Server. The Samba Server Configuration window opens.
-
Click Preferences ? Server Settings. The Server Settings window appears, as shown in Figure 18-3.
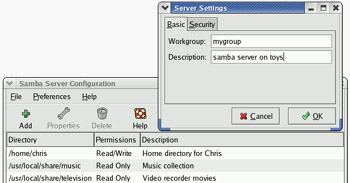
Figure 18-3: Define the workgroup and description for your Samba server. -
Type the workgroup name (to match that of other computers with which you want to share files) and a short description.
-
Click the Security tab. A window appears like the one shown in Figure 18-4.
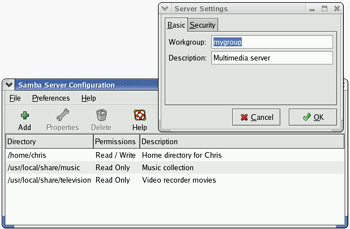
Figure 18-4: Fill in Basic and Security information for your Samba server. -
Provide the following information for the fields on the Security tab and click OK:
-
Authentication Mode — Select User, Share, Server, or Domain. For this example, I selected User. (See the "Security options" section later in this chapter for details on each of the authentication modes.)
-
Authentication Server — This field is only valid if you are doing Server or Domain security. It identifies the server (NetBios name) that will be used to authenticate the user name and password the Samba client enters to gain access to this Samba server. With user authentication, passwords are checked on the Samba server (in this example, therefore, this field is blank.)
-
Encrypt Passwords — Select Yes (to expect clients to send encrypted passwords) or No (to expect clear-text password). See the section on Samba clients later in this chapter to determine how to configure clients to use encrypted passwords.
-
Guest Account — Set this field to a user name that you want assigned to requests from anonymous users. Even with User mode security set globally, you can assign guest access to particular Samba shares (such as printers).
With User mode security (which is being used in this example), any user that wants to access a Samba share must have a regular user account on the Linux system. (Refer to Chapter 11 for information on adding user accounts.)
-
-
To add a user as a Samba user (that is, one who can access your Samba server), click Preferences ? Samba Users. The Samba Users window appears.
-
Click Add User. The Create New Samba User window appears.
-
Provide information for the following fields in the Create New Samba User window and click OK:
-
Unix Username — Click this box, then select the Linux user name to which you want to give access to the Samba server.
-
Windows Username — This is the user name provided by the user when he or she requests the shared directory. (Often, it is the same as the Unix username.)
-
Samba Password — Type the Samba password, then retype it into the Confirm Samba Password field.
-
-
Repeat the previous step for each user you want to access the Samba shared directory.
-
Now that you have configured the default values for your Samba server, add a directory to share by clicking File ? Add Share. The Create Samba Share window appears.
-
Fill in the following fields shown in the Create Samba Share window:
-
Directory — Type the name of the directory you want to share. For example, you might want to share a user's home directory, such as /home/chris.
-
Description — Type any description you like of the Shared directory.
-
Basic Permissions — Select either Read-only or Read/Write. For Read-only, files can be viewed, but not changed, on the shared directory. For Read/Write, the user is free to add, change, or delete files, provided he or she has Linux file access to the particular file.
-
-
Click the Access tab, select one of the following choices for access to the share, and then click OK:
-
Only allow access to specific users — Click here, then choose which users will be allowed to access the shared directory. For example, if you are sharing a user's directory (such as /home/chris), you probably want to restrict access to that directory to the directory's owner (for example, chris). Read and write access to particular files and directories are determined by the Linux ownership and group assigned to them.
-
Allow access to everyone — Choose this option if you want to allow anyone to access this directory. (All users will have privileges assigned to the guest user when accessing the directory.)
After you click OK, Samba is started and the new directory is immediately available. You can close the Samba Server Configuration window.
-
-
Although Samba should be running at this point, you probably need to set Samba to start automatically every time you reboot Linux. To do that, type the following as root user in a Terminal window:
# chkconfig smb on
You can repeat the steps for adding a Samba shared directory for every directory you want to make available on your network. At this point, you can either:
-
Go through your Samba server settings in more detail (as described in "Configuring Samba with SWAT") to understand how you might want to further tune your Samba server.
-
Try accessing the shared directories you just created from a client computer on your network.
If you cannot open the shared directory you just configured from a Windows computer or other Linux computer on your LAN, you are probably experiencing one of the following problems:
-
The client isn't supplying a valid user name and password.
-
The client isn't supplying an encrypted password.
The quick way around these problems is to use only share-level security (which, of course, throws your security right out the window). The other solution is to get passwords up-to-date and make sure that clients are using encrypted passwords (as described in the "Setting up Samba clients" section later in this chapter).
Configuring Samba with SWAT
The Samba Web Administration Tool (SWAT) is a Web-based interface for configuring Samba. While it's not quite as easy to use as the Samba Server Configuration window, it does offer more options for tuning Samba and Help descriptions for each option.
| Caution? |
Both SWAT and the Samba Server Configuration window configure Samba by modifying the /etc/samba/smb.conf file. Different GUI tools can overwrite each other's settings, sometimes in a way that causes the other tool not to work. In general, it's best to make a backup copy of your files before switching GUI tools. Eventually, you should choose one tool and stick with it. |
Turning on the SWAT service
Before you can use SWAT, you must do some configuration. To set up SWAT to run from your browser, follow these steps:
-
To turn on the swat service, type the following, as root user, from a Terminal window:
# chkconfig swat on
-
To pick up the change to the swat service, restart the xinetd start-up script as follows:
# service xinetd restart
When you have finished this procedure, use the SWAT program, described in the next section, to configure Samba.
Starting with SWAT
You can run the SWAT program by typing the following URL from your local browser:
http://localhost:901/
At this point, the browser will prompt you for a user name and password. Enter the root user name and password. The SWAT window should appear, as shown in Figure 18-5.
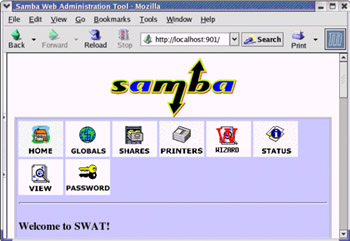
Figure 18-5: Use SWAT from your browser to manage your Samba configuration.
| Tip? |
Instead of running SWAT from your local browser, you can run it from another computer on the network by substituting the server computer's name for localhost. (To allow computers besides localhost to access the swat service, you must change or remove the only_from = 127.0.0.1 line from the /etc/xinetd.d/swat file and restart the xinetd service.) |
The rest of this section describes how to use SWAT to create your configuration entries (in /etc/samba/smb.conf) and to work with that configuration.
| Caution? |
Any time you use a GUI to change a plain-text configuration file (as you do with SWAT), you may lose some of the information that you put in by hand. In this case, SWAT deletes comment lines and rearranges other entries. To protect changes you have made manually, make a backup copy of your /etc/samba/smb.conf file before you edit it with SWAT. |
Creating global Samba settings in SWAT
A group of global settings affects how file and print sharing are generally accomplished on a Samba server. They appear under the [global] heading in the /etc/samba/smb.conf file. To edit global variables, click the GLOBALS button on the SWAT window.
Seven option types are available: Base options, security options, logging options, tuning, printing options, browse options, and WINs options. To view and modify your global Samba server settings, click the GLOBALS button. Then add the following options.
| Note? |
Each option shown relates to the exact parameters used in the /etc/samba/smb.conf file. You can refer to the smb.conf man page (type man smb.conf) to get more information on these parameters. |
Base options
The following options relate to basic information associated with your Samba server:
-
workgroup — The name of the workgroup associated with the group of SMB hosts. By default, the value for this field is WORKGROUP.
-
netbios name — The name assigned to this Samba server. You can use the same name as your DNS host name or leave it blank, in which case the DNS host name is used automatically.
-
server string — A string of text identifying the server. This name appears in places such as the printer comment box. By default, it says Samba and the version number.
-
interfaces — Lets you set up more than one network interface. This enables Samba to browse several different subnetworks. The form of this field can be IP Address/Subnetwork Mask. Or, you could identify a network interface (such as eth0 for the first Ethernet card on your computer). For example, a Class C network address may appear as:
192.168.24.11/255.255.255.0
Security options
Of the security options settings, the first option (security) is the most important one to get right. It defines the type of security used to give access to the shared file systems and printers to the client computers.
-
security — Sets how password and user information is transferred to the Samba server from the client computer. As noted earlier, it's important to get this value right. The default value for security (security=user) is different than the default value for security (security=share) in pre-2.0 versions of Samba. If you are coming from an earlier version of Samba and clients are failing to access your server, this setting is a good place to start. Here are your options:
-
user — The most common type of security used to share files and printers to Windows 95/98/2000 and Windows NT clients. It is the default set with Samba in the current release. This setting is appropriate if users are doing a lot of file sharing (as opposed to a Samba server used mostly as a print server). It requires that a user provide a user name/password before using the server.
The easiest way to get this method working is to give a Red Hat Linux user account to every client user who will use the Red Hat Linux Samba server. This provides basically the same file permissions to a user account through Samba as the same user would get if he or she were logged in directly to Red Hat Linux.
Caution? Apparently, there is a bug in Windows for Workgroups that causes the password that the user types in to be ignored from a "connect drive" dialog box. Instead, Windows uses the user name and password in effect for the user's current Windows login session. One way around this problem, although it is clumsy from a security standpoint, is to assign the same user name/password combination for each user on the Red Hat computer that they use in Windows.
-
share — The share value for security works best for just print sharing or for providing file access that is more public (guest sharing). A client doesn't need to provide a valid user name and password to access the server. However, the user will typically have a "guest" level of permission to access and change files. See the sidebar describing guest accounts for further information.
-
server — The security option that, from the client's point of view, is the same as user security, in that the client still has to provide a valid user name/password combination to use the Samba server at all. The difference is on the server side. With server security, the user name/password is sent to another SMB server for validation. If this fails, Samba will try to validate the client using user security.
-
domain — This security option also, from the client's point of view, looks the same as user security. This setting is used only if the Samba server has been added to a Windows NT domain (using the smbpasswd command). When a client tries to connect to the Samba server in this mode, its user name and password are sent to a Windows NT Primary or Backup Domain controller. This is accomplished the same way that a Windows NT server would perform validation. Valid Red Hat Linux user accounts must still be set up.
-
-
encrypt passwords — Controls whether encrypted passwords can be negotiated with the client. This is on (Yes) by default. For domain security, this value must be Yes. Later versions of Windows NT (4.0 SP3 or later) and Windows 98 and Windows 2000 expect encrypted passwords to be on. (See the "Setting up Samba clients" section for information on getting clients to use encrypted passwords.)
-
update encrypted — Allows users who log in with a plain-text password to automatically have their passwords updated to an encrypted password when they log in. Normally, this option is off. It can be turned on when you want an installation using plain-text passwords to have everyone updated to encrypted password authentication. It saves users the trouble of running the smbpasswd command directly from the server. After everyone is updated, this feature can be turned off. When this option is on, the encrypt passwords option should be set to no.
-
obey pam restrictions — Turn this on (Yes) if you want to use PAM for account and session management. Even if set as yes, PAM is not used if the encrypted passwords feature is turned on (encrypt passwords = yes).
-
pam password change — Indicates to use the PAM password change control flag for Samba. If this is on (Yes), SMB clients will use PAM instead of the program listed in the Password Program value for changing SMB passwords.
-
passwd program — Indicates which password program to use to change Linux user passwords. By default, /usr/bin/passwd is used, with the current user name (%u) inserted.
-
passwd chat — Sets the chat that goes on between the Samba daemon (smbd) and the Linux password program (/usr/bin/passwd by default) when smbd tries to synchronize SMB passwords with Linux user passwords.
-
username map — This sets the file used to map Samba user names. By default, this file is /etc/samba/smbusers.
-
unix password sync — With this on (Yes), Samba tries to update a user's Linux user password with his/her SMB password when the SMB password is changed. To do this, SMB runs the passwd command as the root user. This is on by default.
-
guest account — Specifies the user name for the guest account. When a service is specified as Guest OK, the user name entered here will be used to access that service. The account is usually the nobody user name.
Tip? Make sure that the guest account is a valid user. (The default of nobody should already be set up to work.) With an invalid user as the guest account, the IPC$ connection that lists the shared resources fails.
-
hosts allow — Contains a list of one or more hosts that are allowed to use your computer's Samba services. By default, users from any computer can connect to the Samba server (of course, they still have to provide valid user names and passwords). Usually, you use this option to allow connections from specific computers (such as 10.0.0.1) or computer networks (such as 10.0.0.) that are excluded by the hosts deny option.
-
hosts deny — Contains a list of one or more hosts from which users are not allowed to use your computer's Samba services. You can make this option fairly restrictive, and then add the specific hosts and networks you want to use the Samba server. By default, no hosts are denied.
Logging options
The following options help define how logging is done on your Samba server:
-
log level — Sets the debug level used when logging Samba activity. Raise the level from the default (0) to log more Samba activity.
-
log file — Defines the location of the Samba smb log file. By default, Samba log files are contained in /var/log/samba (with file names log.nmbd, log.smbd, and smb.log). In this option, the %m is replaced by smb to set the smb log file as /var/log/samba/smb.log.
-
max log size — Sets the maximum amount of space, in kilobytes, that the log files can consume. By default, the value is set to 0 (no limit).
Samba always assigns the permissions level of a valid user on the Red Hat Linux system to clients who use the server. In the case of share security, the user is assigned a guest account (the nobody user account by default).
If the guest account value isn't set, Samba goes through a fairly complex set of rules to determine which user account to use. The result is that it can be hard to assure which user permissions will be assigned in each case. This is why it is recommended to use user security if you want to provide more specific user access to your Samba server.
Tuning options
The Socket Options option lets you pass options to the protocols Samba uses to communicate. The following options are set by default: TCP_NODELAY, SO_RCVBUF=8192, and SO_SNDBUF=8192. The first option disables Nagle's algorithm, which is used to manage the transmission of TCP/IP packets. The other two options set the maximum size of the sockets receive buffer and send buffer to 8192, respectively. These options are set to improve performance (reportedly up to 10 times faster than without setting these options). In general, you shouldn't change these options.
Printing options
The printing option is used to define how printer status information is presented. For Red Hat Linux, the value is typically cups. You can use printing styles from other types of operating systems, such as UNIX System V (sysv), AIX (aix), HP UNIX (hpux), and Berkeley UNIX (bsd), to name a few. LPRng (lprng), offered by many UNIX systems, is also included.
Browse options
A browse list is a list of computers that are available on the network to SMB services. Clients use this list to find computers that are not only on their own LAN, but also computers in their workgroups that may be on other reachable networks.
In Samba, browsing is configured by options described below and implemented by the nmbd daemon. If you are using Samba for a workgroup within a single LAN, you probably don't need to concern yourself with the browsing options. If, however, you are using Samba to provide services across several physical subnetworks, you may consider configuring Samba as a domain master browser. Here are some points to think about:
-
Samba can be configured as a master browser. This allows it to gather lists of computers from local browse masters to form a wide-area server list.
-
If Samba is acting as a domain master browser, Samba should use a WINS server to help browse clients resolve the names from this list.
-
Samba can be used as a WINS server, although it can also rely on other types of operating systems to provide that service.
-
There should be only one domain master browser for each workgroup. Don't use Samba as a domain master for a workgroup with the same name as an NT domain.
If you are working in an environment that has a mix of Samba and Windows NT servers, you should use an NT server as your WINS server. If Samba is your only file server, you should choose a single Samba server (nmbd daemon) to supply the WINS services.
| Note? |
A WINS server is basically a name server for NetBIOS names. It provides the same service that a DNS server does with TCP/IP domain names: it can translate names into addresses. A WINS server is particularly useful for allowing computers to communicate with SMB across multiple subnetworks where information is not being broadcast across the subnetworks' boundaries. |
To configure the browsing feature in Samba, you must have the workgroup named properly (described earlier in this section). Here are the global options related to SMB browsing.
| Note? |
If browsing isn't working, check the nmbd log file (/var/log/samba/log.nmbd). To get more detail, increase the debug information level to 2 or 3 (described earlier in this section) and restart Samba. The log can tell you if your Samba server is the master browser and, if so, which computers are on its list. |
-
os level — Set a value to control whether your Samba server (nmbd daemon) may become the local master browser for your workgroup. Raising this setting increases the Samba server's chance to control the browser list for the workgroup in the local broadcast area.
If the value is 0, a Windows machine will probably be selected. A value of 60 will probably ensure that the Samba server is chosen over an NT server. The default is 20.
-
preferred master — Set this to Yes if you want to force selection of a master browser. By setting this to Yes, the Samba server also has a better chance of being selected. (Setting Domain Master to Yes along with this option should ensure that the Samba server will be selected.) This is set to Auto by default, which causes Samba to try to detect the current master browser before taking that responsibility.
-
local master — Set this to Yes if you want the Samba server to become the local browser master. (This is not a guarantee, but gives it a chance.) Set the value to No if you do not want your Samba server selected as the local master. Local Master is Auto by default.
-
domain master — Set this to Yes if you want the Samba server (nmbd daemon) to identify itself as the domain master browser for its workgroup. This list will then allow client computers assigned to the workgroup to use SMB-shared files and printers from subnetworks that are outside of their own subnetwork. This is set to No by default.
WINS options
Use the WINS options if you want to have a particular WINS server provide the name-to-address translation of NetBIOS names used by SMB clients. As noted earlier, you probably don't need to use a WINS server if all of the clients and servers in your SMB workgroup are on the same subnetwork. That's because NetBIOS names can be obtained through addresses that are broadcast. It is possible to have your Samba server provide WINS services.
-
wins server — If there is a WINS server on your network that you want to use to resolve the NetBIOS names for your workgroup, you can enter the IP address of that server here. Again, you will probably want to use a WINS server if your workgroup extends outside of the local subnetwork.
-
wins support — Set this value to Yes if you want your Samba server to act as a WINS server. (It's No by default.) Again, this is not needed if all the computers in your workgroup are on the same subnetwork. Only one computer on your network should be assigned as the WINS server.
Besides the values described here, you can access dozens more options by clicking the Advanced View button. When you have filled in all the fields you need, click Commit Changes on the screen to have the changes written to the /etc/samba/smb.conf file.
Configuring shared directories with SWAT
To make your shared directory available to others, you can add an entry to the SWAT window. To use SWAT to set up Samba to share directories, do the following:
| Note? |
You may see one or more security warnings during the course of this procedure. These are to warn you that someone can potentially view the data you are sending to SWAT. If you are working on your local host or on a private LAN, the risk is minimal. |
-
From the main SWAT window, click the SHARES button.
-
Type the name of the directory that you want to share in the Create Share box, then click Create Share.
-
Add any of these options:
-
comment — A few words to describe the shared directory (optional).
-
path — The path name of the directory you are sharing.
-
guest account — If Guest OK is selected, then the user name that is defined here is assigned to users accessing the file system. No password will be required to access the share. The nobody user account (used only by users who access your computer remotely) is the default name used. (The FTP user is also a recommended value.)
-
read only — If Yes, then files can only be read from this file system, but no remote user can save or modify files on the file system. Select No if you want users to be allowed to save files to this directory over the network.
-
guest ok — Select Yes to enable anyone access to this directory without requiring a password.
-
hosts allow — Add the names of the computers that will be allowed to access this file system. You can separate host names by commas, spaces, or tabs. Here are some valid ways of entering host names:
localhost — Allow access to the local host.
192.168.74.18 — IP address. Enter an individual IP address.
192.168.74. — Enter a network address to include all hosts on a network. (Be sure to put a dot at the end of the network number or it won't work!)
maple, pine — Enable access to individual hosts by name.
EXCEPT host — If you are allowing access to a group of hosts (such as by entering a network address), use EXCEPT to specifically deny access from one host from that group.
-
hosts deny — Deny access to specific computers by placing their names here. By default, no particular computers are excluded. Enter host names in the same forms you used for Hosts Allow.
-
browseable — Indicates whether you can view this directory on the list of shared directories. This is on (Yes) by default.
-
available — Enables you to leave this entry intact, but turns off the service. This is useful if you want to close access to a directory temporarily. This is on (Yes) by default. Select No to turn it off.
-
-
Select Commit Changes.
At this point, the shared file systems should be available to the Samba client computers (Windows 9x, Windows NT, Windows 2000, OS/2, Linux, and so on) that have access to your Linux Samba server. Before you try that, however, you can check a few things about your Samba configuration.
Checking your Samba setup with SWAT
From the SWAT window, select the STATUS button.
From this window, you can restart your smbd and nmbd processes. Likewise, you can see lists of active connections, active shares, and open files. (The preferred way to start the smbd and nmbd daemons is to set up the smb service to start automatically. Type chkconfig smb on to set the service to start at boot time.)
Working with Samba files and commands
Although you can set up Samba through the Samba Server Configuration window or SWAT, many administrators prefer to edit the /etc/samba/smb.conf directly. As root user, you can view the contents of this file and make needed changes. If you selected user security (as recommended), you will also be interested in the smbusers and smbpasswd file (also in the /etc/samba directory). These files, as well as commands such as testparm and smbstatus, are described in the following sections.
Editing the smb.conf file
Changes you make using the Samba Server Configuration window or SWAT Web interface are reflected in your /etc/samba/smb.conf file. Here's an example of an smb.conf file (with comments removed):
[global]
workgroup = ESTREET
server string = Samba Server on Maple
hosts allow = 192.168.0.
printcap name = /etc/printcap
load printers = yes
printing = cups
log file = /var/log/samba/%m.log
max log size = 0
smb passwd file = /etc/samba/smbpasswd
security = user
encrypt passwords = Yes
unix password sync = Yes
passwd program = /usr/bin/passwd %u
passwd chat = *New*password* %n\n *Retype*new*password* %n\n *passwd:
          *all*authentication*tokens*updated*successfully*
pam password change = yes
obey pam restrictions = yes
socket options = TCP_NODELAY SO_RCVBUF=8192 SO_SNDBUF=8192
username map = /etc/samba/smbusers
dns proxy = no

[homes]
comment = Home Directories
browseable = no
writable = yes
valid users = %S
create mode = 0664
directory mode = 0775

[printers]
comment = All Printers
path = /var/spool/samba
browseable = no
guest ok = no
writable = no
printable = yes
In the [global] section, the workgroup is set to ESTREET, the server is identified as the Samba Server on Maple, and only computers that are on the local network (192.168.0.) are allowed access to the Samba service. You must change the local network to match your network.
Definitions for the local printers that will be shared are taken from the /etc/printcap file, the printers are loaded (yes), and the cups printing service (which is the default print service used by Red Hat Linux) is used.
Separate log files for each host trying to use the service are created in /var/log/samba/%m.log (with %m automatically replaced with each host name). There is no limit to log file size (0).
In this case, we are using user-level security (security = user). This allows a user to log in once and then easily access the printers and the user's home directory on the Red Hat Linux system. Password encryption is on (encrypt passwords = yes) because most Windows systems have password encryption on by default. Passwords are stored in the /etc/samba/smbpasswd file on your Linux system.
The dns proxy = no option prevents Linux from looking up system names on the DNS server (used for TCP/IP lookups).
The [homes] section allows each user to be able to access his or her Linux home directory from a Windows system on the LAN. The user will be able to write to the home directory. However, other users will not be able see or share this directory. The [printers] section allows all users to print to any printer that is configured on the local Linux system.
Adding Samba users
Doing user-style Samba security means assigning a Linux user account to each person using the Linux file systems and printers from his or her Windows workstation. (You could assign users to a guest account instead, but in this example, all users have their own accounts.) Then you need to add SMB passwords for each user. For example, here is how you would add a user whose Windows 98 workstation login is chuckp:
-
Type the following as root user from a Terminal window to add a Linux user account:
# useradd -m chuckp
-
Add a Linux password for the new user as follows:
# passwd chuckp
Changing password for user chuckp
New UNIX password: ********
Retype new UNIX password: ********
-
Repeat the previous steps to add user accounts for all users from Windows workstations on your LAN that you want to give access to your Linux system to.
-
Type the following command to create the Samba password file (smbpasswd):
# cat /etc/passwd | /usr/bin/mksmbpasswd.sh > /etc/samba/smbpasswd
-
Add an SMB password for the user as follows:
# smbpasswd chuckp
New SMB password: **********
Retype new SMB password: **********
Repeat this step for each user. Later, each user can log in to Linux and rerun the passwd and smbpasswd commands to set private passwords.
Note? In the most recent version of Samba, options are available in the smb.conf file that cause SMB and Linux passwords to be synchronized automatically. See descriptions of the passwd program, passwd phat, and UNIX password sync options in the SWAT section of this chapter.
Starting the Samba service
To start the Samba SMB and NMB daemons, you can run the /etc/init.d/smb start-up script by typing the following as the root user:
# service smb start
This runs the Samba service during the current session. To set up Samba to start automatically when your Linux system starts, type the following:
# chkconfig smb on
This turns on the Samba service to start automatically in run levels 3, 4, or 5. You can now check SMB clients on the network to see if they can access your Samba server.
Testing your Samba permissions
You can run several commands from a shell to work with Samba. One is the testparm command, which you can use to check the access permissions you have set up. It lists global parameters that are set, along with any shared directories or printers.
Checking the status of shared directories
The smbstatus command can view who is currently using Samba shared resources offered from your Linux system. The following is an example of the output from smbstatus:
Samba version 2.2.8a
Service      uid      gid      pid     machine
----------------------------------------------
chris        chris    chris     1753   duck     (10.0.0.5)
      Tue Sep 2 09:16:20 2003

Locked files:
Pid    DenyMode   Access      R/W        Oplock  Name
--------------------------------------------------------------
1753   DENY_NONE  0x2019f     RDWR       NONE    /home/chris/~WRL35.tmp
      Tue Sep 2 09:24:45 2003
1753   DENY_NONE  0x2019f     RDWR       NONE    /home/chris/media.doc
      Tue Sep 2 09:24:45 2003
This output shows that from your Red Hat Linux Samba server, the chris service (which is a share of the /home/chris directory) is currently open by the computer named duck. The user and group chris is being used to access the resource. PID 1753 is the process number of the smbd daemon on the Red Hat Linux server that is handling the service. The files open are the media.doc and ~WRL35.tmp in /home/chris. Both have read/write access.
Setting up Samba clients
Once you have configured your Samba server, you can try using the shared directories from a client computer on your network. The following sections describe how to use your Samba server from another Linux system or from various Windows systems.
Using Samba shared directories from Linux
There are several methods of connecting to shared directories from your Samba client. The following sections address these methods.
Using Samba from Nautilus
Type smb: into your Nautilus file manager window Location box.
A list of SMB workgroups on your network appears in the window. You can select a workgroup, choose a server, and then select a resource to use. This should work for shares requiring no password.
The Nautilus interface seems to be a bit buggy when you need to enter passwords. Also, it requires you to either send clear-text passwords or type the user and password into your location box. For example, to get to my home directory (/home/chris) through Nautilus, I can type my user name, password, server name, and share name as follows:
smb://chris:my72mgb@toys/chris
Mounting Samba directories in Linux
Linux can view your Samba shared directories as it does any other medium (hard disk, NFS shares, CD-ROM, and so on). Using the mount command, you can mount a Samba shared file system so that it is permanently connected to your Linux file system.
The following example of the mount command shows how I would mount my home directory (/home/chris) from a computer named toys on a local directory (/mnt/toys). As root user, from a Terminal window, type:
# mkdir /mnt/toys
# mount -t smbfs -o username=chris,password=my72mgb //toys/chris
/mnt/toys
The file system type for a Samba share is smbfs (-t smbfs). I pass the username (chris) and password (my72mgb) as options (-o). The remote share of my home directory on toys is //toys/chris. The local mount point is /mnt/toys. At this point, you can access the contents of /home/chris on toys as you would any file or directory locally. You will have the same permission to access and change the contents of that directory (and its subdirectories) as you would if you were the user chris using those contents directly from toys.
To mount the Samba shared directory permanently, you can add an entry to your /etc/fstab file. For the example just described, you could add the following line (as root user):
//toys/chris /mnt/toys smbfs username=chris,password=my72mgb
Using Samba shared directories from Windows
Sharing Samba file systems from your Red Hat Linux system over your network with users on Windows client computers requires some configuration of those clients. On Windows 95/98 and similar systems, most of the configuration is performed from the Network window. To open the Network window, do the following from Windows 95/98:
-
Choose Start ? Settings ? Control Panel.
-
From the Control Panel, double-click the Network icon.
On the Network window, you can see the network components (protocols, clients, adapters, and services). Samba relies on a working TCP/IP network, so you should have already set up TCP/IP on your LAN (as described in Chapter 15). To use Samba file systems, you also need to have at least the following network components configured:
-
Client for Microsoft Networks — The client that allows print and file sharing. If it is not listed, you can add it by choosing Add ? Client ? Add ? Microsoft ? Client for Microsoft Networks ? OK.
-
NetBEUI protocol — The protocol used to carry out file and print sharing among MS Windows (and other) systems. If it is not listed, add it by choosing Add ? Protocol ? Add ? Microsoft ? NetBEUI ? OK. (NetBEUI is a raw NetBIOS protocol. If your computer lets you run NetBIOS over TCP and bypass NetBEUI, you should do so.)
-
A Network Adapter — Represents the networking medium that actually connects the computer together. Chances are this represents a LAN card, such as an Ethernet card.
-
TCP/IP protocol — If TCP/IP is not yet added for your network adapter, choose Add ? Protocol ? Add ? Microsoft ?TCP/IP. Then click OK. Click the TCP/IP entry for your network adapter; then click Properties. From the Bindings tab, make sure that Client for Microsoft Networks is checked. From the WINS Configuration tab, click Enable WINS Resolution, type the IP address for your Linux server, and click Add. Then click OK.
Tip? If you want to allow the client to share its own files and printers, you can click File and Print Sharing. Then you can select to turn on file access and/or printer access from the pop-up window that appears.
Other information that you need to add relates to the client computer's identity and access. On the Network window, click the Identification tab. On that tab, enter a name for the client computer, the name of the workgroup and a description of the computer. Next, click the Access Control tab. From there, select either User-level or Share-level access control (to match the type of control set up on the server). Click OK when you are done. (At this point, you may need to reboot Windows.)
To see the file and print services available from your Red Hat Linux Samba server (as well as from other computers on the network), open the Network Neighborhood window. To open the window, double-click the Network Neighborhood icon on the Windows 95 desktop. Figure 18-6 shows an example of the Network Neighborhood window for a small LAN.
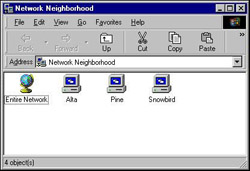
Figure 18-6: View your Red Hat Linux Samba server from the Network Neighborhood window.
The Network Neighborhood window shows the computers that Windows found on your network. If your server appears on the screen (in my case, the server's name is pine), double-click on it. Otherwise, you may need to double-click on Entire Network, then open the workgroup that your server is a part of to find your server. The server should show two kinds of resources:
-
Printers — A name and a printer icon should represent each printer shared from the server. To access a printer, double-click on it. Windows will have you set up the printer for your computer. After that, you can print with it as you would any local printer.
-
Directories — A name and folder icon should represent shared directories fr


