Configuring Print Servers
Configuring Print Servers
You've configured a printer so that you and the other users on your computer can print to it. Now you want to share that printer with other people in your home, school, or office. Basically, that means configuring that printer as a print server.
The printers that are configured on your Red Hat Linux system can be shared in different ways with other computers on your network. Not only can your computer act as a Linux print server (CUPS or LPRng), it can also look to client computers like a NetWare or SMB print server. After a local printer is attached to your Red Hat Linux system, and your computer is connected to your local network, you can use the procedures in this section to share it with client computers using a Linux (UNIX), NetWare, or SMB interface.
| Cross-Reference? |
See Chapter 26 for information on configuring Linux as an AppleTalk server using the netatalk package. |
Configuring a shared CUPS printer
After a local printer is added to your Red Hat Linux computer, making it available to other computers on your network is fairly easy. If a TCP/IP network connection exists between the computers sharing the printer, then you must simply grant permission to individual hosts or users from remote hosts to access your computer's printing service. The procedures for setting up local printers are discussed earlier in this chapter.
To share a local printer as a print server to other computers on your network, do the following:
-
From the main Red Hat menu, select System Settings ? Printing. The Printer configuration window appears.
-
Click the name of the printer you want to share. (If the printer is not yet configured, refer to the "Setting Up Printers" section earlier in this chapter.)
-
Select Action ? Sharing. The Sharing properties window appears.
-
On the Queue tab, click the box next to "This queue is available to other computers." The words "All hosts" should appear in the Allowed Hosts box, indicating that all computers that can access your computer from the network can access the selected printer.
-
If you only want selected hosts to access your printer, click Remove (to remove the All Hosts line), then click Add. You can share your printer in one of the following ways:
-
All hosts — This is the default, where any computer can print on the printer.
-
Network devices — If you have a LAN connection, you can select Network Devices and click the interface (such as eth0) to allow computers on the LAN to access your printer. This is a good choice if, for example, your computer is acting as a router. You could allow computers on your LAN to access your printer, but not allow computers from the Internet to use the printer.
-
Network address — You can restrict access to your printer to a select set of network addresses. The address pool can be indicated with a CIDR address (see Chapter 16 for a description of how to form CIDR addresses).
-
Single IP address — You can indicate that a particular IP address can access your printer. Repeat this step to add more than a single IP address.
Click OK to continue.
-
-
From the Sharing properties window, click OK.
-
From the Printer configuration window, click Apply to apply the changes.
At this point, you can configure other computers to use your printer. If you try to print from another computer and it doesn't work, here are a few things to try:
-
Open your firewall — If you have a restrictive firewall, it may not be allowing printing. You must allow access to port 513 (UDP and TCP) to allow access to printing on your computer. See Chapter 14 for information on configuring your firewall.
-
Enable LPD-style printing — Certain applications may require an older LPD-style printing service in order to print on your shared printer. To enable LPD-style printing on your CUPS server, you must turn on the cups-lpd service. As root user, type chkconfig cups-lpd on. Then restart the xinetd daemon (service xinetd restart).
-
Check names and addresses — Make sure that you entered your computer's name and print queue properly when you configured it on the other computer. Try using the IP address instead of the host name (if that worked, it would indicate a DNS name resolution problem). Running a tool such as ethereal can let you watch where the transaction fails.
Access changes to your shared printer are made in the /etc/cups/cupsd.conf file.
Configuring a shared NetWare printer
NetWare server functions delivered with Red Hat Linux are offered using the mars_nwe package. This package enables you to do file and printer sharing from Red Hat Linux as though the resources being shared were coming from a NetWare server. Although not all NetWare features are offered, the mars_nwe package does well with basic NetWare file and printer sharing.
| Cross-Reference? |
See Chapter 18 for information on setting up the mars_nwe package to share NetWare resources. The mars_nwe service must be running to share your printer as a NetWare print server. |
You can make your Red Hat Linux printers available as NetWare printers by adding entries to the /etc/nwserv.conf file. This file is used for configuring most mars_nwe information. Of particular interest for adding printers is the Print Queues section (section 21). Red Hat Linux printers are identified as NetWare print queues by indicating each line as a section 21 entry. Here is an example:
21 PSPRINT SYS:/PRINT/PSPRINT lpr -Ppsprint
The number 21 identifies the entry as a NetWare print queue. PSPRINT is the name of the queue (you can name the queue anything you like). The queue directory is identified as SYS:/PRINT/PSPRINT. Note that the queue directory is different from the lpd spool directory. Finally, the last part of the entry is the lpr command line, used to print documents submitted to this print queue.
Assuming you have done your basic NetWare server configuration, as described in Chapter 18, use this procedure to check that you can print to the NetWare print server you just set up in Linux:
-
Restart the mars_nwe service to incorporate the changes you just made to nwserv.conf by typing the following:
# service mars-nwe restart
-
Type the slist command to ensure that the NetWare server you configured is available:
# slist
Known NetWare File Servers          Network   Node Address
----------------------------------------------------------
PINE                                7F000001  000000000001
In this example, the NetWare server name (of the NetWare server running on Linux) is PINE. Your server name will be different.
-
Use the nprint command to print to your NetWare print server in Linux. Type the following commands:
$ cd /usr/share/printconf/tests
$ nprint -S PINE -U GUEST -q PSPRINT testpage.asc
Logging into PINE as GUEST
Password:
In the previous example, the NetWare server name is PINE, the user name is GUEST, and the print queue name is PSPRINT. By default, the guest account has no password, so you can simply press Enter at the Password prompt.
Note? You don't need to change to the tests directory in the previous example. I did because I know that the tests directory contains several test print pages in different formats. The textpage.asc is a plain-text file. You can also try printing testpage.ps (a PostScript file) or testpage-a4.ps (an A4 PostScript page).
Configuring a shared Samba printer
Your Red Hat Linux printers can be configured as shared SMB printers. To share your printer as though it were a Samba (SMB) printer, all you need to do is configure basic Samba server settings as described in Chapter 18. All your printers should be shared on your local network by default. The next section shows what the resulting settings look like and how you might want to change them.
Understanding smb.conf for printing
When you configure Samba, as described in Chapter 18, the /etc/samba/smb.conf file is configured to allow all your configured printers to be shared. Here are a few lines from the smb.conf file that relate to printer sharing:
printcap name = /etc/printcap
load printers = yes
printing = cups
encrypt passwords = yes
smb passwd file = /etc/samba/smbpasswd
unix password sync = Yes
[printers]
        comment = All Printers
        path = /var/spool/samba
        browseable = no
        writeable = no
        printable = yes
The settings shown resulted from configuring Samba from the Samba Server Configuration window. In this case, I selected to use encrypted passwords. The lines show that printers from /etc/printcap were loaded and that the CUPS service is being used. Password encryption is on and the /etc/samba/smbpasswd file stores the encrypted passwords. Because password sync is on, each user's Samba password is synchronized with the local UNIX password for the user.
The last few lines are the actual "printers" definition. It shows that users can print to all printers (printable = yes).
Setting up SMB clients
Chances are good that if you are configuring a Samba printer on your Red Hat Linux computer, you will want to share it with Windows clients. If Samba is set up properly on your computer, and the client computers can reach you over the network, finding and using your printer should be fairly straightforward.
The first place a client computer should look for your shared Samba printer is in Network Neighborhood (or My Network Places, for Windows 2000). From the Windows 9x desktop, double-click the Network Neighborhood icon. (From Windows 2000, double-click the My Network Places icon.) The name of your host computer (the NetBIOS name, which is probably also your TCP/IP name) should appear on the screen or within a workgroup folder on the screen. Open the icon that represents your computer. The window that opens should show your shared printers and folders.
If your computer's icon doesn't appear in Network Neighborhood or My Network Places, try using the Search window. From Windows XP, choose Start ? Search ? Computer or People. Type your computer's name into the Named box and click Search. If the Search window finds your computer, double-click it. A window displaying the shared printers and folders from your computer appears. Figure 17-5 shows the results of a search for a computer in Windows XP.
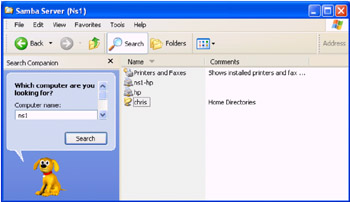
Figure 17-5: Find and display your Samba printer from Find Computer.
After your shared printer appears in the window, the client can configure a pointer to that printer by opening (double-clicking) the printer icon. You should see a message telling you that you must set up the printer before you can use it. Click Yes to proceed to configure the printer for local use. The Add Printer Wizard appears. Answer the questions that ask you how you intend to use the printer, and add appropriate drivers. When you are done, the printer will appear in your printer window. It can now be selected as the printer for any application program in Windows 9x.
Another way to configure an SMB printer from a Windows operating system is to go to Start ? Settings ? Printers. Open the Add Printer icon, and then select Network Printer from the first window. Open the Add Printer icon. Then, follow the instructions to add a printer from the network.


