Protecting Your Network with Firewalls
Protecting Your Network with Firewalls
What is a firewall? In the non-computer world, a firewall is a physical barrier that keeps a fire from spreading. Computer firewalls serve a similar purpose, but the "fires" that they attempt to block are attacks from crackers on the Internet. In this context, a firewall, also known as a packet filter, is a physical piece of computer hardware that sits between your network and the Internet, regulating and controlling the flow of information.
The most common types of firewalls used today are filtering firewalls. A filtering firewall filters the traffic flowing between your network and the Internet, blocking certain things that may put your network at risk. It can limit access to and from the Internet to only specific computers on your network. It can also limit the type of communication, selectively permitting or denying various Internet services.
For Linux to act as a filtering firewall, you can use either the ipchains or iptables features. The iptables feature is the newer of the two and has replaced ipchains as the default Red Hat Linux firewall. Although ipchains has been removed from Red Hat Enterprise Linux, it is still in the Fedora Core distribution. Both ipchains and iptables are described in this chapter.
| Note? |
You can read about differences between ipchains and iptables in the Iptables HOWTO, at http://netfilter.samba.org/unreliable-guides/packet-filtering-HOWTO/packet-filtering-HOWTO.linuxdoc-7.html. |
Configuring a simple firewall
You want your computer to be safe from network intruders, but you may not aspire to be a firewall expert. Instead of trying to understand all the ins and outs of iptables or ipchains, Red Hat Linux offers the Configure Firewalling window (also refers to as Lokkit).
With Configure Firewalling, you don't need to know how to load rules or memorize port numbers. All you need to do is choose what types of services you want your computer to allow in and out over your network connections. It automatically builds an iptables firewall, without requiring you to look at an iptables command.
To launch Configure Firewalling from the Red Hat menu, click System Tools ? More System Tools ? Lokkit. Figure 14-1 shows the Configure Firewalling window.
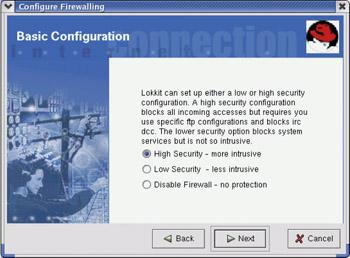
Figure 14-1: Build your firewall by answering a series of questions.
With Configure Firewalling open, you are ready to start. Two warnings before you begin:
-
The Configure Firewalling window overwrites rules created previously. Just to be safe, you should back up your previous rules as follows:
# cp /etc/sysconfig/iptables /etc/sysconfig/iptables.old
-
Run this procedure from the console (not over the network) because if you make a mistake setting up your firewall, you might block network access and not be able to reconnect to your computer to fix the problem.
The following steps will help you answer questions about your firewall:
-
Basic Configuration — Choose High Security if you mostly use the computer as a client for Web browsing, but not as a server (no shared printers, file systems, and so on). Low Security is best to begin with for a server computer. Only choose Disable Firewall if no connections to outside networks exist.
-
Local Hosts — If you are connected to a local network that does not access the Internet, you can choose to trust your connection to that network (Yes). Say No, for example, if the interface provides a connection to a cable modem or DSL line.
-
DHCP — Choose Yes if your network addresses are assigned via DHCP (say No if you are using static IP addresses you assign yourself).
-
Services — Even as a mostly-client computer, you may want to share some network services. If so, select Yes and you will be able to activate the following services:
-
Web Server — If you configure Apache, TUX, or other Web server for your computer (see Chapter 21), click Yes to share that service on the network.
-
Incoming Mail — If you configure Sendmail, Postfix, or other mail server on your computer (see Chapter 19), click Yes to allow your mail server to receive mail.
-
Secure Shell — To allow someone to log in to your computer using a secure shell (ssh command), select Yes here.
-
Telnet — To let someone log in to your computer over a telnet connection, click Yes here. (Ways of securing telnet connections are described earlier in this chapter.)
-
-
Activate the Firewall — Click Finish to activate the new firewall rules.
At this point, your new firewall is in effect. If you want to see your current firewall, type iptables -L | less. To see the rules used to build that firewall, open the /etc/sysconfig/iptables file. (For details on your iptables firewall, see the "Configuring an iptables firewall" section later in this chapter.)
Configuring an ipchains firewall
Ipchains works by examining packets as they are sent and received on a network interface and deciding which packets should be delivered and which should be stopped. It does this by examining a list (also called a chain) of rules. It stops at the first rule that matches the packet and examines that rule's target.
| Note? |
In Red Hat Linux 8, iptables replaced ipchains as the firewall created during installation. To use ipchains, you must turn off iptables and create ipchains rules by hand. Then you must start the ipchains service as described later in this chapter. |
To use the ipchains feature, you must have installed the ipchains RPM. To check if ipchains is installed, type rpm -q ipchains. To see if it's running on your system, type the ipchains -L command. If ipchains is not configured, you will see the message ipchains: Incompatible with this kernel. If ipchains is up and running, you will see output that looks like the following:
# ipchains -L
Chain input (policy ACCEPT):
target  prot opt    source      destination ports
ACCEPT  all  ------ anywhere    anywhere    n/a
ACCEPT  udp  ------ a.myisp.net anywhere    domain - any
ACCEPT  udp  ------ b.myisp.net anywhere    domain - any
DENY    tcp  -y---- anywhere    anywhere    any - any
DENY    udp  ------ anywhere    anywhere    any - any
Chain forward (policy ACCEPT):
Chain output (policy ACCEPT):
The preceding output represents a highly secure firewall. Notice that only input is restricted. In other words, restrictions are on which services outside users can request. The first ACCEPT line results from a rule that allows all requests made from users on the local system (that is, it allows the loopback driver, as indicated by n/a under ports). With that enabled, you can request any service from your local system without the packet being denied.
The next two ACCEPT lines allow the computers I indicate as my DNS servers (from /etc/resolv.conf) to request DNS services (domain) from my computer. The last two rules (DENY) result in all tcp and udp requests to be denied that don't match previous rules.
This firewall configuration is set in the /etc/sysconfig/ipchains file. When the ipchains service starts during system boot time (/etc/init.d/ipchains), the service reads the rules from /etc/sysconfig/ipchains. Here is what the rules from that file look like to create the preceding configuration:
:input ACCEPT
:forward ACCEPT
:output ACCEPT
-A input -s 0/0 -d 0/0 -i lo -j ACCEPT
-A input -s 192.160.0.253 53 -d 0/0 -p udp -j ACCEPT
-A input -s 192.160.0.254 53 -d 0/0 -p udp -j ACCEPT
-A input -s 0/0 -d 0/0 -p tcp -y -j DENY
-A input -s 0/0 -d 0/0 -p udp -j DENY
Because ipchains rules are cleared and reloaded based on the contents of this file, each time you start your system, the /etc/sysconfig/ipchains file is a good place to set up your firewall rules. With computer-cracker attacks on the rise, the current approach to security the experts recommend is to be secure by default. This means you should start by restricting most services and should then add only those services you want enabled. Put in the rules that allow services first, and then have all other services denied in the last two lines.
Understanding ipchains firewall rules
An ipchains target can be a simple command like ACCEPT or DENY, or it can be the name of another rule chain to begin examining. There are three default rule chains that the kernel will always examine. They are the input, output, and forward chains. You can create additional user-defined chains and call them from these original three, but for simple firewall configurations, the standard three should be sufficient.
| Tip? |
ipchains stops examining a rule chain after finding a match, so pay attention to the order of rules. Rules with specific conditions should go before those with similar but broader conditions. If you accept all TCP connections but follow that with a rule to deny telnet access, telnet (being a TCP service) will be allowed. Reverse the rules order (deny telnet, then accept TCP) to have the right effect. |
The general syntax is to invoke ipchains with a parameter specifying the action to take, followed by the rule chain to take it on. A rule description and a rule target may follow this. Table 14-3 shows action parameters you can use with ipchains.
|
Action Parameter |
Description |
|---|---|
|
-A, --append |
Append a new rule to the end of the specified list. |
|
-D, --delete |
Delete a rule from the specified list. You can specify the rule by its numeric place in the list or by the rule parameters that match it. |
|
-R, --replace |
Replace a rule with a new one. |
|
-I, --insert |
Insert a new rule into a specific position in the list. |
|
-L, --list |
List all the rules in a chain. If the chain name is left off, list all rules in all chains. |
|
-F, --flush |
Flush all the rules out of a chain. |
|
-Z, --zero |
Zero out the packet counters for all chains. |
|
-N, --new-chain |
Create a new chain with the specified name. |
|
-X, --delete-chain |
Delete the chain with the specified name. |
|
-P, --policy |
Set the policy for the chain to the specified target. The policy of a chain describes what action to take if no rule matches the packet. The default policy for all chains is ACCEPT. |
|
-M, --masquerading |
Allows viewing of masqueraded connections. IP Masquerading is discussed in Chapter 16. |
|
-S, --set |
Set the timeouts for TCP, TCPFIN, and UDP packets. |
|
-C, --check |
Check a supplied packet against the given chain. This is useful mainly for debugging. |
|
-h |
Print a Help message describing parameters to ipchains. |
As you can see in Table 14-3, the ipchains action parameters can be expressed in two forms, either as a dash followed by a single capital letter, or two dashes followed by a descriptive word. Both will work, so use whichever you prefer. In the example in this chapter, I will use the abbreviated version.
Usually, we follow the action parameter with the rule chain to apply it to. Rules added to the input chain will be examined only when filtering network packets being received by the Linux box. Similarly, the output chain is examined only for packets being transmitted from the Linux box. The forward chain is examined only for network packets that are received by the Linux system but will be delivered to some other network system. Packet forwarding only occurs when your system is configured as a router.
After specifying a chain to act on, you may specify some optional parameters to define a rule. Table 14-4 lists the available optional parameters.
|
Parameter |
Description |
|---|---|
|
-p, --protocol[!] protocol |
Specify the protocol that the rule should match against. This should be TCP, UDP, or ICMP. |
|
-s, --source [!] address |
Specify the source address to match against. This can be an individual address, or you can specify an entire subnet by following the address with a / and the number of 1 bits in the left side of the subnet mask. Thus, the address 199.170.177.0/24 would have a subnet mask of 255.255.255.0. |
|
--source-port [!]port |
The source TCP or UDP port number as specified in /etc/services. You can also specify a range of ports by listing the first and last port number separated by a ':' colon character. |
|
-d, --destination [!] address |
Specify the destination address to match against. This can be an individual address, or you can specify an entire subnet by following the address with a / and the number of 1 bits in the left side of the subnet mask. Thus, the address 199.170.177.0/24 would have a subnet mask of 255.255.255.0. |
|
--destination-port [!] port |
The destination TCP or UDP port number as specified in /etc/services. You can also specify a range of ports by listing the first and last port number separated by a ':' colon character. |
|
--icmp-type [!] typename |
Set the type of ICMP packet to use. |
|
-j, --jump target |
The name of the target (action) to execute when the rule matches. This could be the name of another ipchain or one of several predefined targets. |
|
-i, --interface [!] name |
The name of the network interface that this rule applies to. If this option is not supplied, the rule will apply to all interfaces. |
|
[!] -f, --fragment |
The rule will apply only to fragmented packets, excluding the first packet. In other words, it applies to all packet fragments after the first one. |
|
-b, --bidirectional |
The rule should apply to both incoming and outgoing packets. |
|
-v, --verbose |
Print debug messages when processing this ipchains command. |
|
-n, --numeric |
Use IP addresses instead of host names when printing output to the screen. |
|
-l, --log |
Turn on kernel logging of matching packets. This will slow things down and fill up your hard drive. It is intended mainly for debugging. |
|
-o, --output [maxsize] |
Divert packets to a user space process. Another debugging feature. |
|
-m, --mark markvalue |
Mark the packet with a 32-bit signature. This is probably only useful to you if you are a kernel hacker. |
|
-t, --TOS andmask xormask |
Examine the TOS field of the packet using the supplied bit masks. Read the ipchains man page for a complete discussion of this option. |
|
-x, --exact |
Display exact values of packet counters rather than numbers rounded to the kilobyte. |
|
[!] -y, --syn |
Examine the SYN bit in the TCP packet being looked at. Useful for blocking TCP connection from being initiated in one direction but not the other. |
|
--line-numbers |
Show line numbers when listing rules. This is useful if you plan to delete or modify rules by position number. |
|
--no-warnings |
Disable all warning messages. |
After specifying a rule for a particular type of packet, you must specify the target for it using the -j or --jump option. This tells ipchains what to do with that packet when it finds a rule that matches it. The target could be the name of another rule chain to traverse, but more often it is one of the predefined actions described in Table 14-5.
|
Target |
Description |
|---|---|
|
ACCEPT |
Accept the packet and deliver it in the normal way. |
|
DENY |
Drop the packet completely. |
|
REJECT |
Drop the packet and then send an ICMP packet with an explanation to the sending host. This is primarily useful for debugging. |
|
MASQ |
Use IP Masquerading for this packet type. Refer to Chapter 16 for an explanation of masquerading. |
|
REDIRECT |
Redirect the packet to a new location. |
|
RETURN |
Return from this chain to the chain that called it. Continue examining rules in the calling chain where you left off. |
I've shown you the various components of an ipchains command. It is time to put them together into some practical examples. It is possible to create some very sophisticated and complicated rule lists with ipchains, but I will keep my examples rather simple. Keeping things simple is generally a good policy, since large, complicated rule chains can impact system performance. More time spent examining rules means less time delivering packets and serving up information. The higher the traffic level on your Linux box, the greater the performance impact of those complicated rule chains.
Changing ipchains firewall rules
Now let's try adding a rule. As an example, imagine we want to block ICMP packets to disallow "pinging" of our Linux box. You may do that to avoid various denial-of-service attacks that could be launched against your system. Block ICMP with a command like the following:
# ipchains -A input -p icmp -j DENY
This specifies that we are adding a rule to the input chain. It will match any ICMP packet and will drop it rather than allowing it through. Now if you are using the ping command against your Linux box, you should receive no response. Type the ipchains -L command again, and you'll see something like this:
Chain input  (policy ACCEPT):
target   prot opt     source       destination ports
DENY     icmp ------  anywhere     anywhere    any  -> any
Chain forward (policy ACCEPT):
Chain output  (policy ACCEPT):
You can see your new rule listed. This rule will block all ICMP packets entering your system, regardless of which computer sent those packets. If your Linux system is acting as a router, it will also block ICMP packets that are being forwarded from the Internet to your network, or vice versa. People on the Internet will be unable to ping anything on your network. Likewise, you will be unable to ping anything on the Internet. Perhaps that is not what you want. Assume then that you wish to block pinging of systems on your network by people on the Internet, but allow pinging of the router and allow the router to ping hosts on the Internet. First, we should flush the contents of the input chains using the -F parameter; then we can add our new rule.
# ipchains -F input
# ipchains -A forward -p icmp -j DENY
Now we can ping the Linux system and the Linux system can ping other boxes, but ping requests will not be passed through the Linux system. If you wish, use the ipchains -L command to verify that the rule has now been added to the forward chain rather than the input chain.
You may also wish to block the telnet protocol when coming from the Internet. For this example, let us assume that our Linux router is connected to the Internet via a dial-up connection called ppp0 and is connected to our internal LAN via an Ethernet connection called eth0. In that case, you could block telnet with a command like the following:
# ipchains -A input -i ppp0 -p tcp --dport 23 -j DENY
This rule basically says that any TCP packet with a destination port of 23 (the telnet port as specified in /etc/services) that is arriving on the ppp0 interface should be dropped. This does not prevent you from telneting to your Linux box from your internal network, but it does block telnet access from the Internet.
I'm going to finish up with one more useful example. Imagine you want to allow any type of outbound TCP connection to the Internet, but want to block any inbound TCP connection. Every TCP connection sends packets in both directions, so at first glance it would seem impossible. Block all inbound TCP packets, and the reply packets to your outbound connections will also be blocked. The trick is to block only the initial TCP packet that is used to start an inbound connection. We can do this because all TCP connection requests start with a packet that has something called the SYN bit set. We can use the --syn option to tell ipchains to look for that bit. Try the following command:
# ipchains -A input -i ppp0 -p tcp --syn -j DENY
There are many useful ways to filter traffic using ipchains. I encourage you to read the ipchains man page (type man ipchains) and the ipchains HOWTO document to learn more about it. You can find the HOWTO document at www.tldp.org/HOWTO/IPCHAINS-HOWTO.html.
Saving ipchains firewall rules
After you have created the ipchains rules you want, it is important to save them to a file; otherwise, they will be lost when you reboot the server. Fortunately, a pair of useful scripts (ipchains-save and ipchains-restore) is provided for exactly this purpose. Essentially, ipchains-save will echo the current ipchains rule list to the screen. The ipchains-restore script reads in the specially formatted rule list and makes it active. After customizing ipchains, save the new rules to a file by running ipchains-save and directing the output to a file such as:
# /sbin/ipchains-save > /tmp/ipchains.rules
Next, you can add the rules you have created to the /etc/sysconfig/ipchains file. As root user, open the file in any text editor. Then read in the ipchains.rules file you have created in the preceding example.
Configuring an iptables firewall
The iptables firewall feature (also referred to as netfilter) is the default firewall software when you install Red Hat Linux. Today, both ipchains and iptables are available with Red Hat Linux, although only one can be active at a time. iptables is the better supported firewall tool these days.
If you currently use ipchains on your Red Hat Linux system and you wish to convert to iptables, you need to disable ipchains before you can use iptables. In fact, if you try to use the iptables script (/etc/init.d/iptables) to start iptables while the ipchains module is loaded, the iptables startup script silently exits.
While iptables is generally considered to be more complex than ipchains to work with, it is also considered to be more powerful and flexible. Because development is not continuing for ipchains, the few broken ipchains features that exist will probably stay broken.
This section describes how to turn on iptables and set up firewall rules for several different types of situations. It also tells how to turn on features related to firewalls that allow your iptables firewall to do Network Address Translation (NAT), IP masquerading, port forwarding, and transparent proxies.
| Note? |
The Red Hat Linux startup scripts will "punch a hole" through your firewall if you use certain services, and will therefore work even if they are not explicitly enabled in your iptables configuration. For example, NTP (which sets your system time from a network time server) and DNS resolution (which lets you contact a DNS server to resolve addresses) both open the ports they need in your firewall. |
Turning on iptables
To turn on iptables, you might have to turn off ipchains. (This might be the case if you just upgraded from a release prior to Red Hat Linux 8, where ipchains was the default.) Then you can add the modules and create the rules you need for your iptables firewall. The following procedure describes how to get iptables going on your Red Hat Linux system.
| Tip? |
During the time that you turn off ipchains, turn on iptables, and configure the filtering rules for iptables, your computer may be unprotected from the network. You should test your firewall rules on non-critical computers, and then perform the switch on critical computers either quickly or by temporarily shutting down your network interfaces. |
-
Stop the ipchains script from starting automatically at boot time:
# chkconfig ipchains off
-
Set the iptables script to start automatically at boot time:
# chkconfig iptables on
-
Now you can either reboot Red Hat Linux, or stop ipchains and unload the ipchains module, as follows:
# service ipchains stop
# modprobe -r ipchains
-
Before you can start iptables you must have a working set of rules that have been placed in your /etc/sysconfig/iptables file. To create those rules, refer to the examples in the following sections. (Without the configuration file in place, iptables fails silently.)
-
If you are doing NAT or IP Masquerading, turn on IP packet forwarding. One way to do this is to change the value of net.ipv4.ip_forward to 1 in the /etc/sysctl.conf file. Open that file as root user with any text editor and change the line to appear as follows:
net.ipv4.ip_forward = 1
-
Restart your network interfaces to have IP packet forwarding take effect.
# /etc/init.d/network restart
-
Once the rules file is in place, start up iptables:
# /etc/init.d/iptables start
-
At this point, iptables is installed as your firewall. You can check to see that the modules used by iptables are loaded by using the lsmod command, as follows:
# lsmod |grep ip
ipt_REJECT             3928   6  (autoclean)
iptable_filter         2412   1  (autoclean)
ip_tables             15096   2  [ipt_REJECT iptable_filter]
-
If you want to allow passive FTP or IRC connections from computers on your LAN, you may need to load those modules by adding them to the /etc/modules.conf file. (See the description of passive FTP and IRC after the firewall-example sections.)
If your iptables service didn't start, make sure that:
-
An ipchains module is not loaded. (Unload it with modprobe -r as shown previously.)
-
The /etc/sysconfig/iptables file exists. (You need to create one if one was not already created for you when you installed Red Hat Linux.)
Tip? As you add iptables rules, more modules will have to be loaded. Appropriate modules should be loaded automatically when a new rule is entered. Run lsmod | grep ip again after you have added a few rules to see which modules were added. Note that these modules will not be unloaded if you decide to stop iptables. They will stay loaded until the next reboot or until you remove them (modprobe -r).
The following sections contain examples of iptables firewall rules.
Creating iptables firewall rules
One way to configure iptables is to start by adding and deleting rules to your kernel from the command line. Then when you get a set of rules that you like, you save the rules that are currently running on your system. The tools you use to create your firewall rules and then make them permanent are as follows:
-
iptables — Use this command to append (-A), delete (-D), replace (-R) or insert (-I) a rule. Use the -L option to list all current rules.
-
iptables-save -c — Use this command to save the rules from the kernel and install them in the configuration file.
-
/etc/sysconfig/iptables — This is the configuration file that contains the rules that were saved from the iptables-save command.
-
/etc/init.d/iptables — This is the iptables start-up script that must run automatically each time Red Hat Linux reboots. When it starts, it clears all iptables rules and counters and installs the new rules from the /etc/sysconfig/iptables file. You can also use this script with different options from the command line to check the status of iptables (status) or to run iptables-save for you to save the current rules (save).
To get you started with iptables, I'm providing a sample set of iptables rules along with descriptions of how you might change those rules for different situations. Here's how you could load and save any of the sets of rules described in the following example:
-
If you are currently running ipchains, complete the procedure in the previous "Turning on iptables" section.
-
Stop iptables and clear all existing rules:
# /etc/init.d/iptables stop
-
Add the rules shown in the following example to a file, using any text editor. Modify the rules to suit your situation and save the file.
-
As root user, run the file as a shell script. For example, if you named the file firescript, you could run it as follows:
# sh firescript
-
See how the rules were loaded into the kernel:
# iptables -L
-
If everything looks okay, save the rules that are now in the kernel into the /etc/sysconfig/iptables file:
# iptables-save > /etc/sysconfig/iptables
From now on the rules will be read each time you reboot or restart iptables. Save a copy of the script you used to create the rules, in case you ever need it again.
Example 1: Firewall for shared Internet connection (plus servers)
This example features a home or small-office LAN with a Red Hat Linux system acting as an iptables firewall between the LAN and the Internet. The firewall computer also acts as a Web server, FTP server, and DNS server. Figure 14-2 shows this configuration.
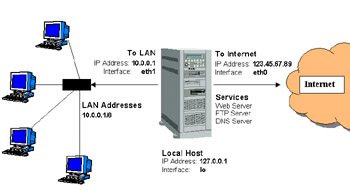
Figure 14-2: Using iptables as a firewall between the Internet and a LAN.
If you want to use the sample firewall script that follows, you must change the following information to match your configuration:
Firewall computer — The firewall computer is set up as follows:
-
Local host — 127.0.0.1 (IP address) and lo (interface). You shouldn't need to change these.
-
Connection to the Internet — 123.45.67.89 (IP address) and eth0 (interface). Replace them with the static IP address and interface name associated with your connection to the Internet, respectively.
-
Connection to the LAN — 10.0.0.1 (IP address) and eth1 (interface). Replace 10.0.0.1 and eth1 with the static IP address and interface name associated with your connection to your LAN, respectively.
Computers on the LAN — Each computer on the LAN in the example has an IP address between 10.0.0.2 to 10.0.0.254. Change 10.0.0.255 to a number that matches your LAN's range of addresses.
Here is an example of a script to load firewall rules that could be used for the configuration shown in Figure 14-2:
# (1) Policies (default)
iptables -P INPUT DROP
iptables -P OUTPUT DROP
iptables -P FORWARD DROP

# (2) User-defined chain for ACCEPTed TCP packets
iptables -N okay
iptables -A okay -p TCP --syn -j ACCEPT
iptables -A okay -p TCP -m state --state ESTABLISHED,RELATED -j ACCEPT
iptables -A okay -p TCP -j DROP

# (3) INPUT chain rules

# Rules for incoming packets from LAN
iptables -A INPUT -p ALL -i eth1 -s 10.0.0.0/8 -j ACCEPT
iptables -A INPUT -p ALL -i lo -s 127.0.0.1 -j ACCEPT
iptables -A INPUT -p ALL -i lo -s 10.0.0.1 -j ACCEPT
iptables -A INPUT -p ALL -i lo -s 123.45.67.89 -j ACCEPT
iptables -A INPUT -p ALL -i eth1 -d 10.0.0.255 -j ACCEPT

# Rules for incoming packets from the Internet

# Packets for established connections
iptables -A INPUT -p ALL -d 123.45.67.89 -m state --state
ESTABLISHED,RELATED -j ACCEPT

# TCP rules
iptables -A INPUT -p TCP -i eth0 -s 0/0 --destination-port 21 -j okay
iptables -A INPUT -p TCP -i eth0 -s 0/0 --destination-port 22 -j okay
iptables -A INPUT -p TCP -i eth0 -s 0/0 --destination-port 80 -j okay
iptables -A INPUT -p TCP -i eth0 -s 0/0 --destination-port 113 -j okay

# UDP rules
iptables -A INPUT -p UDP -i eth0 -s 0/0 --destination-port 53 -j ACCEPT
iptables -A INPUT -p UDP -i eth0 -s 0/0 --destination-port 2074 -j ACCEPT
iptables -A INPUT -p UDP -i eth0 -s 0/0 --destination-port 4000 -j ACCEPT

# ICMP rules
iptables -A INPUT -p ICMP -i eth0 -s 0/0 --icmp-type 8 -j ACCEPT
iptables -A INPUT -p ICMP -i eth0 -s 0/0 --icmp-type 11 -j ACCEPT

# (4) FORWARD chain rules
# Accept the packets we want to forward
iptables -A FORWARD -i eth1 -j ACCEPT
iptables -A FORWARD -m state --state ESTABLISHED,RELATED -j ACCEPT

# (5) OUTPUT chain rules
# Only output packets with local addresses (no spoofing)
iptables -A OUTPUT -p ALL -s 127.0.0.1 -j ACCEPT
iptables -A OUTPUT -p ALL -s 10.0.0.1 -j ACCEPT
iptables -A OUTPUT -p ALL -s 123.45.67.89 -j ACCEPT

# (6) POSTROUTING chain rules
iptables -t nat -A POSTROUTING -o eth0 -j SNAT --to-source 123.45.67.89
I divided the commands in the preceding script into six sections. The following text describes each of those sections.
(1) Policies — The iptables -P commands set the default policies for INPUT, OUTPUT, and FORWARD chains. By assigning each of those policies to DROP, any packet that isn't matched is discarded. In other words, for a packet to get through, it has to be specifically matched and ACCEPTed by one of the other rules in the script.
(2) User-defined chain — A user-defined chain I call okay is created to do a few more checks on packets requesting certain TCP services that I'm going to allow through (Web, FTP, and DNS services). The -N okay option creates the okay chain. The next line says that a SYN packet (--syn), which requests a new connection, is fine to let through. The next line allows through packets associated with an ESTABLISHED connection (one that has already had traffic pass through the interface) or a RELATED connection (one that is starting a new connection related to an already-established connection). The final line in this set tells iptables to DROP packets that don't meet one of those checks.
(3) INPUT chain rules — The bulk of the packet filtering is done in the INPUT chain. The first sets of input rules indicates to iptables when to always accept packets from the Internet and from the LAN. The next three sets determine which requests for specific protocols (TCP, UDP, and ICMP) are accepted.
-
Packets from LAN — Because you want the users on your LAN and the firewall computer itself to be able to use the Internet, this set of rules lets through packets that are initiated from those computers. The first line tells iptables to accept packets for ALL protocols for which the source is an acceptable addresses on your LAN (-s 10.0.0.0/8, which represents IP numbers 10.0.0.1 through 10.0.0.254). The next three lines allow packets that come from all valid IP addresses on the firewall computer itself (-s 127.0.0.1, 10.0.0.1, and 123.45.67.89). The last line accepts broadcast packets (-d 10.0.0.255) on the LAN.
-
Packets from Internet (already connected) — This line is split in two (I just used the backslash to join the lines because the page wasn't wide enough to show it as one line). It ACCEPTs packets that are both associated with connections that are already established (--state ESTABLISHED,RELATED) and are requested directly to the firewall's IP address (123.45.67.89).
-
TCP rules (new connections) — Here is where you open up the ports for the TCP services you want to provide to anyone from the Internet. In these lines you open ports for FTP service (--destination-port 21), secure shell service (22), Web service (80), and IDENTD authentication (113), the last of which might be necessary for protocols such as IRC. Instead of accepting these requests immediately, you jump to the okay chain you defined to further check that the packets was formed properly.
Caution? You want to ensure that the services on the ports to which you are allowing access are properly configured before you allow packets to be accepted to them.
-
UDP rules (new connections) — These lines define the ports where connection packets are accepted from the Internet for UDP services. In this example I chose to accept requests for DNS service (--destination-port 53) because the computer is set up as a DNS server. The example also illustrates lines that accept requests for a couple of other optional ports. Port 2074 is needed by some multimedia applications the users on your LAN might want to use, and port 4000 is used by the ICQ protocol (for online chats).
-
ICMP rules — ICMP messages are really more for reporting conditions of the server than for actually providing services. Packets from the Internet that are accepted for ICMP protocol requests are those for ICMP types 8 and 11. Type 8 service, which allows your computer to accept echo reply messages, makes it possible for people to ping your computer to see if it is available. Type 11 service relates to packets whose time to live (TTL) was exceeded in transit, and for which you are accepting a Time Exceeded message that is being returned to us. (You need to accept Type 11 messages to use the traceroute command to find broken routes to hosts you want to reach.)
(4) FORWARD chain rules — Because this firewall is also acting as a router, FORWARD rules are needed to limit what the firewall will and will not pass between the two networks (Internet and local LAN). The first line forwards everything from the local LAN (-A FORWARD -i eth1). The second line forwards anything from the Internet that is associated with an established connection (--state ESTABLISHED, RELATED).
(5) OUTPUT chain rules — These rules basically exist to prevent anyone from your local computer from spoofing IP addresses (that is, from saying packets are coming from somewhere that they are not). According to these three rules, each packet output from your firewall must have as its source address one of the addresses from the firewall computer's interfaces (127.0.0.1, 10.0.0.0.1, or 123.45.67.89).
(6) POSTROUTING chain rules — The POSTROUTING chain defines rules for packets that have been accepted, but need additional processing. This is where the actual network-address translation (NAT) work takes place. For the NAT table (-t nat), in the POSTROUTING chain, all packets that go out to the Internet have their addresses translated to that of the firewall's external interface (--to-source 123.45.67.89). In this case I used the Source Network Address Translation (SNAT) chain because I have a static IP address (123.45.67.89) associated with my Internet connection. If I were using a dynamic IP address (via DHCP), I would use MASQUERADE instead of SNAT. I would also have to change any references to -d 123.45.67.89 to -i eth0. (Of course, you would be using a different IP address and possibly a different Ethernet interface.)
Example 2: Firewall for shared Internet connection (no servers)
In this scenario, the firewall is protecting a Linux system (firewall) and several systems on the LAN that only want to connect to the Internet. No servers are behind this firewall, so you want to prevent people from the Internet from requesting services.
You could use the same script shown in Example 1, but not use lines that request TCP services. So you could drop the user-defined chain in section 2 and drop the TCP rules from section 3. You could also remove the ICMP rules, if you don't want your firewall to be invisible to ping requests (Type 8) and if you don't care about receiving messages when your packets exceed their time to live values (Type 11), such as when a packet runs into a broken router.
Example 3: Firewall for single Linux system with Internet connection
In this example, there is one network interface, connecting your Red Hat Linux system to the Internet. You are not sharing that connection with other computers and you are not offering any services from your computer.
In this case, you could cut sections 2, 4, and 6. From section 3, you could cut all rules relating to incoming requests from the LAN and all TCP services. As I mentioned in Example 2, you could also remove the Type 8 ICMP rule to make your firewall invisible to ping requests from the Internet and the Type 11 ICMP rule to not accept messages about failed time-to-live packets.
Understanding iptables
Now that you've seen something about what iptables rules look like and how you can get them going, step back a bit and see how iptables works.
The iptables feature works by having IP packets (that is, network data) that enter or leave the firewall computer, traverse a set of chains that define what is done with the packet. Each rule that you add essentially does the following:
-
Checks if a particular criterion is met (such as that a packet requests a particular service or comes from a particular address) and
-
Takes an action (such as dropping, accepting, or further processing a packet).
Different sets of rules are implemented for different types of tables. For example, tables exist for filtering (filter), network address translation (nat), and changing packet headers (mangle). Depending on the packet's source and destination, it traverses different chains. Most of the rules you create will relate to the filter table (which is implied if no other table is given).
The chains associated with the filter table are INPUT, OUTPUT, and FORWARD. You can add user-defined chains as well. You will probably be most interested in adding or removing particular TCP and UDP services using the basic rules shown in the previous example. Assign ACCEPT to packets you want to go through and DROP to those you want to discard. You can also assign REJECT to drop a packet but return a message to the sender, or LOG to neither drop nor accept the message, but to log information about the packet.
A lot of great features are built into iptables. The following descriptions tell you about some cool things you can do with iptables and give you some tips on using it.
Allowing FTP and IRC services through an iptables firewall
With passive FTP, the FTP client sends its IP address and the port number on which it will listen for data to the server. If that client is on a computer that is behind your firewall, for which you are doing NAT, that information must be translated as well or the FTP server will not be able to communicate with the client.
iptables uses connection-tracking modules to track connections. Using this feature, it can look inside the FTP data themselves (that is, not in the IP packet header), to get the information it needs to do NAT (remember that computers from the Internet can't talk directly to your private IP addresses). To do FTP connection tracking (to allow passive FTP connections to the clients on your LAN), you need to have the following modules loaded:
-
ip_conntrack
-
ip_conntrack_ftp
-
ip_nat_ftp
The same is true for chats (IRC) and DCC sends. Addresses and port numbers are stored within the IRC protocol packets, so those packets must be translated too. To allow clients on your LAN to use IRC services, you need to load the following modules:
-
ip_conntrack_irc
-
ip_nat_irc
The default port for IRC connections is 6667. If you don't want to use the default you can add different port numbers when you load the connection-tracking modules:
insmod ip_conntrack_irc.o ports=6668,6669
Using iptables to do NAT or IP Masquerading


