Removing Dynamically Created Content
You can easily remove dynamically drawn lines from a timeline using the clear() method. Here's the syntax:
path.clear();
Movie clip instances that are created using duplicateMovieClip() or attachMovie(), such as icons that are dragged and dropped onto canvas_mc, can be removed using a method of the Movie Clip class called removeMovieClip().
NOTE
You can't use this method to remove movie clip instances that were not created using ActionScriptthat is, instances that you've actually dragged from the library and placed on the stage.
Removing movie clip instances can be useful for dynamically clearing the stage content, freeing system resources, reinitializing applications, or adding functionality to some applications. The syntax is simple:
someMovieClip.removeMovieClip()
In this exercise, you'll create a function that will clear the canvas of all dynamically drawn lines as well as instances of the icon_mc movie clip instance that might be dragged and dropped onto canvas_mc.
Open draw4.fla.
This is the file as you left it at the end of the preceding exercise. In this exercise, you'll add a function to Frame 1 in the Actions layer of the main timeline that will clear the canvas of any content, and you'll add a script to the Clear button in the window2_mc movie clip instance that calls this function.With the Actions panel open, select Frame 1 of the Actions layer and add the following function definition at the end of the current script:
function clearContent() {

  _root.holder_mc.clear();

  for (var i = 0; i <= iconDepth; ++i) {

    var name:String = "object" + i + "_mc";

    _root[name].removeMovieClip();

  }

  iconDepth = 0;

}
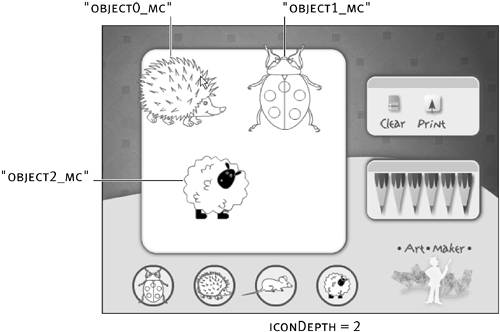
The first action in this function clears all dynamically drawn lines from the holder_mc movie clip instance, using the clear() method. A simple for loop is then used to remove any instances of the icon_mc movie clip instance that have been dragged and dropped onto the canvas. Because the value of iconDepth is incremented with each icon_mc instance that's dragged, dropped, and duplicated, as shown in the buildIconList() function definition scripted in the preceding exercise, its value always represents the number of icon_mc instances that have been duplicated and placed on the canvas. This value is thus used in the loop to set how many iterations the removal loop should perform. After the loop finishes removing all the dragged and dropped icon_mc instances, the value of iconDepth is set to 0 so that the next time an icon_mc instance is dragged and dropped onto the canvas, naming of the duplicated instances can once again begin with 0.

Double-click the window2_mc instance to edit it in place. Move the playhead to the admin frame label. Select the frame on the Actions layer and add the following script:
clear_btn.onRelease = function() {

  _root.clearContent();

};
This frame contains two buttons: clear_btn and print_btn. The script added in this step defines an onRelease event handler for the clear_btn button instance. When clicked, the clearContent() function on the main timeline is called, clearing the canvas of content.On the same frame, add the following script for the print_btn button instance:
print_btn.onRelease = function() {

  printAsBitmap("_root", "bmovie");

};
When the print_btn button is released, the graphical content of the _root timeline, as well as of any of its child movies (essentially, everything you see, including dynamically created instances), will be printed as a bitmap graphic at actual size.
NOTE
This script demonstrates how dynamically created instances can be printed as easily as anything else. Had we wanted to get a bit more sophisticated, we might have opted to print only what was drawn on the canvas itself; however, this would require some different syntax in our various functions, and printing options are not the focus of this exercise. You'll see more on printing in Lesson 21, "Printing and Context Menus."
Choose Control > Test Movie to test the movie. Draw a few lines and then click the Clear button.
When you click the Clear button, the clearContent() function is executed and the for loop iterates through and deletes every created movie clip instance.Close this movie and save your work as draw5.fla.
This completes the exercise and the lesson. As you have learned, the dynamic removal of content is even easier than its creation; however, knowing how to do both allows your projects to scale and change in many ways based on user input and interaction.


