Tracking Playback and Downloading Progression
The number of frames in a movie and the file size of their contents determine the movie's overall length and sizea fact made evident by looking at the main timeline where these factors represent the length and size of the entire SWF. The total number of frames in a movie is a represented by the_totalframes property. If the main timeline has 400 frames that span several scenes, the following script sets the value of myVariable to 400:
var myVariable:Number = _root._totalframes;
You can use this property in scripts to determine the overall length of the movie (based in frames).
NOTE
Because it's a read-only property, the value of _totalframes is set automatically by Flash (based on the number of frames on a timeline). Not only does it not make sense to attempt to reset this valueit's not even possible!
If you know the value of _totalframes, you can use it in conjunction with other movie properties to make comparisons during downloading and playback. For example, by comparing the value of the _currentframe property with the value of the _totalframes property, you can determine how much longer the movie will play:
var framesLeft:Number = _root._totalframes - _root._currentframe;

message_txt.text = "There are " + framesLeft + " to go.";
Because Flash is based on streaming technology, the process of downloading and viewing an SWF from a Web site actually occurs one frame at a time. Another property, _framesloaded, provides the total number of frames that have been downloaded. The value of this property can be compared to the _totalframes property to provide information about the progress of the download. In the following exercise, we'll demonstrate this principle by creating a progress bar (known as a preloader) that shows the percentage of frames that have been downloaded.
Open preloader1.fla in the Lesson16/Assets folder.
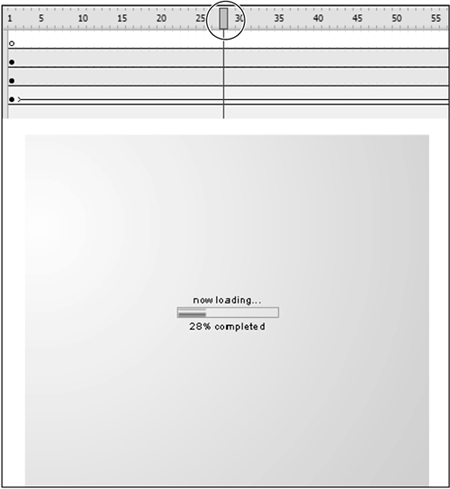
This project contains two scenes: Preloader and Content. The Content scene simply contains several layers of graphics and animation that demonstrate how the preloader works. The Content scene also contains a frame label named Start that plays an important role in the end result of the project. All of our work in this exercise takes place in the Preloader scene, which contains three layers: Background, Preloader, and Actions. The Background layer contains a square with a radial gradient. The Actions layer contains a stop() action to prevent the timeline from moving forward until we instruct it to do so. The Preloader scene contains two elementsa text label containing the text "now loading…" and a movie clip instance named preloader_mc, which includes the elements that show the downloading progress. We'll add script to this instance's timeline, so let's take a closer look at it.Double-click the preloader_mc movie clip instance to edit it in place.
This movie clip's timeline consists of four layers named according to their contents. The most important aspects of this timeline are the text field named info_txt, which resides on the Text layer, and the tweened animation on the Amount layer. The text field dynamically displays the percentage of frames that have downloaded. The tweened animation represents a 100-frame progress bar that begins at 0 percent and ends at 100 percent. Among other things, our script moves this movie's timeline to the appropriate frame number based on the percentage of frames that have been downloaded, and the progress bar moves accordingly.

With the Actions panel open, select Frame 1 of the Actions layer and add the following script:
stop();

onEnterFrame = function() {

  var framesLoaded = (Math.ceil (( _parent._framesloaded / _parent._totalframes) * 100));

  gotoAndStop (framesLoaded);

  info_txt.text = framesLoaded + "% completed";

  if (framesLoaded >= 90) {

    _root.gotoAndPlay ("Start");

  }

}
The first action prevents the timeline from moving forward until we tell it to do so.
The second line attaches an onEnterFrame event handler to the preloader clip. As a result, the script within the event handler is executed 24 times a second, which means that it instantly reacts to the current downloading conditions to display the most accurate representation of the process.
This script determines a percentage value for the number of frames that have downloaded. It then rounds up that number and assigns the resulting value to the framesLoaded variable. Using precedence, the expression employed to do this work is evaluated in the following manner:
_parent._framesloaded /_parent._totalframes
With this part of the expression, the number of frames on the main timeline that have loaded is divided by the total number of frames on the main timeline.
NOTE
Because this script is within the preloader movie clip instance and the instance resides on the main timeline, the use of _parent as the target path is a reference to the main timeline. This setup allows the preloader clip to be used (and function properly) without modification in any project.
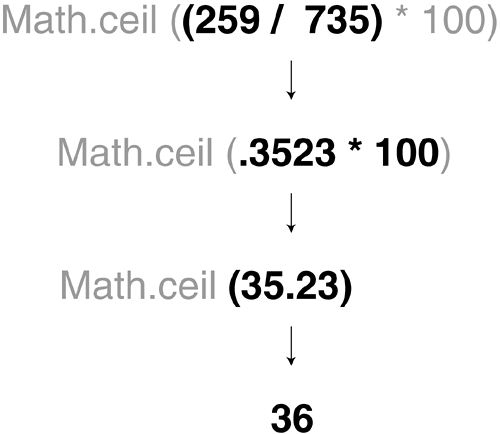
For demonstration purposes, let's assume that the movie has 735 frames, 259 of which have loaded. The expression would look like this:
259 / 735
This would result in a value of .3523. The next part of the expression multiplies that result by 100:
* 100
This would result in a value of 35.23. Finally, using the Math.ceil() method, this value is rounded up to the next whole number, 36and thus framesLoaded is assigned a value of 36. Remember that because this script is executed 24 times per second, the value of framesLoaded increases as the movie is downloaded.

TIP
The _framesloaded and _totalframes properties used in this script can be replaced with the getBytesLoaded() and getByteTotals() methods of the MovieClip class if you want to make this preloader react to bytes loaded (rather than just frames). This is sometimes the preferred method of scripting a preloader because a frame is not considered loaded (and thus the preloader doesn't advance) until all the data that it contains is loaded. The preloader may appear stalled if the frames loaded contain numerous bytes of data. In contrast, looking at the bytes loaded causes the preloader to move forward more smoothly because changes in byte data happen more frequently (as each byte of data is downloaded). See the bonus file on the CD that demonstrates this principle.
The next action in the script sends the preloader instance to the appropriate frame, based on the value of framesLoaded. Because the current movie contains the tweened animation of the progress bar moving from left to right, this action controls the movement of that bar. As the value of framesLoaded increases, so does the appearance of progress on the progress bar.
The next action sets what's displayed in the info_txt text field. Here, the value of framesLoaded is concatenated with the string "% completed". If framesLoaded has a value of 36, for example, the result is "36% completed".
The last part of the script contains a conditional statement used to determine when the preloader's work is complete. It says that when the value of framesLoaded is equal to or more than 90, the main timeline should be moved to the frame labeled Start and played from there.
NOTE
The value of 90 in this conditional statement could easily be changed to any value to specify when the preloader's work is finished and the movie can begin to play.
Choose Control > Test Movie to view the project to this point. When the test movie appears, choose View > Download Settings > 56K; then choose View > Simulate Download.
This setting provides a fairly accurate simulation of how the preloader will look and function when the movie is being downloaded over a 56K modem. As the movie loads, the percentage of the movie downloaded changes repeatedly. The progress bar reflects the ongoing status of the downloading process. As explained in Step 3, after 90 percent of the movie's frames have downloaded, the timeline moves to the Content scene and the movie plays from there.Close the test movie and save the project as preloader2.fla.
This step completes the exercise and this lesson.


