Targeting the Current Movie
Whenever a script is placed in a timeline, such as on a frame or on a button, and the target for those actions is that same timeline, the target for the actions in that script is the current movie. This is sort of like telling yourself to do something. For example, if you were to tell yourself to stand up, that action could be said to be targeting the "current" personyoubecause you gave and responded to the command (you're both the commander and the person taking orders). If you were to script this action, it would look like this:
standUp();
Note that the action doesn't include a target path. This is because the action targets the current movie: if you were to tell yourself to stand up, you wouldn't normally address yourself prior to giving the command. In much the same way, Flash understands that when an action doesn't include a target path, it's meant to affect the timeline where the script resides.
Another way to address the current movie in a script is by preceding an action with the term this, like so:
this.standUp();
In essence, you're saying, "With this timeline, take the following action." We'll provide greater detail about this later in the book. For now, remember that in all cases, the following syntax is interchangeable when addressing the current movie:
action ();

this.action ();
Keep in mind that your project may contain many scripts on various timelines that don't contain target paths. When this is the case, each script affects its own timeline or the current movie.
In the next exercise, we'll target the current movie for several timelines, using no target path and the term this interchangeably. We use both because we want you to grow accustomed to the use of this as well as how it relates to the current referenced object. You will have opportunities to use it in more advanced ways later.
Open currentTarget1.fla in the Lesson03/Assets folder.
This project consists of a single scene with four layers, each named according to its content. The Background layer contains four keyframes. At each of these keyframes the background is a different color. (Move the playhead back and forth to see this in action.) In the middle of the stage is a movie clip instance of a very rounded fellow.
In our first scripting task, we'll instruct the main timeline to move to a random frame when it begins playing, causing a random background color to appear. After that, we'll work with the movie clip instance in the middle of the stage, script it to do something, add a few family members, and then script them to do something as well.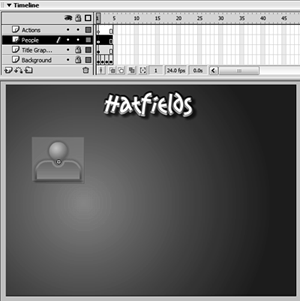
Select Frame 1 of the main timeline and add the following script:
var colorNumber:Number;

colorNumber = random (4) + 1;

this.gotoAndStop (this.colorNumber);
The keyframe on Frame 1 of the main timeline is currently selected, meaning that the main timeline is the current movie in the context of this script. As a result, any action you enter in the Actions panel without a target path (or that uses this) will affect this timeline.
After declaring that colorNumber will contain a number, the second line in the script generates a random number between 1 and 4 and assigns it to colorNumber. By using random (4) we ask Flash to generate a random number with four possible values, always beginning with zero0, 1, 2, or 3. By adding 1 (+1), the possible values generated become 1, 2, 3, or 4a necessity because the last line in the script tells the current movie to go to and stop at a frame number based on the random value assigned to colorNumber. Timelines don't have a Frame 0, so colorNumber can't contain a value of less than 1. As a result of this script, one of the background colors displays at random when the movie begins.
Notice that no target path is used on line 2 when assigning the value of colorNumber (for example, this.colorNumber = random(4) + 1;) ; however, the term this is placed before the variable's name in the last line. The two syntax types are interchangeable and reference the current timeline. In this case, the current timeline is the main timeline because Frame 1 of the main timeline is where this script exists.
The timeline that is considered the "current" timeline in a script is determined completely by where the script exists. In other words, the main timeline is considered the current timeline, relative to the script in this step, because this script is placed on Frame 1 of the main timeline. If you were to move this script to Frame 1 of a movie clip's timeline, the target for these actions would cease being the main timeline and would instead become the movie clip where the script was placed.
The next few steps should help you more fully understand this concept.Double-click the movie clip instance in the middle of the stage to edit it in place.
You'll need a solid understanding of this movie clip's timeline to complete several of the exercises in this lesson, so let's take a minute now to get acquainted with it.
This timeline has two frame labels: Quiet and Speak. At the Speak label, a text balloon appears that includes a text field named balloon_txt. We will soon create a script that displays text within this text field whenever the timeline is moved to the Speak label.
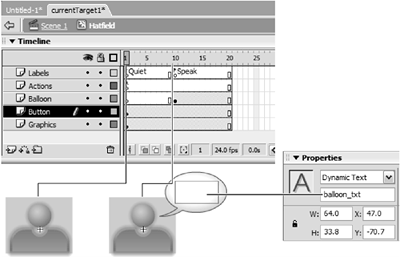
The Button layer of this timeline contains an invisible button that's placed on top of all graphics on this timeline. We will script this button in the next step.
Finally, Frame 1 of this timeline's Actions layer contains a stop() action to prevent the timeline from moving past this frame until we instruct it to do so.With the Actions panel open, select the invisible button and add this script:
on (press) {

  startDrag (this);

  gotoAndStop ("Speak");

  balloon_txt.text = words;

}


on (release) {

  stopDrag ();

  this.gotoAndStop ("Quiet");

}
The first set of actions is executed when this button is pressed, causing the movie clip instance to become draggable. Next, the same timeline is sent to the frame labeled Speak. In addition, we set the text to be displayed in the balloon_txt text field to the value of wordsthe name of a variable that will contain a string of text. We will define the value of this variable shortly.
As the script shows, when the invisible button is released (the mouse button is released), dragging stops and the timeline is sent to the frame labeled Quiet.
Once again, the important thing to remember in this script is that either a target path has not been defined in front of the actions, or this has been used. In either case, the target is understood to be the current timeline, which is the timeline that this button is a part of.Return to the main timeline. With the Library panel open, drag two more instances of the Hatfield movie clip onto the stage. Choose Control > Test Movie to test what you've done so far.
The first thing you'll notice is that the main timeline goes to a random frame to display one of the background colors on Frames 1 through 4. This is a result of the script on Frame 1 of the main timeline, which we added in Step 2 of this exercise.
Press any of the instances, and you'll notice that they become individually draggable and that their text balloons appear. The concept to grasp here is that the invisible button that enables this functionality is part of the master movie clip itself (see Step 4). Thus, each instance of that clip contains this button as well as the script that makes it work (instances are nothing more than exact copies of the master clip).
Recall that the script on the button is set up to make the timeline it is part of (the current timeline) draggable when the button is pressed. Because each instance is considered a separate timeline, only the instance that contains the currently pressed button will be dragged when the button is pressed. When actions are placed on the master clip's timeline or a button inside the master clip (as demonstrated here), and those actions target its own timeline, each instance of the movie clip inherits that scripted functionality. Think of this as "genetically" programming instances based on the same master movie clip so that they all have a fundamental function.
Using clip event handlers, we can give each instance its own personality, on top of what it is "genetically" programmed to do. Let's look at that technique next.Close the test window to return to the authoring environment. With the Actions panel open, select one of the three instances on the stage and add the script:
onClipEvent (load) {

  var words:String;

  words = "I'm Derek";

  this._xscale = 75;

  _yscale = 75;

}
You learned in Lesson 2, "Using Event Handlers," that clip events (load, enterFrame, mouseMove, and so on) are event handlers attached to movie clip instances. As such, clip events allow you to script actions that affect single movie clip instances rather than every instance of a movie clip, as demonstrated in the previous steps. As a result, you would use clip eventsoutside the movie clip's timelineto script characteristics unique to specific movie clip instances, but you would script shared traits inside the movie clip's timeline (on a frame or button inside the clip) so that all instances of that movie clip would inherit those characteristics. Both sets of actions target the current timeline, but they do so with a different scope.
If you were to extend this metaphor to people, you would think of shared traits (the things you script inside your movie clip's timeline) as our common capacity to think, feel, and movethings we all inherit. Unique characteristics (the things you script outside your movie clip's timeline) could include name, size, and locationthings that are individual to each of us.

The script in this step is executed when the instance loads or first appears in the movie. The first action assigns a text value to words. When this action is executed, the name and value of this variable are stored in this instance. Remember that the value of this variable is used to set the text that is displayed in the balloon_txt text field mentioned in Step 4.
The next two actions in this step scale the instance by 75 percent.With the Actions panel open, select one of the other two instances on the stage and add this script:
onClipEvent (load) {

  var words:String;

  words = "I'm Ashlie";

  _x = 400;

  _y = 300;

}
This script is similar to the one in Step 6 except that it sets the value of words to "I'm Ashlie" and, on loading, moves this instance to a location 400 pixels horizontally from the left of the stage and 300 pixels vertically from the top of the stage.With the Actions panel open, select the last instance on the stage and add the script:
onClipEvent (load) {

  var words:String;

  words = "I'm Kathy";

}

onClipEvent (mouseMove) {

  this._rotation = this._rotation + .5;

}
When this instance is loaded, the first action will change the value of words. A second clip event rotates the instance half a degree each time the mouse is moved.Choose Control > Test Movie to see what we've done so far.
On loading, you'll see that our scripts have caused several things to occur: the instance we scripted in Step 6 is now 75 percent smaller than the other two. The second instance we scripted can be seen at the x and y coordinates we told it to go to on loading. The third instance rotates as the mouse is moved. Press any of these movie clip instances to see that you can still drag as before, but the text balloon now includes text that's customized for each instance. Again, remember that while scripts placed inside the movie clip they target will affect all instances of that clip, clip events attached to individual instances let you customize each instance.Close the testing environment to return to the authoring environment. Save this file as currentTarget2.fla.
We will build on this file (with a few modifications) in the next exercise.


