Writing Your First Script
Now that we have all the information we need, as well as a rough storyboard for our project, let's assemble it.
Open Windows Notepad or Apple Simple Text to create a new text file and type &electricBill=60.
In the first part of this exercise we create the source for the data to be loaded into our movie when it plays. For our project, this data source contains a value representing the amount of the electric bill. When Flash loads this text file, it interprets this line of text and creates within the movie a piece of data (called a variable) named electricBill and assigns it a value of 60. The value of this variable will be used in several ways in our project.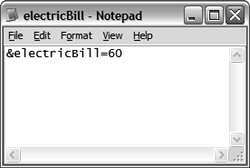
NOTE
Loading data into Flash from external sources is discussed in detail in Lesson 11, "Getting Data In and Out of Flash." Variables are discussed in detail in Lesson 6, "Creating and Manipulating Data."
Name the text file Electric_Bill.txt and save it in the folder that contains the files for this lesson. Open electricbill1.fla in the Lesson01/Assets folder.
With the exception of setting up scripts, our project elements are largely in place. (Remember, the focus of this book is ActionScript, not how to use Flash.)
Our project's main timeline contains five layers. The layers will be named in such a way that their content is evident. Currently, the Actions layer is empty.Open the Property Inspector and select the text field to the right of the text that reads "You currently owe:". In the Property Inspector, give this text field an instance name of owed_txt.
Because this text field will be used to display the amount of the electric bill, we've named it owed_txt. We add the _txt suffix to this text field's name so that when we create the script that references it, code hints will appear.
With the Property Inspector open, select the text field to the right of the text that reads "Enter the amount you would like to pay:". In the Property Inspector, give this text field an instance name of paid_txt.
The text field you selected is an input text field. It will be used to accept input from the userspecifically, the amount he or she wants to pay toward the electric bill. We've entered zero (0) in this text field, so that's the amount that will appear initially when our movie plays.With the Property Inspector open, select the text field on the right of the stage, under the label "Status". In the Property Inspector, give this text field an instance name of message_txt.
This text field will be used to display a custom message to our user, depending on how much he or she chooses to pay.Select the stamp movie clip instance (it appears as a tiny white circle below the message_txt text field) and name it stamp_mc.
Because our script will affect this movie clip instance, we must give the movie clip instance a name so that we can tell the script what to do with it. This movie clip instance has four frame labels (none, underpaid, paid_in_full, and overpaid) on its timeline that represent how it will look under various conditions. Initially, it will appear as none.
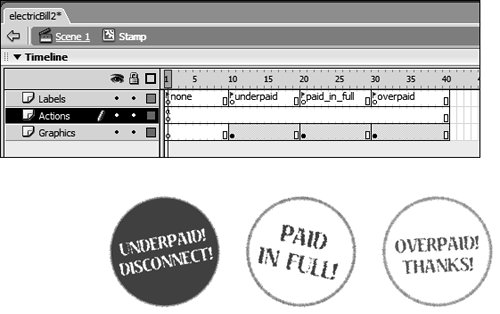
In the script we're about to set up, we want the movie clip to move to the underpaid label if the user pays less than what he or she owes, which causes the Underpaid stamp graphic to appear. If the user pays the exact amount, we want to send the clip's timeline to the frame label paid_in_full, which causes the Paid in Full stamp graphic to appear. If the user pays too much, we want the clip's timeline to go to the frame labeled overpaid, causing the Overpaid stamp graphic to appear.
Now that our scene elements are named, we're ready to script. Begin by instructing our movie to load the data from the external text file.With the Actions panel open, select Frame 1 of the Actions layer, and enter the script:
var externalData:LoadVars = new LoadVars();
ActionScript uses LoadVars objects to load and store data that comes from an external source. The LoadVars object in our example is the external text file named Electric_Bill.txt that we created earlier.
In the next steps we add a script that loads the data in our external text file into this object, for use by Flash.Add this script below the current script on Frame 1:
externalData.onLoad = function(){

  owed_txt.text = externalData.electricBill;

}
With these three lines of script, we tell Flash what to do once data from our text file has finished loading into the externalData LoadVars object. We've used the onLoad event to trigger the execution of the rest of the script. Essentially, this script is saying, "When data has finished loading (onLoad) into the externalData LoadVars object, execute the following function." (You'll learn more about functions in Lesson 5, "Using Functions.")
The function does one thing: it sets the value of the text property of the owed_txt text field instance to equal the value of externalData.electricBill. This requires a bit of explanation.
Our LoadVars object is named externalData. As mentioned earlier, this object is used to load and store data loaded from an external source. Our text file contains a single piece of data named electricBill, which has a value of 60. When this data is loaded into the externalData LoadVars object, it becomes part of that object. Thus, externalData.electricBill holds a value of 60 once the data from the external text file has been loaded. If our external text file contained other pieces of data, they could be referenced using the syntax:
externalData.name

externalData.address

externalData.phone
You'll remember that owed_txt is the instance name we assigned to the text field used to display what the customer owes. Thus, the function will cause the number 60 to appear in the owed_txt text field.
Text fields are objects that have numerous properties. One of the properties of a text field instance is its text property. This property is used to designate the text displayed in an instance. The script demonstrates how this property is used to set the text displayed in the text field instance named owed_txt. Notice that a dot (.) separates the object name from the name of its property. In ActionScript, this is how you indicate that you want to work with something specific concerning the objectin this case, one of its properties.
Here you'll also notice the use of an operator between two elementsan object property and a variable (and its value). Here, the equals sign (=) is used to tell the script to assign the value of the externalData.electricBill variable to the text property of the owed_txt text field instance.Add this script below the current script on Frame 1:
externalData.load("Electric_Bill.txt");
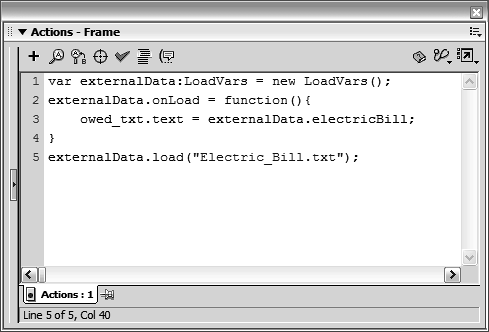
This line of script tells Flash to begin loading of the external data. It does so using the load command, which is a special command used by LoadVars objects. The command requires that you specify the URL of the external data to be loaded. In our case, it's the text file named Electric_Bill.txt. This is an example of setting a parameter value.
Recall that earlier we discussed how some actions had configurable parameters, and the parameter value you provided would determine how the action worked. In this case, the load action allows us to enter the URL to a text-based data source anywhere on our hard drive or on the Web. The command always works in the same manner (it loads data from an external source), but the location of the data source (the parameter value) can vary. You'll find that many actions in ActionScript work in this manner.
The script required for loading data from our external text file into Flash is complete. Let's do a quick review.
First, we created a LoadVars object named externalData for loading and holding our external data. Next, we told the externalData object to execute an action after data had finished loading into it. Finally, we initiated the process of loading the external data.
Are you wondering why we told the script what to do with the loaded data before we loaded the data? While it may not be obvious, it's the logical thing to do. Look at nature. For example, our stomachs are preprogrammed to process food. Imagine the mess that would ensue if we had to eat a complete meal before our stomachs knew what to do with the food. The same principle applies here. Scripting generally requires that you script how to handle various consequences, before they actually occur.
Now it's time to set up the script for the Pay Now! button.NOTE
We've placed this script on Frame 1 of our movie so that it will be executed as soon as the movie begins playingimportant because our movie needs the electricBill value in order for the script that we'll be adding to the Pay Now! button to work.
With the Actions panel open, select the Pay Now! button and enter this script:
on (press) {

  var amountPaid:Number = Number(paid_txt.text);

  var amountOwed:Number = Number(owed_txt.text);

}
This script executes when the button it is attached to is pressed. In the script, this event is followed by an opening curly brace ({ ), a couple lines of script, and a closing curly brace (} ). These curly braces indicate, "Do these two things when the button is pressed."
In the first line of the script, a variable named amountPaid is created and its value is set to equal that displayed in the paid_txt text field instancewith a twist. Normally, anything entered in a text field is considered text. Thus, even if a value of 100 appears in the text field as numerals, it's considered text (consisting of the characters 1, 0, and 0, or "100" with quotes) rather than the number 100 (without quotes).
NOTE
The fact that Flash considers everything entered in a text field to be text is a default behavior. Even though the user might not add quotes while typing into a text field, Flash adds them so that the movie knows that the value is a text value.
You can think of the Number() function as a specialized tool that allows you to convert a text value to a numerical value in such a way that ActionScript recognizes it as a number instead. You need to place the text you want to convert between the parentheses of the function. For example:
var myNumber:Number = Number("945");
will convert the text "945" to the number 945 (no quotes) and assign that number value to the variable named myNumber. In our script, we used the Number() function and placed a reference to the text value to be converted between the parentheses of the function. If the user types "54" (text initially) into the paid_txt field, the Number() function causes amountPaid to be given a numeric value of 54 as well.
TIP
The Number() function has its limitations: you can use it only to convert something that is potentially a number in the first place. For example, Number("dog") results in NaN (not a number) because a numeric conversion is not possible.
The next line in the script in Step 10 does essentially the same thing, except that the value of amountOwed is set to equal the converted-to-a-number value displayed in the owed_txt text field instance. You'll remember that this text field instance displays the amount of the electric bill. Thus, after the conversion takes place, amountOwed is given a value of 60.
The reason for converting the values in the text fields in this manner is that most of the rest of the script will be using them to make mathematical evaluations or calculationsit needs to see them as numbers, not text, in order for them to work.
In summary, when the button is pressed, the text values displayed in the paid_txt and owed_txt text fields are converted to numbers. These number values are assigned to the variables named amountPaid and amountOwed, respectively. These variable values will be used in the remainder of the script.With the Actions panel still open, add these lines to the script created in the previous step. Add them within the curly braces ({ } ), just below where it says var amountOwed:Number = Number(owed_txt.text);:
if (amountPaid < amountOwed) {

  var difference:Number = amountOwed - amountPaid;

  stamp_mc.gotoAndStop ("underpaid");

  message_txt.text = "You underpaid your bill by " + difference + " dollars.";

} else if (amountPaid > amountOwed) {

  var difference:Number = amountOwed - amountPaid;

  stamp_mc.gotoAndStop ("overpaid");

  message_txt.text = "You overpaid your bill by " + difference + " dollars.";

} else {

  stamp_mc.gotoAndStop ("paid_in_full");

  message_txt.text = "You have paid your bill in full.";

}
Because we added these lines of script within the curly braces of the on (press) event, they are also executed when the button is pressed.
This part of the script is broken into three parts, identified by the lines:
if (amountPaid < amountOwed)

else if (amountPaid > amountOwed)

else
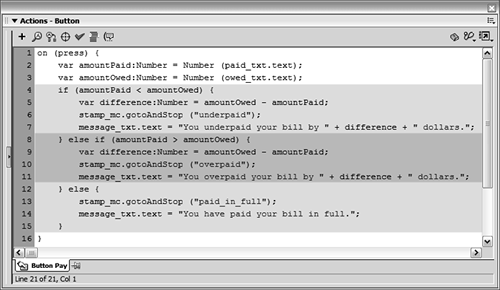
These three lines represent a series of conditions the script will analyze when executed. The condition to be analyzed in each case is specified between the parentheses. Underneath each of these lines in the script are several lines of indented script (between additional curly braces), which represent the actions that will be executed if that particular condition proves true. Here's how it works:
When our Pay Now! button is pressed, we want our script to determine whether the amount the user enters to pay is more than, less than, or equal to the amount owed. That's what the three conditions our script analyzes are all about. Let's review the first condition, which looks like this:
if (amountPaid < amountOwed) {

  var difference:Number = amountOwed - amountPaid;

  stamp_mc.gotoAndStop ("underpaid");

  message_txt.text = "You underpaid your bill by " + difference + " dollars.";

}
The first line uses a less-than operator (<) to compare the value of one variable to another. It basically states, "If the amount the user enters to pay (amountPaid) is less than the amount he or she owes (amountOwed), take these actions." These actions are only executed if this condition is true. And if they are executed, it's as a group, which is why they're placed within their own set of curly braces. The first action creates a variable named difference and assigns it a value of amountOwed minus amountPaid. If the user has entered 40 as the amount to pay, difference would have a value of 20 (amountOwed amountPaid, or 60 40). It's important to note that any equation to the right of the equals sign is calculated prior to assigning the calculated value to the item to the left. The next line tells the stamp_mc movie clip instance to go to and stop at the frame labeled underpaid, causing the Underpaid stamp to appear. The last line will generate a custom message to be displayed in the message_txt text field.
We call this a custom message because of the way the message is constructed within the script. Note the use of the difference variable in this line: the value of difference is inserted in the middle of this message between the two sections of quoted text and the plus signs. If difference has a value of 20, this message would read: "You underpaid your bill by 20 dollars."
Remember that anything within quotes is considered plain text. Because difference is not enclosed in quotes, ActionScript knows that it references a variable's name and thus will insert that variable's value there. The plus sign (+) is used to concatenate (join) everything to create a single message. The equals (=) sign is used to assign the final, concatenated value to the text property of the message_txt text field.
If the amount the user enters to pay is the same as what's owed, or more, this part of the script is ignored and the next part of the script is analyzed. It reads:
else if (amountPaid > amountOwed) {

  var difference:Number = amountOwed - amountPaid;

  stamp_mc.gotoAndStop ("overpaid");

  message_txt.text = "You overpaid your bill by " + difference + " dollars.";

}
The first line here states, "If the amount the user enters to pay is more than the amount he or she owes, take these actions." The actions executed here are variations on the ones discussed previously, with minor differences. The first difference is that the stamp_mc movie clip instance is sent to the frame labeled overpaid, which displays the Overpaid stamp. The second difference comes in the wording of the custom message. Instead of saying underpaid, here it says overpaid. The actions in this section are executed only if the user pays more than what's owed. If that's not the case, these actions are ignored and the last part of the script is analyzed. It reads:
else {

  stamp_.gotoAndStop ("paid_in_full");

  message_txt.text = "You have paid your bill in full.";

}
Here, the script doesn't begin by asking if amountPaid is more or less than amountOwed (as it did in the first two sections). This is because the script continues to this point only if the user has entered the exact amount owedthis part of the script will execute only if neither of the first two sections does.
In the end, when the button is pressed, only one of these three sets of actions will execute. As a result, the stamp_mc movie clip instance will appear a certain way and a custom message will appear in the message_txt text field.
When the Pay Now! button is released, we want the elements in our scene to reset so that they appear as they did when the movie first played. Let's add that functionality.With the Actions panel open and the Pay Now! button selected, enter these lines at the end of the current script:
on (release) {

  stamp_mc.gotoAndStop ("none");

  message_txt.text = "";

}
This script is triggered when the button is released. It will send the stamp_mc movie clip instance to the frame labeled none and empty the message_txt text field, returning these scene elements to their original state.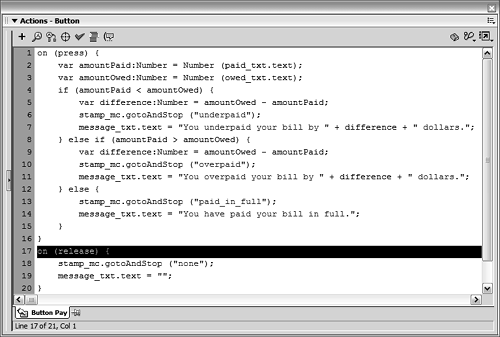
Save this file as electricBill2.fla in the same directory where you saved the Electric_Bill.txt file created earlier.
We'll use this file in the next exercise in this lesson.


