Using Event Handler Methods
All standard event handlers have equivalent event handler methods (also called callback functions or function callbacks). For example:
on (press) is buttonName_btn.onPress or movieClipName_mc.onPress


on (release) is buttonName_btn.onRelease or movieClipName_mc.onRelease


on (enterFrame) is movieClipName_mc.onEnterFrame
In addition, these event handler methods exist but have no standard event equivalents:
Buttons/Movie Clips
nameOfClipOrButton.onKillFocus

nameOfClipOrButton.onSetFocus
Sound Objects
nameOfSoundObject.onLoad

nameOfSoundObject.onSoundComplete

nameOfSoundObject.onID3
Text Fields
nameOfTextField.onChanged

nameOfTextField.onKillFocus

nameOfTextField.onScroller

nameOfTextField.onSetFocus
Stage Objects
Stage.onLoad
StyleSheet Objects
nameOfStyleSheet.onResize
ContextMenu Objects
nameOfContextMenu.onSelect
ContextMenuItem Objects
nameOfContextMenuItem.onSelect
LoadVars Objects
nameOfLoadVarsObject.onLoad
SharedObject Objects
nameOfSharedObject.onStatus
LocalConnection Objects
nameOfLocalConnection.allowDomain

nameOfLocalConnection.onStatus
NetConnection Objects
nameOfNetConnection.onStatus
NetStream Objects
nameOfNetStream.onStatus
XML Objects
nameOfXMLObject.onData

nameOfXMLObject.onLoad
XMLSocket Objects
nameOfXMLSocketObject.onClose

nameOfXMLSocketObject.onConnect

nameOfXMLSocketObject.onData

nameOfXMLSocketObject.onXML
You can use numerous events to trigger a script. Because some of these objects are intangible (for example, Sound, LoadVars, and XML), defining event handler methods on a keyframe of the timeline is the only way to execute a script when an event occurs in relation to that object (in contrast to buttons and movie clip instances, which you can select on the stage and to which you can directly attach scripts).
NOTE
We will discuss and use many of these event handler methods throughout this book. For more information, see the ActionScript dictionary.
By attaching a script to a button or movie clip instance using a regular event handler, you pretty much lock down not only what happens when an event occurs but also the events that actually trigger execution of a script. For example:
on (press) {

  gotoAndPlay(5);

}
If you were to attach this script to a button, the button would react only to the press event, performing a single action when that event occurred. To give you an idea of the power and flexibility of event handler methods, assume there's a button instance on the stage named myButton_btn. By placing the following script on Frame 1 of the main timeline (assuming the button exists at that frame), you define how that button will react to certain events:
myButton_btn.onPress = function() {

  stopAllSounds();

}

myButton_btn.onRelease = function() {

  myMovieClip_mc._xscale = 50;

}
When pressed, the button will halt all sounds; when released, it will horizontally scale myMovieClip_mc to 50 percent of its original size.
However, by moving that timeline to Frame 2which contains the following script (assuming the button exists at Frame 2)you would change the button's function completely:
myButton_btn.onPress = null

myButton_btn.onRelease = null

myButton_btn.onRollOver = function() {

  stopAllSounds();

}

myButton_btn.onRollOut = function() {

  myMovieClip_mc._xscale = 50;

}
By using null, you prevent the button from continuing to react to an onPress or onRelease eventand instead instruct it to react to the two newly defined events.
TIP
You can also delete an event handler method using this syntax: delete myButton_btn.onPress.
By using event handler methods, we can change the button's functionality and the events it reacts toa powerful capability.
Event handler methods also come in handy for dynamically created objects. Because the act of dynamically creating an object involves putting an object in your movie that wasn't there when the movie was authored, you can't set up the object to react to an event by selecting it (it hasn't been created yet). This is where event handler methods become really useful. Take a look at this sample script:
_root.createEmptyMovieClip("newClip_mc", 1);

_root.newClip_mc.onEnterFrame = function(){

  myVariable++;

}

_root.newClip_mc.onMouseMove = function(){

  myCursorClip_mc._x = _root._xmouse;

  myCursorClip_mc._y = _root._ymouse;

}
After creating a movie clip instance named newClip_mc, we immediately use event handler methods to define what that instance will do when certain events occur.
In the next exercise, we place event handler methods on Frame 1 of our movie to define how scene elements react to various events. The idea behind this project is that when the user selects a particular text field (or types text into a field), elements in the scene will react and other elements will be dynamically configured to react to various mouse and clip events.
NOTE
Although we have used event handlers attached directly to button and movie clip instances thus far in the book, we will be using event handler methods a lot more extensively from this point on. The reason is twofold. First, they're a lot more flexible and dynamic. And second, they allow us to script various elements from a central locationthe timelinewhich is a recommended practice by Macromedia due to the fact that scattering scripts throughout your project (placed on various instances) makes the project more difficult to debug and manage.
Open CarParts1.fla in the Lesson02/Assets folder.
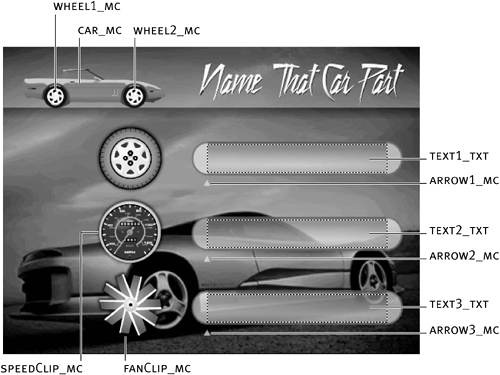
This project contains a single scene with eight layers that are named according to their contents.
The Background layer contains the main background graphic. The CarClip layer contains the red car at the top-left of the stagea movie clip instance named car_mc. That movie clip's timeline contains a couple of movie clip instances, wheel1_mc and wheel2_mc, which represent the wheels of the car. The next layer, Text Fields, contains three text fields: text1_txt, text2_txt, and text3_txt. As you will see, the way in which the user interacts with these text fields will dictate how the project functions.
The next layer, Arrows, contains three small arrow movie clip instances: arrow1_mc, arrow2_mc, and arrow3_mc. These arrows appear below each text field and will be set up to move horizontally along the bottom of the text field as text is entered and removed in a field. The next layer, Wheel, contains the movie clip wheelClip_mc, which will be dynamically scripted to react to the onEnterFrame event only when the text1_txt text field has been selected. The layer above that, Speedometer, contains a movie clip instance named speedClip_mc whose timeline contains a short animation of a needle rotating in a gauge, as well as a revving sound. When the clip is played, these animations make the clip appear to operate like the real thing. This instance will be dynamically scripted to play when the onPress event occursbut only after the text2_txt text field has been selected. The next layer, Fan, contains a movie clip instance named fanClip_mc, which will be set up to react to the onEnterFrame event only when text3_txt has been selected. Finally, Frame 1 of the Actions layer will contain most of the script for our project.

With the Actions panel open, select Frame 1 and add this script:
text1_txt.onChanged = function(){

  car_mc._x += 2;

  car_mc.wheel1_mc._rotation += 10;

  car_mc.wheel2_mc._rotation += 10;

  arrow1_mc._x = text1_txt._x + text1_txt.textWidth;

}
This script defines what happens when the text in the text1_txt text field is changed (added to or deleted).
The first action is used to move the car_mc instance two pixels to the right by adding 2 to its current x property. The next two actions rotate the wheel1_mc and wheel2_mc movie clip instances (which are in the car_mc instance) by adding 10 degrees to their current rotation values. This will cause them to appear to spin as the car moves right.
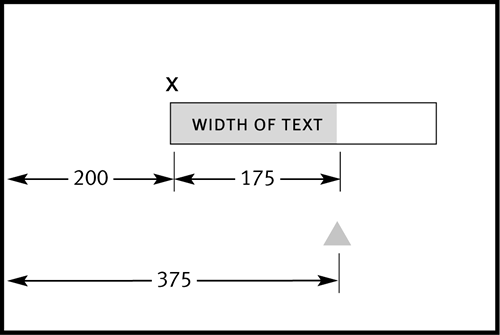
The last action moves arrow1_mc horizontally so that it appears just below the last letter in the text1_txt text field. It does this by adding the horizontal location of text1_txt (its _x property) to the width of the text in the field. The sum of this amount will position arrow1_mc appropriately. Every time text is changed (onChanged) in text1_txt, these actions will be triggered.NOTE
As shown in an earlier script, using + and = in the script is the same as saying, "Add the value on the right of the equals sign to the current value of what is identified on the left"which in this case is the rotation value of the wheel1_mc and wheel2_mc movie clip instances.

With the Actions panel open, add this script below the script you just added:
text1_txt.onSetFocus = function(){

  wheelClip_mc.onEnterFrame = function(){

    this._rotation += 30;

  }

  speedClip_mc.onPress = null;

  fanClip_mc.onEnterFrame = null;

}
This script defines what happens when the text1_txt text field has been given focus or clicked. (To "focus" on a field means to make it the active field, into which the user can immediately enter information.)
When this event handler method is triggered, it does an interesting thing: it configures three other event handler methods. Yes, they are that flexible. First, wheelClip_mc is set to react to the onEnterFrame event so that it will spin by an additional 30 degrees each time the event is triggered (24 times a second). This will cause it to spin as soon as text1_txt is selected. Because we will be adding script in the next couple of steps that will enable speedClip_mc and fanClip_mc to react to onPress and onEnterFrame events, respectively, the next two actions are used to remove that functionality when text1_txt is selected.
The next additions to the script are just a variation on what has been added so far.With the Actions panel open, add this script below the script you just added:
text2_txt.onChanged = function(){

  car_mc._x += 2;

  car_mc.wheel1_mc._rotation += 10;

  car_mc.wheel2_mc._rotation += 10;

  arrow2_mc._x = text2_txt._x + text2_txt.textWidth;

}
Syntactically and functionally, this script is the same as the script shown in Step 2with two exceptions. First, it's executed when the text in the text2_txt text field changes. Also, the last action is used to move arrow2_mc horizontally so that it appears just below the last letter in the text2_txt text field.With the Actions panel open, add this script just below the script you just added:
text2_txt.onSetFocus = function(){

  wheelClip_mc.onEnterFrame = null;

  speedClip_mc.onPress = function(){

    this.play();

  }

  fanClip_mc.onEnterFrame = null;

}
This script is a variation of the script in Step 3. It dictates what occurs when text2_txt is given focus (selected). You'll notice that the speedClip_mc instance is set up to react to an onPress event. Pressing the speedClip_mc instance after text2_txt has been given focus will cause that instance to play. The other actions prevent the wheelClip_mc and fanClip_mc instances from reacting to the onEnterFrame event that other parts of the script define. As you may have realized, the idea behind this functionality is to enable the instance to the left of a text field to react to an event when the field is given focus, but prevent it from reacting to that event when another field is given focus.With the Actions panel open, add this script below the script you just added:
text3_txt.onChanged = function(){

  car_mc._x += 2;

  car_mc.wheel1_mc._rotation += 10;

  car_mc.wheel2_mc._rotation += 10;

  arrow3_mc._x = text3_txt._x + text3_txt.textWidth;

}

text3_txt.onSetFocus = function(){

  wheelClip_mc.onEnterFrame = null;

  speedClip_mc.onPress = null;

  fanClip_mc.onEnterFrame = function(){

    this._rotation += 20;

  }

}
Once again, this script is a variation of those presented in previous steps. It dictates what occurs when text3_txt is given focus or when text within that field changes.Choose Control > Test Movie.
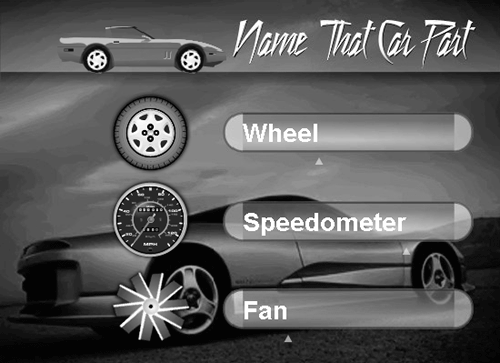
Click the top text field (text1_txt); that text field will be given focus and the wheelClip_mc instance will begin spinning. As you type text into the field, two things will occur: the car_mc movie clip instance will move to the right, with its wheels spinning, and the arrow underneath the field will continue to appear just below the last character in the field. Try clicking the speedClip_mc movie clip: notice that nothing happens. Click text2_txt, and that fact changes: the wheelClip_mc instance will quit spinning, and clicking the speedClip_mc instance will make that instance play. Clicking text3_txt will cause the speedClip_mc instance to become inactive again, but the fanClip_mc instance will begin spinning.

Close the test movie to return to the authoring environment and save your work as CarParts2.fla.
This step completes the exercise.


