Adding Parameters to Functions
In the preceding exercise, you learned how to create a function and call it. In this exercise, you'll add parameters to a function and learn how to use them. Here's the syntax for creating a function that accepts parameters:
function convertToMoonWeight (myWeight:Number){

  var weightOnMoon:Number = myWeight/6.04;

}
The sole parameter for this function is named myWeight. The value of that parameter is also used within the function definition (near the end of the second line), just as if it were a preexisting variable. Notice that you should associate a data type with the parameter in the function definition. In this case, the parameter myWeight represents a numeric value.
Here's an example of the syntax used to call this function:
convertToMoonWeight(165);
Here you can see that we added a numeric value of 165 to the function call. This value is sent to the function being called so that it can perform its specified functionality, based on that value. In this example, the value of 165 in the function call is assigned to the myWeight parameter in the function definition. The result looks something like this:
function convertToMoonWeight (165){

  var weightOnMoon:Number = 165/6.04;

}
Thus, in our example, sending a value of 165 to our convertToMoonWeight() function would set the value of weightOnMoon to 165/6.04, or 27.32.
The myWeight parameter is replaced with the value sent to the function when it is called. The great thing about this is that whenever we call our function again, we can send it a different value, which will result in the weightOnMoon variable's being set to a different value as well. Take a look at these function calls to the convertToMoonWeight() function:
convertToMoonWeight(190);

convertToMoonWeight(32);

convertToMoonWeight(230);
Each of these function calls is to our single function, but because different values are sent to the function in each call, the function performs the same action (converting that value to moon weight) using the different values.
NOTE
Parameters you define for a function have meaning only within that function. In our example, myWeight has no meaning or use outside of the function itself.
When sending values to a function, you can also use variables in your function call, as in the following:
convertToMoonWeight(myVariable);
When you do this, the current value of the variable is passed to the function.
Functions can also be made up of multiple parameters, like this:
function openWindow(url:String, window:String){

getURL(url, window);

}
This function definition contains two parameters, url and window, separated by a comma. The function contains a single action, getURL(), which makes use of these two parameters. Making a call to this function looks like this:
openWindow("http://www.yahoo.com", "_blank");
The function call also sends two values, separated by a comma, to the function: a URL and the HTML target for opening the specified URL. These parameter values are used by the function in order to perform its specified functionality. In this case, the function call would result in yahoo.com opening in a new browser window.
When defining multiple parameters in a function definition, remember their order within the parentheses. Respective values that are defined in the function definition should be listed in that same order in the function call.
Here's a function call to the openWindow() function that won't work because the parameters of the function definition dictate that the URL should be listed first in the function call:
openWindow("_blank", "http://www.yahoo.com");
NOTE
When a function is called, a temporary array called arguments is created. This array contains all parameters passed to the functioneven if you specified none when defining your function. Here is an example of how to access the arguments array:
function traceNames() {

  trace("This function was passed " + arguments.length + "arguments");

  trace("The value of the first argument is: " + arguments[0]);

  trace("The value of the second argument is: " + arguments[1]);

}

traceNames("Kelly","Chance");
In this example, these strings appear in the output window:
This function was passed two arguments

The value of the first argument is: Kelly

The value of the second argument is: Chance
Accessing the arguments array enables you to create functions that can adapt their functionality based on how many parameters are passed to them. For more information about arrays, see Lesson 6, "Creating and Manipulating Data."
In this exercise, you'll add functionality to the numeric keypad on the remote control and to the TV channel Up and Down buttons, allowing them to change the channel displayed on the TV screen. The numeric buttons work by calling a function and passing in the number of the channel to jump to. You will also modify the togglePower() function slightly.
Open television2.fla.
We continue to work with the file you completed in the preceding exercise. Before we do, however, it's important to note the structure of the screen_mc movie clip instance, which is inside the tv_mc movie clip instance. The screen_mc movie clip instance's timeline has graphical content on Frames 1 through 7. This content represents the "off" state of the TV (on Frame 1), as well as six channels of programming that our TV will be set up to receive.

Select Frame 1 of the Actions layer on the main timeline and open the Actions panel. Add this ActionScript just below the line that reads var tvPower:Boolean = false;:
var currentChannel:Number;
In this exercise we create functions that change the channel of the TV, including incrementing and decrementing the TV channel. To increment or decrement a channel, you need to have the current channel stored. The script declares a new variable called currentChannel, which will be used to store the numeric value of the current TV channel.With Frame 1 still selected, add this script just below the end of the last function definition:
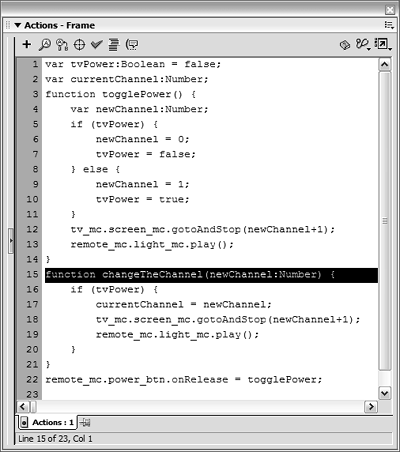
function changeTheChannel(newChannel:Number) {

  if (tvPower) {

    currentChannel = newChannel;

    tv_mc.screen_mc.gotoAndStop(newChannel+1);

    remote_mc.light_mc.play();

  }

}

You have just created a function that accepts a parameter. This function changes the TV channel based on the parameter value received (newChannel). All of the actions the function performs are enclosed in an if statement, which is used to allow channels to be changed only if tvPower is true. The function then sets a variable used to store the current channel of the television to the value of the parameter value sent to the function.
The next two lines should be familiar from the togglePower() function we discussed in the preceding exercise: they set the frame in the screen_mc movie clip instance (causing the television to change channels) and instruct the light on the remote control to blink. To understand how this function works, consider a simple example. Assume this function call is made:
changeTheChannel(4);
The function would ask whether tvPower is true (TV is on) before doing anything else. If it is, currentChannel is given a value of 4 (the same as the parameter passed to the function). Next, the screen_mc movie clip instance is moved to a frame based on the parameter value passed to the function, plus 1 (or 4 + 1). The screen_mc instance is moved to Frame 5.
Your newly created function is ready for use. Next, we'll add onRelease event handlers to each of the numeric buttons to call changeTheChannel().Add this script to the end of the current script on Frame 1:
remote_mc.channel1_btn.onRelease = function() {

  changeTheChannel(1);

};

remote_mc.channel2_btn.onRelease = function() {

  changeTheChannel(2);

};

remote_mc.channel3_btn.onRelease = function() {

  changeTheChannel(3);

};

remote_mc.channel4_btn.onRelease = function() {

  changeTheChannel(4);

};

remote_mc.channel5_btn.onRelease = function() {

  changeTheChannel(5);

};

remote_mc.channel6_btn.onRelease = function() {

  changeTheChannel(6);

};
You just added an event handler function to each of the numeric buttons on the remote control (you'll remember that remote_mc contains six buttons named channel1_btn through channel6_btnthus the basis for the syntax used). When one of those buttons is clicked, it will call the changeTheChannel() function and pass it a channel number. In this way we are able to use the same function with several different buttons and have the result depend on a parameter that was passed in.
NOTE
Functions that are created as the result of the assign operator (=) are considered to be actions. All actions should be terminated with a semicolon. Therefore, each function definition above ends with a semicolon, whereas the normal function syntax does not.
Choose Control > Test Movie. Press the Power button on the remote control to turn on the TV, and then use the numeric keypad on the remote control to change the channels.
If you press the channel buttons before turning on the television, the changeTheChannel() function will not perform the change request. If the television is on and you press one of the channel buttons, that button number is passed into the changeTheChannel() function and the screen_mc movie clip instance will move to the correct frame (channel).Close the testing movie to return to the authoring environment. With the Actions panel open, select Frame 1 of the Actions layer.
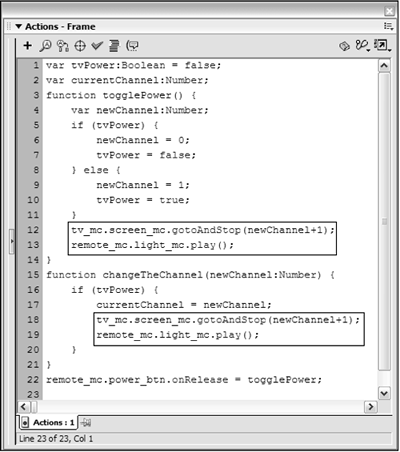
This frame now contains two function definitions, one for turning the TV on and off, and another for changing channels using the numeric buttons on the remote control keypad. However, you'll notice some redundancy between these functions: Both are set up so that when either is called, it tells the remote control light to blink as well as sends the screen_mc movie clip instance to the correct frame. It's best to fix this type of redundancy whenever possible, so we'll correct this problem now.

With the Actions panel still open, modify the togglePower() function to read:
function togglePower() {

  if (tvPower) {

    changeTheChannel(0);

    tvPower = false;

  } else {

    tvPower = true;

    changeTheChannel(1);

  }

}
This function now makes use of the changeTheChannel() function to change the channel when the power is turned on or off. When the TV is turned on, the togglePower() function makes a call to the changeTheChannel() function and passes in the number 1. This means that every time the TV is turned on, it will start on Channel 1. When it is turned off, it goes to Channel 0 (the off state of the TV screen). This demonstrates how one function can contain a call to another.
Let's create some functions that will allow us to increment and decrement channels using the Up and Down arrows on the remote.NOTE
Notice that in the first part of the if statement in Step 7, the call to the changeTheChannel() function happens before tvPower is set to false. This is because we defined the changeTheChannel() function so that it works only if tvPower is true (which it is if this part of the statement is executed). If tvPower were set to false first, the function call of changeTheChannel(0) would do nothing. The else part of the statement works just the opposite: The value of tvPower is set to true first, before the function call. Once again, this is because tvPower must have a value of true before the function call will have an effect.
Select the first frame of the Actions layer on the main timeline and open the Actions panel. Insert this script in the frame, just below tvPower:Boolean = false;:
var numberOfChannels:Number = 6;
This line of code creates a variable called numberOfChannels and assigns it a value of 6. This variable will be used in a function (which we'll create in a moment) that will be used to increment channels each time it's called. Remember that the screen_mc movie clip instance contains graphics representing only six channels; this value of 6 represents the total number of channels our TV can display and will be used to prevent the incrementing of channels beyond Channel 6. Let's see how this works.Add this script at the end of the currently selected frame:
function channelUp () {

  if (currentChannel + 1 <= numberOfChannels) {

    changeTheChannel(currentChannel + 1);

  }

}
This functionwhich does not accept parametersbumps up the channel by 1 each time the function is called. However, it uses a "safety mechanism" to prevent going beyond Channel 6. Recall that a variable named currentChannel is set every time the changeTheChannel() function is called (see Step 3). The value of this variable represents the channel currently displayed minus 1. Thus, if Channel 4 is currently displayed, this variable's value will be 3. Before the channelUp() function will execute, it uses an if statement to determine whether the current channel incremented (the value of currentChannel + 1) will still be less than or equal to the upper channel limit (the value of numberOfChannels, or 6). If the condition is satisfied, the changeTheChannel() function is called with a parameter that has a value of the current channel plus 1. This will cause the next channel to be displayed. This if statement contains no accompanying else statement: if the condition is not satisfied, this means that Channel 6 is currently displayed and no further actions are performed.Add this script at the end of the currently selected frame:
function channelDown () {

  if (currentChannel  1 >= 1) {

    changeTheChannel(currentChannel  1);

  }

}
Like the channelUp() function, this function does not accept parameters. When called, it determines whether the value of the currentChannel variable decremented by 1 is greater than or equal to the lower bound of 1, thus preventing the user from "channeling down" beyond Channel 1. If this condition is satisfied, the changeTheChannel() function is called and passed the value of the currentChannel minus 1. This will cause the previous channel to be displayed. As with the if statement in the channelUp() function definition, this if statement contains no accompanying else statement. If the condition is not satisfied, it means that Channel 1 is currently displayed and no further actions will be performed.
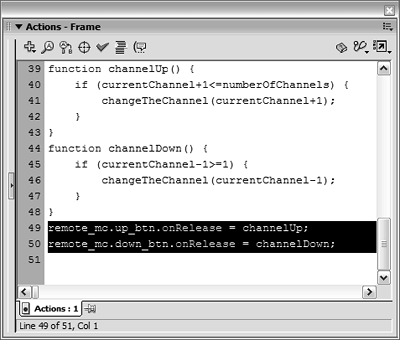
It's time to add function calls to the Up and Down buttons on our remote control that will use the channelUp() and channelDown() functions we created.Add this script at the end of the current script on Frame 1:
remote_mc.up_btn.onRelease = channelUp;
This line of ActionScript assigns an event handler to the onRelease event of the up_btn instance inside the remote_mc movie clip instance. Every time the button is clicked, the channelUp() function will be called. When the current channel reaches its upper limit (as defined by the numberOfChannels variable), the channels will no longer increment.Add this script:
remote_mc.down_btn.onRelease = channelDown;
As with the Up button in Step 11, this script assigns an event handler to the down_btn button instance in the remote_mc movie clip instance. Every time this button is pressed, channelDown() is called and the currentChannel variable is decremented (as long as it's greater than the lower limit). The television is then set to the correct channel.
Choose Control > Test Movie. Turn on the television using the Power button, and use the Up and Down buttons to change channels.
Notice that you can select any channel, and from there use the Up and Down buttons to change the channels. Using a variable that stores the current channel and functions, as you have done here, makes this type of functionality simple.Close the test movie and save your work as television3.fla.
You have created a functional remote control for a television. In the next exercise, you'll use functions in a new way while adding functionality for the cable box in our project to display a text description of the current channel's content.


