Upgrade Strategies
|
You can implement SQL Server 2005 in a few ways in your organization. You can upgrade your current servers "in place," or you can migrate the databases and other objects from an older version on one server onto SQL Server 2005 on another system. This is useful if you are upgrading your hardware at the same time. You can also keep both versions on one server (called a side-by-side install). The strategy you choose should be based on a cost/benefit analysis for your situation. If you need to allow users to access their current applications during the upgrade, you can either follow the migration or side-by-side upgrade methods I show you in a moment. You can have the users hosted on a separate system while you copy the items to the new, and then either "catch up" the transactions or use a differential output from the older system to the new to handle the time difference for the changeover. MigrationIn a migration upgrade, you copy the data and database objects from an earlier version of SQL Server to 2005. This method provides a lot of flexibility when you do not want to bring over all the data or objects from an older system. Even within this method, you have options. Copy Database WizardThe first method to migrate databases from an earlier version of SQL Server to the latest is to use the Copy Database Wizard within SQL Server 2005. You can access that tool by opening the SQL Server Management Studio and then connecting to the older database server or instance. Drill down to the Databases object in the Object Browser. Right-click any database and select Copy Database from the menu that appears. The wizard guides you through the process of selecting the objects, data, and security information you want to migrate (and even lets you schedule the process). This process enables you to move all or part of the database from one server to another with a lot of control. It hides much of the complexity of the process from you. Backup and RestoreYou can also back up your older databases on one system and restore them to the new one. This is a more useful feature when you are going to wipe the old system clean and re-install the operating system or the database software. SQL Server 2005 will restore an older database (7.0 and 2000) using the standard RESTORE DATABASE command or with the graphical tools I explain in this book. Detach and AttachYou can use the sp_dbdetach stored procedure on a SQL Server 7 or 2000 server, copy the mdf and ldf files to the SQL Server 2005 system, and then use the sp_dbattach stored procedure to copy and migrate the databases to a new server. You can also do the same thing graphically by right-clicking the name of the database in Enterprise Manager or SQL Server Management Studio and selecting Detach Database from the menu. You then copy the mdf and ldf files to the new server, right-click the Databases item in the Object Browser in the SQL Server Management Studio, and select Attach Database from the menu. Provide the name of the database and the location of the files and the system will "adopt" the databases. Side-by-SideYou might decide not to upgrade at all. You might want to keep your older system just as it is and add SQL Server 2005 into your landscape. Many organizations coincide major platform releases with new versions of their internal applications. The reason this works out is that major changes in the underlying platform create new architecture possibilities. It may be that a rewrite makes more sense than just tacking on a new back end to the system. New advances in hardware, especially with lengthy upgrade schedules, might mean that it is time to upgrade the hardware as well as the database engine. If you do that, you can recycle the old hardware after the cutover to the new system. That strategy also allows you to run a parallel system (old and new), a common practice in complicated mission-critical environments. Although this might sound expensive, it can actually save you money. SQL Server 2005 includes new features that enable you to consolidate multiple functions, such as reporting, onto fewer servers. If it is time to replace several servers, you may be able to re-architect the system such that you can use fewer of them. Another advantage in keeping your old system is that you do not have to put as much effort into an exit strategy. Because the older system is still available, your exit strategy normally contains just the steps to enter any data back into the old system that you have been entering on the new. It is one of the safest, but possibly more expensive, ways to upgrade. The Microsoft SQL Server 2005 tools enable you to connect to and manage earlier SQL Server versions, so you only have to install one toolset on your local workstation. You can manage most features in the older versions the same way as SQL Server 2005, with a couple of exceptions. You will not be able to create new objects when they are not included in SQL Server 2005. This means that you can still manage the older maintenance plans when you are connected to version 7 or 2000, but you cannot create new ones using SQL Server Management Studio. Likewise, you can manage DTS packages on those versions but not create new ones in SQL Server Management Studio. Newer features found in SQL Server 2005, such as the Reports view in Management Studio, are not available against an older system because they do not have the subsystems needed to make them work. Rather than deprecating your current hardware, you may decide to keep two versions of SQL Server running on it. You can install SQL Server 2005 in addition to a current version of SQL Server, but you can only have one named instance on a system at a time. To install a single-server side-by-side configuration, install SQL Server 2005 as normal, but specify a new installation during the initial screens and set the name of the instance to a name that is not currently used on the system. You will still have the older tools and binaries, along with the SQL Server 2005 tools and binaries. The directory structure for SQL Server 2005 differs slightly from what you will find in the previous versions, so read through Chapter 1 to find out where everything ends up. In-PlaceIn many cases, you want to replace the version of SQL Server on your current system with SQL Server 2005. This is called an in-place upgrade. For simple software packages, you start the installation or upgrade program, and the binaries for the programs are replaced with new ones. In more complex software applications, you have to complete many steps to upgrade a system, starting with preparing the older system to be upgraded. An SAP application, for instance, can take days or even weeks to upgrade. SQL Server is used as the back end to many other programs. As such, it falls into the "more complex" category. SQL Server is composed not just of the database engine function, but a "Swiss knife" of features and applications. Previous upgrades took a high level of reading, studying, and planning to implement. Although you still need to be concerned about some things for the upgrade, Microsoft provides a handy tool to at least discover all the issues you have, and in most cases it even tells you what you can do to fix them. Before you start the upgrade, make sure you are upgrading the edition you have to either the same or a higher edition. Also make sure that you have covered whatever licensing issues you need to deal with. Just because you can physically upgrade something does not mean that it is legal to do so. Upgrade AdvisorThe Upgrade Advisor program examines your SQL Server installation and creates a report that shows you what issues the upgrade will have. The report also includes any information available to help you solve the problem or at least where to find out more information. You can run the SQL Server Upgrade Advisor from any machine that can connect to your current SQL Servers. You can find the Upgrade Advisor on the installation media. When you insert that media, the auto-start menu gives you an option to run it. When you start the Upgrade Advisor, you will see a screen similar to the one shown in Figure A-1. Figure A-1.[View full size image] 
The first thing you should do is click the Check for Updates link. The tool works from a series of control files that were built during what Microsoft called the Community Technical Preview (CTP). They watched the upgrade process on thousands of machines to drive the Upgrade Advisor, building on the knowledge of those trial upgrades. This process continues, so that as Microsoft learns more about what steps are needed to upgrade a component, they include it in the control files. By downloading the latest tool, you get the most current information for your upgrade process. When you download the latest version, click the Launch Upgrade Advisor Wizard link to start the analysis. The first page is the welcome screen, shown in Figure A-2. Figure A-2.
This is standard stuff for Microsoft installations and upgrades, and if you are going to analyze more than one SQL Server, you can select the box not to show this screen again. Click the Next button to continue. Figure A-3 shows the screen that sets the instance and components that you want the wizard to examine. If you know you have not used a feature even though it is installed, you can leave it out of the process. Figure A-3.
The next screen shown in Figure A-4 uses the server name you entered on the previous screen and sets the instance name on that server along with the credentials you need to connect to it. Figure A-4.
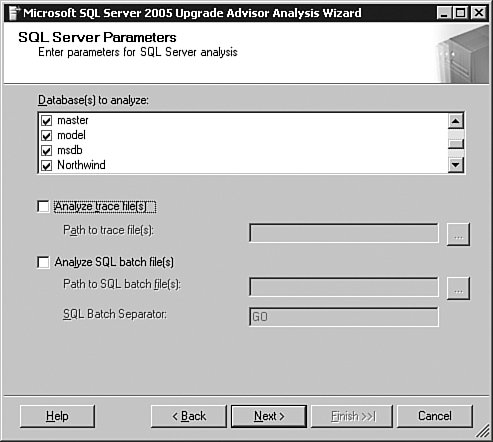
Figure A-5 shows the part of the wizard that sets the databases that should be part of the analysis. You can also capture trace files from the server for the wizard to evaluate. This is a handy feature. Figure A-5.
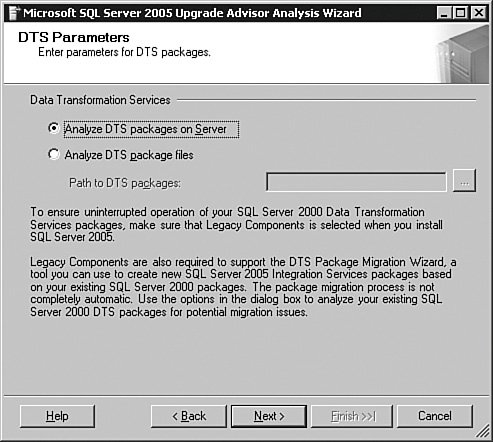
Suppose you have an application that was written a long time ago and that has not been updated. There may be things such as ANSI 89 joins or other calls that are coded into the application. If you take a trace file on the server that hosts the database for the application, the wizard will tell you if it encounters anything to be concerned about. You need to make sure the trace file is long enough to guarantee some level of completeness. The same idea goes for the next check box. The wizard can examine any of your batch scripts that call SQL Server commands to ensure that they do not have any issues. After you have made your choices, select Next to continue. Figure A-6 shows the Data Transformation Services package selection. The wizard can evaluate packages on the server or the ones you have stored in files. If you have complicated DTS packages, you are almost sure to have things to deal with here. Figure A-6.
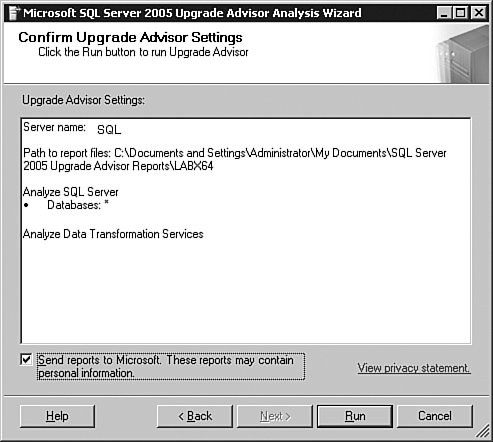
Figure A-7 shows the screen that allows you to move backward and change any selections you have made. It is also the screen that lets you send the upgrade report to Microsoft. This is how the product gets better. The wizard states that some personal information may be sent, but it is not like it is going to collect your personal address. The reason they have this disclaimer is in case the server name, IP, and other information is sensitive to you. If you are nervous about it, cut it off; if you are not, select it. Figure A-7.
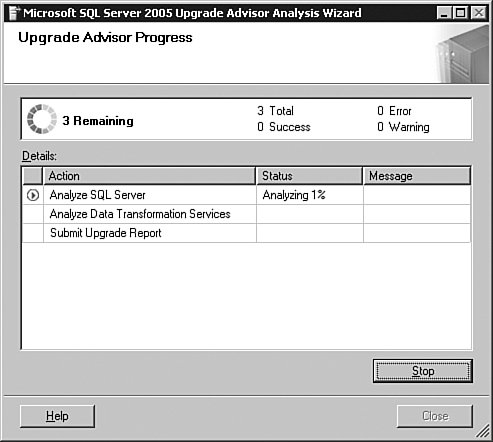
In Figure A-8, I have started the wizard on a test system. During the run, you will get feedback on the process. This test system is an IA64-bit SQL Server 2000 system with Service Pack 4 installed. Figure A-8.
Figure A-9 shows that this system has two sets of issues. It seems there are some problems with the SQL Server engine and other issues with Data Transformation Services. I click Launch Report to see what the issues are. Figure A-9.
Figure A-10 shows the Reporting portion of the tool. In this screen, I selected the DTS area to see what I need to take care of. The wizard presents me with a great deal of information, the ability to learn more, and even a check box to indicate I have fixed the issue. Figure A-10.[View full size image] 
This brings up a couple of very important points. The first is that the tool lets you save the report using the Export Report link at the bottom of the screen. You can use that to create a "to-do" list that also fits in the checklists I showed you earlier in this Appendix. The other point is that after you correct the issues, you should run the wizard again to ensure that you did not create new issues by fixing the old ones. Figure A-11 shows the SQL Server engine report, which has even more information, including a time indicator for when the problem should be addressed. Although you can leave "informational" things uncorrected going into an upgrade, you should deal with as much as you can prior to starting. Figure A-11.[View full size image] 
|