Maintenance
To administer a system means to be in charge of its hardware, software, availability, and security. Administration also involves tracking and managing a system's growth. In this section, I break those responsibilities down into tasks. These tasks form the maintenance that you are required to perform. As I introduce each concept, I explain the theory behind it, followed by practical examples. In the "Take Away" section, I include a sample checklist you can start with to manage your own systems. In the section that follows, I explain how automation can help you with these tasks. It is important to remember, however, that automation is not a substitute for actively managing your system. The automation I show you will collect the information you need, but it will not necessarily act on it, nor should it. Blindly "correcting" issues can lead to real trouble. I explain more about that in a moment. I begin with a discussion of the Recovery Model of the database, which affects your backup and recovery strategies. I then explain how to take a backup and perform a recovery, and then discuss consistency checks. I also cover re-indexing strategies. Although not technically part of maintaining a particular database, recording an audit is another part of system maintenance. I explain what you should audit and how to do that. Finally, I explain how to check for service packs and hot fixes, and when you should apply them; I also cover planning for system growth. The Recovery ModelIn Chapter 1, "Installation and Configuration," I mentioned a setting on a database that determines how the log file is used, called the recovery model. Let's complete that discussion now. At its most basic, the recovery model setting on a database determines when an entry is erased from its Transaction Log. Tracing a transaction from an application to the database, the rows of data are first written sequentially to the log file, and then on to the database. The recovery model setting determines what happens to the transaction after that. SimpleIf the database is set to the simple recovery model, then after the transaction is written to the database, the entry is deleted from the Transaction Log. In this situation, the Transaction Log grows larger and then shrinks as entries are written to it and then erased. No additional maintenance is needed on the log file. The simple recovery model is quick and efficient. The problem with it becomes apparent when you imagine a backup and restore scenario. Let's assume that an application writes datawe will call that transaction Aat 11 in the morning. The entry is written first to the Transaction Log and then on to the database. After it arrives safely in into the database, the entry is removed from the log. Transaction A is now only in one location: the database. Now let's assume that you back up the database at noon. You now have nothing in the log file, transaction A in the database, and transaction A on a backup device such as a tape or in a file system. Now assume that between noon and 1 o'clock two more transactions are written to the log and then the database; we will call them B and C. After making it safely to the database, they are then erased from the log file. You now have transactions A, B, and C safely within the database, and transaction A still on tape. Nothing is in the log file. At 1:30 the unthinkable happens; the hard drive dies. You replace the drive and restore the database from tape. Now what do you have in the database? Just transaction A. You have no way to get B and C back. The only place they were stored is gone. As you can see, the simple recovery model is useful for seldom-changing databases or those that are read-only and completely backed up somewhere else. It is not safe for databases where a loss of data would be a problem, unless you take full backups frequently. Because full backups have a performance impact, you don't want to run them when the system is under heavy load. FullThe full recovery model overcomes the limitations of the simple model but requires a little more maintenance work. In this model, the entries in the log file are retained in the log even after they are stored in the database and are only removed when you perform another backup operation, either on the database or just the log file itself. Let's assume the database is in the full recovery model and then replay our scenario from above. Once again, transaction A is entered first to the log and then to the database. The entry now exists (because of the full recovery model setting) in both the database and the Transaction Log. At noon, you take a complete database backup (called a full backup). This has the effect of copying transaction A to a backup device and erasing the entry from the log. In other words, the tape contains the entire data set as it exists at a point in timehence the name full backup. Once again, two more transactions (B and C) are written to the log file and then on to the database. Because of the full recovery model setting, this time the entries are not erased from the log file. Now you need to set up log backup operations. Let's assume you have set them to run once an hour. This type of backup just copies the entries from the log file, but not the whole database. The log backup operation then releases the transactions to be deleted. Let's review where all the data is located now. The database contains A, B, and C. The full backup tape contains transaction A. The log backup tape contains transactions B and C. The log file is empty. Once again, your troublesome server loses a drive at 1:30. To recover the database, you restore the full backup tape, without "closing out" the restore operation. You can allow users to read, but not write, data during this time. Next, you restore the Transaction Log backup tapes to "replay" transactions B and C to the database, and then you close the restore operation. You have now recovered all the transactions as of the last Transaction Log backup to the database and users can continue working. In fact, even if you did not have a log backup, as long as the database failed and not the device where the logs are, you could still recover the database and then apply the logs to it. This is a simple example; if your database is quite large, you will not be able to do a full backup several times a day, because you will run out of time or adversely affect the users. Using the full recovery model setting, you can perform a full backup periodically, such as once a day or once a week, and you back up the log more frequently, such as hourly or twice a day. Because the log file contains only the new entries, the backups are smaller and faster and do not affect the users as much. Of course, you may need even more safety than that. If you need a high-availability solution, you would implement clustering, database mirroring, or replication. I explain those concepts in Chapter 6, "High Availability." There is one other advantage to keeping the transactions around until you back them up: You can use the transactions to restore your database to a particular point in time. Every entry to the log is time encoded, and so SQL Server 2005 knows when they occurred. Using a special flag on the RESTORE command, you can restore those entries to a particular point in time. Because of the safety it provides and the point-in-time feature, the full recovery model is what all of your production databases should use. Bulk-LoggedThe bulk-logged recovery model is similar to the full recovery model, with the exception that not every operation is sent through the Transaction Log. This model allows you to bypass the log file for these operations, so they are not recorded in the log:
The advantage with this model is that it makes the log backups smaller, and the operations described above run faster. I have used this model when I have a lot of data to import into a database on a frequent basis. In those situations, I first take a log backup, set the database to the bulk-logged recovery model, and then do the import. I take a full backup of the database after the operation and then put the model back to the full setting. Setting the Recovery ModelThere are a few ways to change this setting, but the two you will use most often are using the SQL Server Management Studio and T-SQL commands. To change the setting using SQL Server Management Studio, open the tool, drill down to the database, and then right-click it. Select Properties from the menu that appears. Click the Options item on the left side of the panel that appears and change the recovery model setting from there. You can see that in Figure 3-1. Figure 3-1.[View full size image] 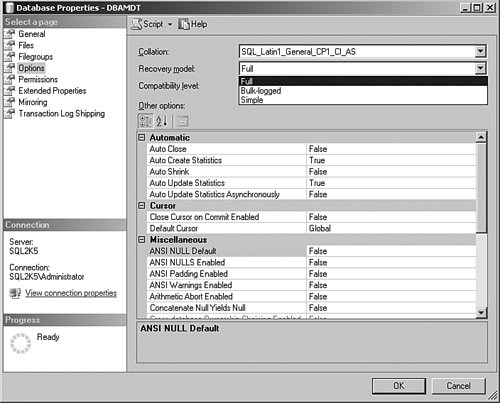
The T-SQL command to do the same operation is as follows: USE [master] GO ALTER DATABASE [DBAMDT] SET RECOVERY FULL WITH NO_WAIT GO Change the [DBAMDT] enTRy for the name of your database and the RECOVERY FULL to either RECOVERY SIMPLE or RECOVERY BULK_LOGGED for the other models. If you want to start out every database that you create with a certain recovery model, then change the model database setting. Remember that model is used as a template when you create a database on the server.
Restoring a database or attaching it does not change the recovery model setting or use the model database. BackupWhenever you perform any maintenance task, I advise that you always try to have an exit strategy defined first. The first part of any exit strategy is to ensure that your databases have adequate backups. If you are not checking the system on a daily basis, then open the SQL Server Management Studio and drill down to the properties of the database and note the Last Database Backup date. The database on my test system was last backed up quite some time ago, as you can see in Figure 3-2. Figure 3-2.[View full size image] 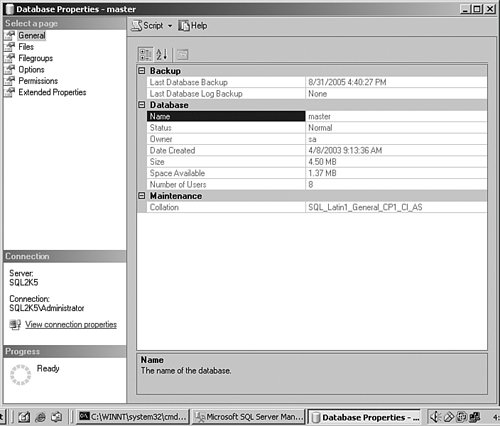
An alternate method is to use the Report capability on the right side of the Management Studio, in the Summary pane. There is a pull-down for the Report button that shows all backup activity for the database. If the backup is current, you can proceed on any other operations on the database. If not, take a backup before you do anything, regardless of how small you think the change might be. I show you how backups work in a moment. You can back up a SQL Server 2005 database or Transaction Log while the system is in use, and users can continue to access the database while the backup is running. The backup can be sent to disk or tape directly, or you can create a backup device, which is a prenamed location for the backup. When the backup starts, it continues to run even though users are still editing the data. So if the users are changing data after the backup passes the area they are working on, what is in the backup when it completes? In other words, if the backup takes an hour, and 200 transactions change in that hour, what data do you have in the backup? The answer is that the data is current as of the time the backup completes. While the backup runs, SQL Server 2005 does not empty the Transaction Log, regardless of the recovery model setting. It backs up the database and then applies the log entries to the backup at the end of the operation. That ensures that if the backup runs for hours, the backup is current at the end of that time. Creating a Backup Strategy Using Backup TypesA backup is a copy of all the data in your database in a proprietary binary format and is not compressed. You can password or encrypt the backup (more on that later), but it is not protected by default. The backup creates one or more of these files on tape or on disk. Your maintenance plan should include backing up all the data as often as possible. Your backup strategy should answer the question "How much data can we afford to lose?" This is called a risk interval. It is the amount of work you will lose between a catastrophic failure of the system and when it is available again for use. Of course, the organization will tell you the answer is "none," and in that case you are looking for high-availability solutions. These involve a real-time duplication of the data, which I explain in Chapter 6. But even with a high-availability solution, you still need a backup strategy. Before you discuss that solution, find out what the risk interval is. That number will define the rest of your strategy for you. There are three backup types: full, differential, and Transaction Log. Each contains different data, and using them correctly forms the core of your backup strategy. You can also back up just a part of the database if you are using filegroups. FullA full backup copies all the data in your database and log files. It is the most complete backup you can take, and works with all of the recovery models. If your database is in the simple recovery model, it has no other affect. If your database is in any other model, the backup copies all of the data and releases the committed entries in the log file to be erased. You should take a full backup at least once a day if the size of your database permits. If your database is extremely large, you can take a full backup as time permits and log, differential, and filegroup backups after that. The risk interval in this situation is mitigated if you use filegroups. Transaction LogA Transaction Log or just log backup is a separate backup operation and creates its own backup files. This operation copies the data in the log file that has been committed to the database and then releases those entries to be deleted. To create a Transaction Log backup, the database must be in either the full recovery model or the bulk-logged recovery model. Your strategy in these two recovery models is to take a full backup periodically, such as every day, and then take a log backup on a more frequent basis after that, perhaps hourly. It is this interval that answers the question "How much data can we stand to lose?" Let's look at an example using this strategy. In a medium-sized firm running only one daily shift, it is decided that a two-hour loss of data is tolerable. The DBA sets a full backup to run nightly at midnight and a log backup every two hours starting at 0600 hours just before the first shift arrives, until midnight to cover any late work or traveling workers who connect to the system remotely. Using this strategy, the DBA could restore the last full backup, bringing the system to last night's known good state. The DBA would then restore each Transaction Log backup, starting with the 0600 backup, repeating with each log backup file until the time of failure. The data in this case would never be more than two hours out. When the next full backup is taken, the previous ten Transaction Log backups can be erased, because the full backup includes all of the data they contain. DifferentialA differential backup gets all the data since the last full backup. The easiest way to think about a differential backup is that it is similar to a log backup, because it gets all the committed transactions in the log file, and is not useful without a full backup. The difference is that the differential backup is not smallit gets all of the transactions from the time of the last full backup, so each time you take one, you are getting a little more data. Let's look at our earlier example again, this time with the simple recovery model. Your application once again writes data (transaction A) at 11 in the morning. The entry is written first to the Transaction Log and then on to the database. Using the simple recovery model, after it arrives safely in into the database, the entry is removed from the log. Transaction A is now only in one location: the database. You take a full backup at noon. You now have transaction A in the database and transaction A on a backup device. Now assume that between noon and 1 o'clock, two more transactions are written to the log and then the databasewe will call them B and C. You now have transactions A, B, and C safely within the database, and transaction A still on tape. At 1 o'clock, you take a differential backup, capturing B and C to another file on the tape. More data is written (D and E) and at 2 o'clock you take another differential backup. Now you have A, B, C, D, and E in the database but only B, C, D, and E on the differential file on the tape. Notice how the file grows, whereas in the log file backup example, you only have the entries between the log backups. Because the log files only capture those changes, its files are much smaller. The differential backup files get larger the further you get away from the last full backup, regardless of how many differential backups you take. To take a differential backup, you need to take a full backup first. To restore the database, you need only restore the full backup and then the last differential backup. That makes restoring even faster than with a log file operation, in which you need multiple backup files to restore. Another advantage with differential backup is that you can use it with any recovery model. In effect, your get a kind of Transaction Log backup without using the full model. Keep in mind that in your overall backup strategy, you might use all three methods. For instance, you could take a full backup at midnight, a differential at noon, and log backups every hour. That way you would only need to restore the full, the differential, and at most 12 hours of log backups, making recovery that much faster. Backup LocationsYou have two options for the location of your backup files: disk and tape. There are other drivers provided by vendors for different destinations, but these are the ones you get out of the box. DiskA common method of database backups is to back up the database or log to a file on disk and then use whatever enterprise backup solution you have to "sweep" the files to your normal backup location. If the database is small to medium sized, this is a great way to go, because you have the most immediate access to the last backup and can store the backups off-site. It is important to note that SQL Server locks its physical files during use, so simply backing up the drives where SQL Server 2005 databases live will not back them up. Even if you use a "live backup" tool, SQL Server will not always allow you to recover your database properly. Some commercial packages do allow this operation. You can back up to share locations, but I have found this method to be less than reliable. A better strategy is to back up to a drive that the SQL Server can see natively and then compress and copy the file across. You can also apply Pretty Good Privacy (PGP) encryption to the database at that time. You can encrypt the data within a database before a backup, a process described in more detail in Chapter 4, "Security." TapeOn a single server, it is common to see a tape device connected directly to the SQL Server computer. SQL Server can see and use the MTF, or Microsoft Tape Format, so you can use these devices with other products that follow this standard. In fact, you can point the backup to multiple tapes at the same time (called striping), making backup operation faster. This feature also allows you to back up a database that is larger than a single tape. When you back up a single database to multiple tapes simultaneously, the restore operation needs all the tapes available to restore it. You are not making multiple copies of the backup; you are just using multiple tapes for the same backup.
You can back up to multiple disk locations simultaneously, too, but the advantages you see in a tape environment do not really carry through to files on disk. The advantage of using tapes is that the data can be stored separately from the server and put into a safe place in case of a disaster. In some cases, financial, medical, or legal requirements dictate that you have a tape backup stored in an off-site location. If you would like to make multiple backups at the same time (as opposed to using multiple tapes for the same backup), you can use the MIRROR TO command. I show you that in the examples that follow. Backup DeviceA backup device is not really different from a disk or tape location. It is simply a name that points to one or more of these backup locations. The reason you might use a backup device rather than specifying the file or tape location is that you can make backup scripts that are transportable to multiple systems. For instance, if you name your backup device "Tape Device One," you can create a script that you can use on any system as long as it has a backup device with that name on it, regardless of where it really points. To create a backup device, open the SQL Server Management Studio and drill down to the Server Objects item. Right-click that and select New Backup Device… from the menu that appears, as shown in Figure 3-3. Figure 3-3.[View full size image] 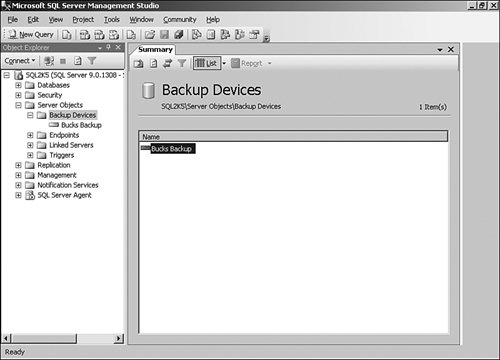
You can also create a backup device using T-SQL code: /* Create BackupDevice [Bucks Backup] */ EXEC master.dbo.sp_addumpdevice @devtype = N'disk' , @logicalname = N'Bucks Backup' , @physicalname = N'D:\TEMP\SQL2K5Backup.bak' GO In this example, the name I chose for the backup device is Bucks Backup, and it points to a physical file location on my hard drive. Alternate MethodsThere are other methods to secure your data in addition to the ones I have explained here. Some cost money, and others are outside the normal strategies you will see at larger organizations, but all have their place. Using a Third-Party ProductIn larger organizations, it is common not to use the SQL Server 2005 backup methods at all. The IT department at a firm will select a comprehensive backup strategy for all of their storage, including SQL Server. Often, these proprietary systems are paired with a hardware solution such as a tape library or Write-Once Read Many (WORM) drive jukeboxes or even large storage area network (SAN) hard drives. In this situation, the backup software will often contain "agents" that can read SQL Server 2005 databases. These agents have their own terminology and methodology and can reach into an operational SQL Server database to back up the data. Some of them are faster than the SQL Server native backups, and others provide features based on the hardware they use. If you are in one of these shops, you need to familiarize yourself with the backup methodology these tools use. It is still a good idea to know how the SQL Server 2005 native processes work, however, because many of these products explain their use in comparison the native methods. Detaching a DatabaseA database is simply a collection of files that is controlled by SQL Server. The files have a logical name in the master database on the server, which in turn points to physical files. SQL Server 2005 can "release" these files by closing the transactions and connections to them and removing the entry from the master database tables. This is called "detaching" a database. The files are then just like any other on the hard drive, and can be copied to tape or another location. In the section that follows, I show you how SQL Server can "attach" these files again to the same or another server. It is a good idea to close out all database activity before you detach a database by having all the users complete their work, setting the database to Single in the Options panel on the Properties menu on that database, and running all the maintenance discussed in this chapter. This makes the database smaller and safer to transport. Running a backup on the database also clears the log, and you will not need to care about the Log Database Files (LDFs) when you copy the database files. SQL Server creates the log file for you on the other system. You can detach a database using SQL Server Management Studio graphical methods or by using a T-SQL command. To use the graphical methods, open SQL Server Management Studio, drill down to the database you want to detach, and right-click it. Select Properties from the menu that appears and note the filenames and locations. Close that panel and then right-click the database name again. This time select Tasks from the menu, and then Detach from there. You are able to select whether you want to close connections and a couple of other options. Click OK and the files are ready for transport. You can compress them to make them smaller. Database files normally compress well. Backup SecurityYou need to physically secure the backup files. You can also add a backup password, which I demonstrate in the examples that follow. If someone gets a copy of the unprotected database backup file, they can restore it to any other SQL Server 2005 system, even if he does not exist as a user in the database. |


