Restore
Restoring a database is a bit different from backing one up. For instance, restore operations are much slower than backup operations. Also, your users cannot access the database while you are restoring.
Users can access the database while you restore it if you use more than one filegroup in the database. After you restore the primary filegroup, users can access the database while you restore other filegroups. After you have restored the database using the methods discussed here, there may be security implications. As I explain further in Chapter 4, security is stored in two placesin the master database and in the user database. Users are represented by unique numbers in both places and tied together to allow them to access a database schema. When you restore a database to a different server, these connections get severed, even if you have the same user name and other information on the receiving server. I show you how to fix that condition in Chapter 4. You can restore a database that is not there yet. That is, you can create a database by restoring a backup. You can also restore a database over the top of an existing database, after you ensure there are no users accessing the current one. That means that you can take a backup file from another server and restore it on your server. Although there are no technical limitations on this process other than having enough space, there are some security implications, which I explain in Chapter 4. You can restore a backup from a previous version (7.0 and 2000), and the restoration process will upgrade the database for you. I explain this process more in Appendix A, "Upgrading to SQL Server 2005." Restore TypesWhen you restore a database backup, you select where the backup file is located, how you want it restored, and a few options. I show an example of a few restoration types in a moment. Complete RestoreThe first type of restore is the complete database restoration, closing out the database restore operation and leaving the database ready for use. Your backup plan should include the time it takes to recover the server. This includes the time it takes to replace the parts that failed, and also the time it takes to perform a restore operation. To do that, you need to perform a restore on the same machine or another just like it. That combined time is what it takes from the identification of the failure to resuming operations. It is also not enough to try this just once. You need to have a recurring process to test your backup and restore procedures. Differential RestoreAs explained earlier, the differential backup file contains all the transactions that have occurred since the last full backup. To restore a differential backup, you first restore the full backup, this time setting the options to leave the database open for more restore operations. You then restore the latest differential backup file, this time closing the restore operations and allowing the users back in to the database. Transaction Log RestoreTo restore a database that has the recovery model set to full or bulk-logged, you first restore the latest full backup, and the latest differential backup if you have one. In both cases, you leave the database in recovery mode. Starting with the earliest Transaction Log backup from the last full or differential restore, you restore the logs in earliest-to-latest order, leaving the database in recover mode until the last log restore. Restore the last Transaction Log and close out the restoration process, and you can then allow users back in to the database. Point-in-Time and Other Special Restore OperationsIf your database is set to the full or bulk-logged recovery model, you can perform a restore that stops at a point before the actual end of the backup set. For example, if the backup contains data containing the values 1 through 10, you can recover to the time that 6 was entered, leaving the database completely usable, as long as you have the data safely stored on a backup location.
If you are set to the bulk-logged recovery model and you have performed some of those operations I mentioned earlier that bypass the log, you cannot use a point-in-time recovery. Point-in-TimeA point-in-time recovery allows you to set the entries to be restored by specifying a time, down to the second, of the last piece of data that you want restored. Be advised that this is not always the easiest thing to do. In most OLTP applications, the data flows in an out of the system in ways that are not easily untangled. It is often best if the activity in the system is stopped before the backup operation. To find out whether this is true in your system, ask one of the developers this: "If I could restore the system to the state the data was in at exactly 7:38 a.m. today, would the application still work?" To recover a database to a point in time, you use a special modifier to the RESTORE command. I demonstrate that feature in the examples that follow. LSNTo address the concerns I mentioned previously, Microsoft has provided another method to restore the database to a certain point. In every transaction, there is both a time stamp and a log sequence number (LSN). As an added feature, you can stop the restore before or after a particular LSN. The difficulty is that this number is not easily determined, so Microsoft says that this feature is primarily reserved for third-party vendors. To recover a database using an LSN, you use a special modifier to the RESTORE command. I demonstrate that feature in the examples that follow. MarkA more developer-friendly method for recovering to a point in time is using a recovery with a mark. Developers can name transactions, and a special entry into the msdb database will record a "mark" along with the LSN in the logmarkhistory table.
This is a different process than rolling back a transaction to a mark, which is covered in many T-SQL programming texts. To recover a database using a mark, you use a special modifier to the RESTORE command. I demonstrate that feature in the examples that follow. Alternate MethodsJust like the database backup process, you do not have to use these methods to restore your database. You can use a third-party product, you can attach a database to your server, or you can use a SQL Management Objects (SMO) script. Using Another ProductAny third-party product that you might use in a larger shop will restore a database with its own methods, just as it backs them up. Once again, it is best to learn the processes SQL Server 2005 uses for restores, because much of the documentation for third-party products extends these concepts. Attaching a DatabaseAttaching a database is the opposite effect of detaching it, although the process is a bit more complex. Once again, you can perform the process using SQL Server Management Studio or T-SQL commands. To attach a database, copy and unzip the files you created and place them in the location where you want them to live permanently. Note the names and locations because you need this information to attach the database. Right-click the Databases item in the Object Explorer pane and select Attach… from the menu that appears. Click the Add button in the panel that appears to add the database files form the location you noted earlier. Add all the Microsoft Database Files (MDFs) until you have them all. SQL Server will automatically create the Transaction Log files for you if you did not copy them. Click OK and the system will "adopt" the database by noting the logical and physical names and locations and mounting the database. It then presents the database to users, ready to use. Attaching a database also has the advantage of upgrading the source database if it was transferred from version 7.0 or 2000. Let's examine the various backup and restore methods using a few examples. Backup Example, Simple Recovery ModelThe least complicated backup method is when your database is set to the simple recovery model. In essence, you set the location for the backup, select full or differential as the type, and then run the command or click the OK button. As mentioned earlier, this can be done while users are still in the database. If there is activity during the backup, both the backup and the users will be slightly affected. Backing Up the DatabaseYou can back up the database to disk or tape, and if other devices are installed they may present different devices in the menus that you will see in the following screenshots. The examples I show are all directed to a hard drive file, although you can also use the backup device mentioned earlier. GraphicalOpen SQL Server Management Studio and locate the database name in the Object Browser. Right-click that object and select Tasks… from the menu that appears. From there, click the Back Up item. You are presented with a screen similar to Figure 3-4, showing the General tab. Figure 3-4.[View full size image] 
This tab sets the type of backup you want to take, whether you are backing up the entire database or just files or filegroups and the name and description of the backup. You can also expire the backup after a certain number of days or on a specified date. You would do this to prevent stale data from being used again. I have seen this used in medical and financial industries. In the General tab, you also set the location for the backup files. You can add as many as you like of either tape or disk locations, but remember that all of these need to be available at restore time because the backup will be striped across all of the devices you specify here. Moving to the next item on the left side of the panel, you will see the Options tab, shown in Figure 3-5. Figure 3-5.[View full size image] 
The first section sets whether you will use the existing media set (a named group of files or tapes) or create a new one. In the case of a drive, you will most often use the existing media set. The option that I have set here determines whether the backup gets written in addition to the backups that are already in the file (or tape) or the backup overwrites the data there. For a tape, you will often append the information, but in a disk file, it is usually better to select the overwrite option. The reason is that if you select the append option, the backups get a number within the device. That is no problem during the backup operation because this happens automatically; but when you restore the file (which I explain in a moment), you have to remember which number you want to restore. That is something you might think about with a tape, but for a file you tend to think of one file, one backup. What will happen when you forget or do not know that the file contains more than one backup is that you will restore an older (or other) backup, and you will be quite confused. In this example, I have set the backup verification option because I want to be sure that the file is valid before I store it. If you are running low on time during the backup, you can turn this option off, but I do not recommend it. As a further check of safety, you can turn checksum verification on, but I have not found this to be necessary. To run the backup with these options, click the OK button. T-SQL CommandsTo do the same backup that I have shown here graphically, you can run the following script: /* This script backs up a database to disk, overwriting the backups that are already in the file if any. */ BACKUP DATABASE [DBAMDT] TO DISK = N'd:\temp\DBAMDT.bak' WITH DESCRIPTION = N'First Full Backup' , INIT , NAME = N'DBAMDT-Full Database Backup' GO In this first half of the script, the database name is encased with right and left brackets ([]) in case the name has a space in it. Using spaces in any database object name is a poor idea, and including brackets anyway is a good idea. The line that begins TO DISK sets the drive and filename. It is prefaced with an N, which is another good habit to get into because it enables a proper Unicode rendering of the text that follows it, even if you are not using Unicode.
The Options tab is represented as the WITH statements you see here. The INIT predicate sets the backups to be overwritten in the file, and the NAME predicate sets the name. The next half of the script performs the verification: /* This part verifies the database using the first set in the file */ RESTORE VERIFYONLY FROM DISK = N'd:\temp\DBAMDT.bak' WITH FILE = 1 GO You are actually doing a restore here, but only a read of the backup file. The file is named, and then the backup number that you want to verify. Mirroring the BackupA mirror backup is a copy of the same backup at the same time to a different location. This provides a safety net or another copy that you can restore to another server for reporting purposes. There are no graphical methods to create a mirror backup, but you can use T-SQL commands to create one in code or in a script. Keep in mind that the backup is not complete until both files are written, so the speed of both locations should be the same. You can create a mirror backup to disk or tape, and you can mirror the backup to three additional devices, for a total of four backups of the same data. T-SQL CommandsTo create a mirror backup of the same database that we backed up a moment ago to two files in the same directory, you would use the following commands:
BACKUP DATABASE DBAMDT
TO DISK = 'd:\temp\DBAMDT1.bak'
MIRROR TO DISK = 'd:\temp\DBAMDT2.bak'
WITH
    FORMAT
GO
This time the WITH qualifier is FORMAT. This qualifier writes a new header over a media set, which is a grouping of backups. The tests on the machines I have available are very fastthere is almost no discernable speed difference on the smaller databases at all. Adding a Backup PasswordThere are two ways to add a password to a backup. This is important to do, because as you will learn in Chapter 4, a backup contains all your data, and by default is not protected in any way. Anyone running SQL Server 2005 can restore your unprotected files. You can password a media set or a backup set. T-SQL CommandsTo back up the same database to a file location with a password, just add the PASSWORD qualifier to the WITH predicate:
BACKUP DATABASE DBAMDT
TO DISK = 'd:\temp\DBAMDT.bak'
WITH
    INIT
,   PASSWORD='NotAVeryHardPassword'
GO
When you restore this backup, you need to make sure you have that password handy. The backup file in this case is not encrypted, but it is protected from a simple restore operation. Backup Example, Full or Bulk-Logged Recovery ModelThere is no difference in backing up the database itself in the full or bulk-logged recovery model than the way I showed you in the simple model, but in the former two models you can back up the Transaction Log separately. You can do this using graphical means or T-SQL commands. Backing Up the LogBacking up the log uses the same processes as backing up the database. You can use the same graphical options and T-SQL commands, with the exception that you specify a log operation rather than the database for the backup process. Log backups should be taken frequently, so they are smaller and do not take a lot of time. Log backups are designed not to impact the users while they are running transactions against the database. GraphicalThe only difference in the graphical method for backing up the Transaction Log rather than the database is to select Transaction Log in the backup type on the first panel. Make sure you also change the location for the backup or you will overwrite your database backup with your Transaction Log. On the Options panel, you have the same overwrite versus append options for the file or tape, but because you are backing up the log, you get two additional options. The first option (which I have set here in Figure 3-6) removes the entries in the log. This process is called "truncating" the log. The second copies the log and sets the database to the "restoring" or recovery state. This second option is often used in log-shipping operations where you copy the log file to another server and restore it there. Figure 3-6.[View full size image] 
T-SQL CommandsTo create the same log backup as in the graphical method shown previously, you can use the following script: BACKUP LOG [DBAMDT]
TO DISK = N'D:\Temp\DBAMDTTL-1.bak'
WITH
INIT
, NAME = N'DBAMDT-Transaction Log Backup'
GOTo create the log backup but not truncate the log, the script changes to this: BACKUP LOG [DBAMDT]
TO DISK = N'D:\Temp\DBAMDTTL-1.bak'
WITH
NO_TRUNCATE
, INIT
, NAME = N'DBAMDT-Transaction Log Backup'
GOIn this example, it is the WITH NO_TRUNCATE option that leaves the entries in the log. There is a similar option that does the opposite: WITH TRUNCATE_ONLY. This option does not perform a backup at all; it just removes the entries from the log as if it had. One reason to use a WITH TRUNCATE_ONLY qualifier is if the log is so large you have run out of room on the disk and you cannot operate the database properly. If this happens, run the log backup command with that statement and then immediately back up the entire database. At that point, you have broken the "log chain" and do not have an effective point in time recovery method until you take another set of log backups over time. Making a "Copy" BackupIf you need to back up a database out of the normal cycle, you will break your normal backup strategy and potentially affect the ability to perform a point-in-time recovery. The reason is that you truncate the log when you perform a complete backup. You can, however, take a backup without harming the log chain with a script. T-SQL CommandsThe following script backs up the database we have been working with but does not disrupt the log chain: BACKUP DATABASE DBAMDT
TO DISK = 'd:\temp\DBAMDTCopy.bak'
WITH
INIT
, COPY_ONLY
GOYou can also use this WITH COPY_ONLY qualifier in the log backup operation to copy the log but not affect the restore chain. Restore Example, Simple Recovery ModelWith the database and logs safely backed up, you can restore the database to the same or another system. Remember that users need to be out of the database for this operation and that if the database is restored to another system there may be security implications. GraphicalTo restore the database using graphical means, open the SQL Server Management Studio and right-click the word Databases in the Object Browser pane. The reason for not selecting the name of an existing database is that doing so places a connection to that databaseand now someone is in the database and you cannot restore it. After you right-click Databases, select Restore Database… from the menu that appears. You will see a panel similar to Figure 3-7. Figure 3-7.[View full size image] 
You can pull down a list of database names or even type one in that does not exist yet. If you do that, make sure you pick the same name that the database had on the source system. Next you select the restore location. The first option, called From database, lets you pick from the databases on the current system. It then reads from their backup histories, and places the recent backups in a list for you to choose from. In this example, you will use the second method, and assume that the database does not currently exist on the system. That requires that you select the locations manually. Click the button next to the From Device line to bring up a panel similar to Figure 3-8. Figure 3-8.
From here, you can add all of the backup files you created earlier. Remember that if you selected multiple files for the backup (not the copy operation), you need to have all of those available. After you have finished adding them, click the OK button. In Figure 3-9, you can see that I have the list of backup sets within the files I selected. This allows me to pick the one I want to restore. Now let's move to the Options section by selecting it in the left part of the panel. There are quite a few options here to review, as you can see in Figure 3-10. Figure 3-9.[View full size image] 
Figure 3-10.[View full size image] 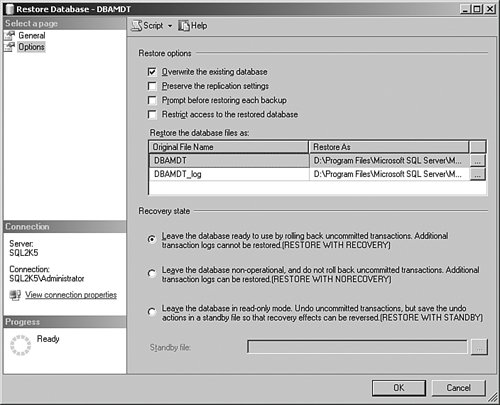
The first option overwrites a database if it already exists. The second option takes care of any replication settings, which I explain further in Chapter 6. The third option prompts you for each restore section, in case you are using multiple tapes in a single device. The fourth option leaves the database in a state such that no one else can access the database until you manually allow that user to. The next box asks you where to restore the files, and it is important that you pay attention to this location. A database, as you recall, is made up of a logical name that SQL Server uses in the master database and a set of physical files that this logical name points to. The backup file contains a pointer to these original locations. You should leave the filename alone but ensure that the driver letters and the path match what you have on the system where you are restoring the database. Failure to do this will result in an error. The final set of options is explained next to their radio buttons. The first option is used in a simple recovery model or when you are finished with the last Transaction Log restore. Because we are doing a simple restore, you can leave this first radio button selected. T-SQL CommandsIn this example script, I include the commands to relocate the files, even though I am just placing them right back where they were: RESTORE DATABASE [DBAMDT]
FROM DISK = N'D:\Temp\DBAMDT.bak'
WITH FILE = 1
, MOVE N'DBAMDT'
TO N'd:\Program Files\Microsoft SQL
Server\MSSQL.2\MSSQL\Data\DBAMDT.mdf',
MOVE N'DBAMDT_log'
TO N'd:\Program Files\Microsoft SQL
Server\MSSQL.2\MSSQL\Data\DBAMDT_log.LDF'
, REPLACE
GOThe commands that move the file are the WITH MOVE predicates for both the database and log files. You can remove those lines in a restore operation to the same locations. The WITH FILE = 1 sets the backup in the file in case you used the append option on the backup when you took it. You can leave that line as well if there is only one backup in the file or on the tape. I have also set the example script here to replace the database in case it already exists with the REPLACE option. Restore Example, Full or Bulk-Logged Recovery ModelTo restore a database in the full or bulk-logged recovery model, you first restore the database the same way as above, but in the Options panel, you select the second radio button to leave the database in a restoring mode. With that complete, the database will be restored but unusable because you have not "closed it out." Right after that, you restore the log files the same way from earliest to latest and close out the last log file restore with the first radio button. Using the script method, you add the NORECOVERY option to the WITH statement, which changes the example restore script as follows: RESTORE DATABASE [DBAMDT] FROM DISK = N'D:\Temp\DBAMDT.bak' WITH FILE = 1 , REPLACE , NORECOVERY GO Here it is the NORECOVERY option that leaves the database in the restoring mode. Next you restore each Transaction Log, starting with the earliest, one at a time, just as in the graphical method. I show you a complete exercise in a moment. Restoring the Database Using Transaction Log BackupsIn the full or bulk-logged recovery models, you take log backups more frequently than you do each database backup. It is important to keep the backups straight, so I usually name the log backups in a sequential manner starting with 1. That makes restoring them fairly intuitive. This is important because many times when you are restoring a database, there has been some type of issue, and being clear and straightforward is a good thing in those circumstances. GraphicalIn this example, I have already restored the database and left it in the "recovery" mode, ready for Transaction Log restores, picking up where we left off in the database restore example earlier. Move back to the Restoration Operation panel and select the backup files and sets just as before, as shown in Figure 3-11. Figure 3-11.[View full size image] 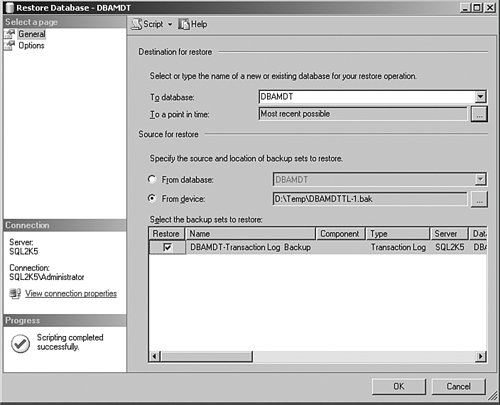
In this example, pick the Transaction Log backup file. You will do each log restore operation one at a time. Next select the Options section and select any options that you want to change. In this example, you have just one log file to restore, so at this point select the first radio button and restore the log, as shown in Figure 3-12. That sets the state of the database ready for use, and closes out the restore operation. Figure 3-12.[View full size image] 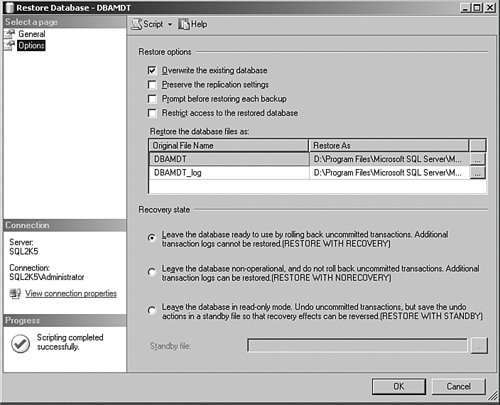
T-SQL CommandsTo restore the database log files using a script, restore the database backup first, using the WITH NORECOVERY qualifier as I explained earlier. When that completes, use the following example script to restore the DBAMDT database we have been working with: RESTORE LOG [DBAMDT] FROM DISK = N'D:\Temp\DBAMDTTL-1.bak' WITH FILE = 1 GO Point-in-Time and Other Special Restore OperationsThe point-in-time recovery is much the same as a regular restore, but you stop the restore early and close out the restore process. Although the process is simple, as I mentioned earlier these restores are more difficult than just implementing the process because it is often impossible to tell what the state of the data is at any given point in time for an entire application. There are times, however, when this kind of restore is useful, such as during testing or controlled data changes. GraphicalIn the previous graphic, you may have noticed the To a point in time… button near the top of the Transaction Log backup. That is the only option you need to set to get the restore to the time you are looking for. Once again, you need to be in the full or bulk-logged recovery model for this to work. T-SQL CommandsThere is a modifier to the WITH predicate on the example restore script I showed earlier that will stop the backup at a certain point in time: RESTORE LOG [DBAMDT] FROM DISK = N'D:\Temp\DBAMDTTL-1.bak' WITH FILE = 1 , STOPAT = 'Nov 22, 2005 12:02 AM' GO The STOPAT modifier to the WITH predicate will set the time the restore stops. I have one final note before I close out this section on backups and restore operations. Never trust your backups. Whatever methods you use to backup and restore your databases, test them regularly. Restore your backups on a test system, noting the duration each time. |


