Real-Time Availability Mechanisms
Although near-real time availability is applicable to many situations, sometimes you need to make a system available in real time. A real-time highly-available system is essential where emergency services or medical systems are involved, or in utilities such as power plants. You also need real time high-availability for global systems, where a central server stores data needed by other servers. In these cases, the system cannot be down, not even for maintenance. Because you need to maintain and upgrade your system, you need to be able to provide a seamless method for the applications to get at the same data regardless of a particular server's state. Because a server can and probably will develop a requirement to be offline at some point, the only alternative is to provide multiple servers to service the application's data requests. Using coding techniques, developers can write the application to request data from a federated set of servers. Federating means that each SQL Server 2005 system retains its own identity and another system brokers the data requests to an available server. There are many ways to design this type of architecture, but only a few require any special configuration for the SQL Server systems. The other methods of implementing multiple servers are database mirroring and clustering. In database mirroring, a copy of the entire database is available on another server, in real time. Once again, the servers retain their individual identities. The application must "know" which server they point at for data. It is a simpler coding change, however, to implement database mirroring than federating the data layer. The most comprehensive mechanism for providing real-time high-availability is the database Cluster. Using a combination of the Windows operating system and SQL Server 2005, two or more servers present a separate, single name to the applications, called a Virtual Server. Applications are coded only to talk to the Virtual Server, and the Clustered systems behind it ensure that one of them will continue to provide services such as the database engine and Analysis Services under the guise of the Virtual Server's name and IP address. This is the most costly mechanism to implement, and it requires special hardware to make it happen. Database MirroringDatabase mirroring is similar to log shipping but is more automatic for the failover. It can be used instead of clustering. It requires no special hardware but does require another database instance to implement. Database mirroring cannot mirror system databases. Although database mirroring is immediate and fails over automatically, client programs need to be able to switch to a new server in order to complete the recovery. Although most programs need to be recoded to have this feature, some of the Microsoft .NET development tools have a special setting within the connection string that can detect the failover and set the application to use the new server. There are three components within database mirroring: the principal server, the mirror server, and an optional witness server. The principal server holds the original database, the mirror server holds the copy, and the witness server keeps track of the transfer and state of the system. You can use the SQL Server 2005 Express Edition as the witness server so that you do not incur additional license costs.
In the earlier releases of SQL Server 2005, database mirroring was not enabled by default. If you have one of these releases, you can start the Database Engine service with trace flag number 1400 to enable the Mirroring feature. Check Books Online for more information about this trace flag. You can use the DBCC TRACEON (1400) command or start it with the service by adding T1400 to the startup line of the service. Database mirrors can also interchange roles, making the primary server the mirror and the mirror server the primary. In most cases that I have seen database mirroring implemented, it is as a failover measure and not to fail back and forth this way. You can work three modes for database mirroring. If you are using a witness server and you have the Transaction Safety Setting (more about that in a moment) to Full, you are using the High-Availability Operating Mode. If you have the Transaction Safety Setting to Full but you do not have a witness server, you are operating in High-Protection Operating Mode. If you have the Transaction Safety Setting off, you are operating in High-Performance Operating Mode. All of these have to do with how often the transactions are committed and how quickly you fail over. In the first mode, you are protected and the failover is fast, and in the last you are not as current. You do not need any special hardware to use database mirroring, but it is a good idea to have a fairly robust network connection between them. Unlike replication, in database mirroring only two systems are directly involved. In other words, you cannot replicate from one principal server to multiple mirror servers. You also want to make sure that the times on the servers are synchronized either to each other or to a central time server. Microseconds do not matter as much, but seconds do. Database mirroring communications work through TCP endpoints. Endpoints are essentially a direct connection to the database engine. You need to create these on both the principal and mirror servers so that you can make the connection between them. I show you how to do that next. Setting Up Database MirroringYou can follow a graphical setup on your system by simply right-clicking the database and selecting Mirror from the menu that appears. When you use this set of panels, it is not always clear what you need to set up first. In this section, I explain how to create the entire process using scripts, so that we can talk a little about the process. In these scripts, I call the principal server PRINCIPAL and the mirroring server MIRROR Both systems need to be able to connect to each other using TCP/IP. You also need a file share location on the principal server that both systems can read and write to. I call that \\PRINCIPAL\DBMIRROR on my test system We begin on the principal server first. We need a set of keys to encrypt the data between the servers. This is not required, but I normally set one up. Create a key and a certificate, and then store that certificate on the share: PRINCIPAL CREATE MASTER KEY ENCRYPTION BY PASSWORD = 'password'; CREATE CERTIFICATE principal_cert AUTHORIZATION DBO WITH SUBJECT = 'Principal'; BACKUP CERTIFICATE principal_cert TO FILE = '\\PRINCIPAL\DBMIRROR\principal_cert.cer' GO; Next, we need a connection that the process uses for the principal server to connect to the mirror server, and vice versa. I explained endpoints earlier in the book when we discussed connections, and database mirroring is one of the places this is used. In this example, the authentication is set with the certificate we just made for the mirror_ep endpoint: CREATE ENDPOINT mirror_ep STATE=started AS tcp (listener_port=5022) FOR database_mirroring (role=all, authentication=certificate principal_cert); GO; It is set to start automatically, and the port is 5022. Next, the database needs to be backed up so that it can be restored. In this example, the database name is MIRRORTEST: BACKUP DATABASE mirrortest TO DISK = '\\PRINCIPAL\DBMIRROR\MIRRORTEST.BAK' WITH FORMAT GO; The system needs a common account between the servers that can use the certificate. In this example, we create a login, then a database user, and grant the account the certificate and the ability to talk to the endpoint: CREATE LOGIN mirror_user WITH PASSWORD = 'password'; GO; CREATE USER mirror_user FOR LOGIN mirror_user; GO; CREATE CERTIFICATE mirror_cert AUTHORIZATION mirror_user FROM FILE = '\\PRINCIPAL\DBMIRROR\principal_cert.cer'; GRANT CONNECT ON ENDPOINT::mirror_ep TO mirror_user; GO; Finally, set the database to have a partner from the mirror system, using the TCP port: ALTER DATABASE mirrortest SET PARTNER = 'tcp://MIRROR.mydomain.mycompany.com:5022'; GO; Now we move over to the MIRROR server and run the following script to create the certificates to work with: MIRROR CREATE MASTER KEY ENCRYPTION BY PASSWORD = 'password'; GO; CREATE CERTIFICATE mirror_cert AUTHORIZATION DBO WITH SUBJECT = 'Mirror'; BACKUP CERTIFICATE mirror_cert TO FILE = '\\PRINCIPAL\DBMIRROR\ mirror_cert.cer'; GO; Now create an endpoint on the MIRROR server to talk with the PRINCIPAL server. In this case, I will just use the same names: CREATE ENDPOINT mirror_ep STATE=started AS tcp (listener_port=5022) FOR database_mirroring (role=all, authentication=certificate mirror_cert); GO; And now the same login and user account, granted it access to the endpoint: CREATE LOGIN mirror_user WITH PASSWORD = 'password'; GO; CREATE USER mirror_user FOR LOGIN mirror_user; GO; CREATE CERTIFICATE mirror_cert AUTHORIZATION mirror_user FROM FILE = '\\PRINCIPAL\DBMIRROR\principal_cert.cer'; GRANT CONNECT ON ENDPOINT::mirror_ep TO mirror_user; GO; We will restore the database to the mirroring server, and leave it set to a recovering state, ready to apply changes from the principal server: RESTORE DATABASE mirrortest FROM DISK = '\\PRINCIPAL\DBMIRROR\MIRRORTEST.BAK' WITH NORECOVERY GO; Finally, set up the restored database to participate in the mirroring: ALTER DATABASE mirrortest SET PARTNER = 'tcp://PRINCIPAL.mydomain.mycompany.com:5022'; GO; The server is now mirroring the two databases. To check the mirroring, you can check a table on the PRINCIPAL server: SELECT * FROM sys.database_mirroring GO; ClusteringOf all the methods of high availability, only clustering meets the requirements of securing the data to multiple locations in real time and providing application-agnostic switching. In this section, I explain the concepts around a Microsoft cluster implementation and then describe how to install, configure, and manage SQL Server 2005 on that cluster. The original meaning for a computer cluster was a group of systems that coordinated processing among themselves. This means that a computer cluster in the classic sense shared processing, storage, memory, and applications. To do this required a dedicated set of hardware and an operating system designed to manage the interaction between the systems, deciding which process would be handled by which system and so forth. Under this type of cluster, the focus was often more on sharing the processing load (called load balancing) than the redundancy that was inherent in the system. Microsoft uses the term cluster to define a failover system, one that allows a single system within the cluster, or node, to leave the cluster without interrupting operations. Little if any application load balancing occurs in a Microsoft cluster without special coding.
Microsoft calls its new 64-bit true-clustering software a "compute cluster" to indicate that it does true application load balancing. This chapter focuses on the failover cluster technology found in Windows 2000 and Windows 2003. To use a physical example of Microsoft clustering, think of the window at a doctor's office. You, as the patient, always approach a single window to make your requests. There are usually two or more attendants behind the window, each capable of handling your request, but only one that speaks with you. If the first attendant is not available, the next steps up to help you. You do not concern yourself with which attendant answers the question, as long as the question gets answered. In the case of a cluster, the "window" from the preceding example is a name (called a virtual server) and IP address provided to the network for all the attachments from the applications. The "attendants" are the servers (called the nodes) involved in the cluster. The "patients" in this example are the applications.
It is a bit beyond the scope of a single chapter to cover everything to know about Microsoft clustering, but the basic concepts are not difficult. I cover these basics in this chapter, but before you implement a cluster, you should learn more about installing and configuring a cluster using Microsoft operating systems from the Microsoft clustering Web site. To keep the examples simple, I explain a two-node cluster, although depending on the software you use you might have up to eight nodes in a single cluster. I explain more about which versions of SQL Server supports clustering in a moment. In a two-node cluster, two computers of similar hardware share three things: A network card each for the "public" network that all clients can see, a network card each configured for a "private" network that only the two nodes can see, a shared SCSI bus for some of the hard drives that both nodes can see, and three sets of drives. The first drive is connected locally to each system, like any other server. Each node can see only its own version of this drive or set of drives. The second drive or set of drives is set up on the shared SCSI bus that both nodes can see as a "quorum," which is the place where a set of data files are stored to show who "owns" the cluster resources at any given moment.
Windows 2003 has the ability to store the quorum files on multiple systems, not just on a shared drive. This allows a greater degree of redundancy, but it is a bit more complicated to administer. In this chapter, I will stick with a single quorum drive. The third drive or set of drives is also on a shared SCSI bus and is used for data that each node needs to keep in common. For a database application such as ours, this is the drive where the data files and log files go. Although you can use the same SCSI bus that the quorum drives use, I recommend that you use a second controller for this purpose. From the software side, you need an edition of the operating system that supports clustering. As of this writing, that is Microsoft Windows 2000 Advanced Server (two nodes), Microsoft Windows 2000 Data Center (four nodes), Windows 2003 Enterprise Edition in either 32- or 64-bit (eight nodes), or Windows 2003 Data Center (eight nodes). There are several other requirements for a Microsoft cluster, both from a hardware and software standpoint. Microsoft maintains a "Hardware Compatibility List" on their Web site that is mostly ignored during regular server installations. You cannot ignore this list for a cluster because the hardware is examined during installation. If it does not meet the requirements, the installation aborts I explain the specifics further in a moment. After the hardware is assembled and configured, you install the cluster from the Windows CDs. In Windows 2000, you install the clustering software from the Windows Components section in the Add and Remove Programs of the Control Panel. In Windows 2003, it is pre-installed for you and just needs to be configured. In any case, a wizard will guide you through selecting the network cards used for the public and private networks, the drives for the local, quorum and shared disks, and will automatically create a cluster group that shares various resources. Clustered resources include network shares, IP addresses, applications, and more. When the installation of the clustered operating system is complete, you can install and configure applications and resources within the cluster, which will present themselves on the virtual server. To cluster an application, it needs to be cluster enabled or cluster aware, such as SQL Server 2005. These applications are written to understand and use the facilities of the cluster and have capacities to fail over if the primary node is unavailable. Within each cluster, nodes are defined as either active or passive. An active node retains its identity and can share resources like any normal server in addition to the cluster. A passive node lurks in the background, its only purpose to provide the cluster resources in case of a failure. In a cluster, you could have an active/active arrangement, where two nodes are active, or an active/passive arrangement, where one node is active and the other passive. The ramifications for these arrangements have to do with licensing and resources. Having an active node fail over to another node incurs another license and more hardware. If you have a node fail over to a system where SQL Server is already running, you will need to ensure you have enough memory and hard drive space to support both instances of SQL Server on the system.
The licensing information I have described has to do with Microsoft products and only in a general sense. Always check with your software vendor to ensure you are within licensing compliance for your installation. Clustering RequirementsSetting up a cluster is not difficult, but it has more requirements than setting up a standard SQL Server. You face three main design decisions when you create the cluster: hardware, operating system, and platform. Hardware RequirementsAs I mentioned earlier, your choices with the hardware decision are guided by the Hardware Compatibility List (HCL) from Microsoft. The primary difference between the hardware guidelines you follow for a standard SQL Server installation and those on the HCL is that the HCL defines makes and models of computers, not just requirements for their architecture. You might be tempted to stray from the list, but you will have to use hardware from the list if you want support from Microsoft. On a general level, you need two servers, and it is a good idea to make sure they are similar. In fact, I recommend that you pair the systems, so that when you have issues, you can eliminate a difference in configuration as an issue. This is not a requirement, but you will find it easier to manage two (or more) servers that have the same configuration, especially in a clustered environment. Within those servers, you need at least one shared SCSI bus. This is a special type of controller that can see two servers on the same channel. Once again, you want to pair these cards by manufacturer to avoid configuration problems. The shared SCSI bus is required for at least one drive that is shared among all the nodes in the cluster, called a quorum. The quorum drive stores files that ensure that only one server acts as the primary node in the cluster. It has to be available for the cluster to work. You do not need a lot of space on the quorum drive, just around 500MB or so. You also do not want to store anything else on that drive, and it is a good idea to have it mirrored or protected in a RAID set. Most often, you will see the drive letter set for the quorum set to Q:, but that is only a convention. For a SQL Server cluster, you need at least one more shared bus between the nodes in the cluster. Because a SCSI device can have several IDs per controller, you can use the same controller with a different drive ID for this storage; for higher performance and security, however, you can install another shared SCSCI bus card in each node for the drives. The SQL Server cluster needs these drives for data and log files. The same layouts that I explained in Chapter 1, "Installation and Configuration," apply to a cluster. The next set of hardware you need to ensure you have for the cluster is at least two network cards for each node. The first network card provides a method for the client machines to access the nodes, called the "public" network. Although not a hardware requirement, you need a standard set of IP addresses for the public network cards on all your machines. You need another IP address for the cluster itself. This is what the users access, and what the nodes present as a single network resource to keep the cluster alive. In the case of the SQL Server cluster, you need another IP on the public network for that, too. This is the address that SQL Server presents to the network for the clients. The other network card is used for a "private" network between the nodes of the cluster. Each node pings the other to make sure they are still available. If a node does not answer back on the private network within a specified period of time, usually in a few seconds, the node is removed from the cluster. If the node was the primary, the cluster's resources are transferred to another node, keeping the cluster alive. This second card will need an independent IP network, and it is best to keep them on either a second set of switches or, if you are using only two nodes, connected directly to each other with a cross-over cable. There are other hardware components and configurations that are important in a cluster, such as Error-Correcting memory and hot-swappable parts, but they are not technically required for the cluster to work. You should seriously consider these measures because the whole purpose of a cluster is to enable high availability, and anything you do to ensure that will help. You do not want to put a cluster into place only to have a cascade failure of cheap memory chips. OS RequirementsNot every operating system supports a cluster. At this writing, you can choose from Windows 2000 Advanced Server or Windows 2000 Datacenter, and Windows 2003 Enterprise Edition and Windows 2003 Datacenter. You also need an Active Directory domain, a DNS server, and everything set up with the latest security patches; and all nodes need to be on the same domain. If possible, I recommend that you build the entire cluster connected only to each other, and then connect the nodes to the Internet to upgrade them. The reason is that if you install the operating system and then patch it, you will have a lot of CD switching that you will have to do to install the cluster. This largely goes away on Windows 2003, but I still follow the same process. Platform RequirementsJust as certain operating systems support clustering, only certain editions of SQL Server 2005 support clustering. You need either SQL Server 2005 Standard Edition for up to two nodes, and Enterprise Edition for the maximum that the operating system supports. You do not have to install anything else to make the cluster work for SQL Server. All you have to do is ensure all nodes are online and log on to the primary one. Start the installation program, and the entire process is handled automaticallyassuming that your cluster meets all the requirements. If it does not, the installation program will let you know what problems it encounters; you can check the documentation to see what you can do to fix the problem. In the next section, I lead you through installing the software on a cluster. If you do not have a cluster to practice on, check out the information in the "Take Away" section at the end of the chapter. If you do not have a lot of cash, you can get evaluation versions of the virtual machine software, the operating system, and even SQL Server 2005 to practice. Installing SQL Server 2005 on a ClusterTo install SQL Server 2005 on a cluster, you need to have one of the operating systems I described earlier installed and configured as a cluster. If you do not have access to a system that is clustered, you can follow the instructions in the "Take Away" section at the end of this chapter to build a two-node cluster using virtual machine technology.
It is important to keep a few terms straight: remember that a virtual machine is the same thing as a physical server in this chapter, and a virtual server is what the cluster presents to the users as a single computer. So a virtual server runs on a virtual machine. On a physical set of systems on your actual network, you will only work with a virtual server. After the operating system is clustered and configured with all current service packs, ensure the cluster is running. You need to configure the Microsoft Distributed Transaction Coordinator service (or MSDTC) to run as a clustered application. On all nodes, ensure that the service is set to automatic and then open an operating system command prompt. Type comclust.exe and press Enter. Allow that process to complete before you continue. Next, open the SQL Server 2005 installation program on the primary node and start the setup program from the installation media. The server will detect the cluster and begin the installation. As you can see in Figure 6-37, when the installation program starts, it proceeds like a normal installation, but when you reach the components installation screen, you can choose to create a SQL Server failover cluster for the database engine and Analysis Services, as shown in Figure 6-38. Figure 6-37.[View full size image] 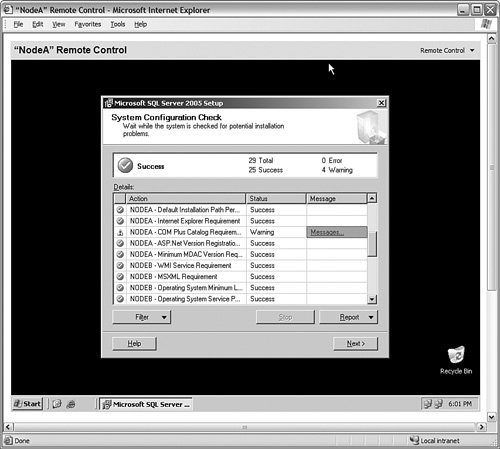
Figure 6-38.[View full size image] 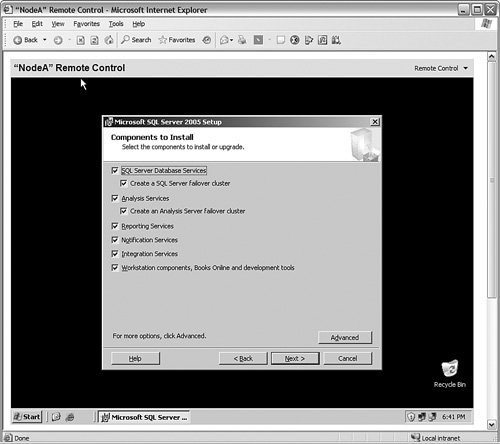
The database and log files need to be available to both systems. When you create databases on the system, they should go on the shared drive for the cluster, but not the quorum drive. You will set that in a moment. When you are past the selection portion of the installation, you are asked to provide the name of a "virtual server." This name is the "window in the doctor's office" from the example I mentioned earlier. It is the name that the cluster will ensure is available for client requests. As you can see in Figure 6-39, I have named the Windows 2003 cluster SQLCLUSTER and the SQL Server ClusteredSQL. Figure 6-39.[View full size image] 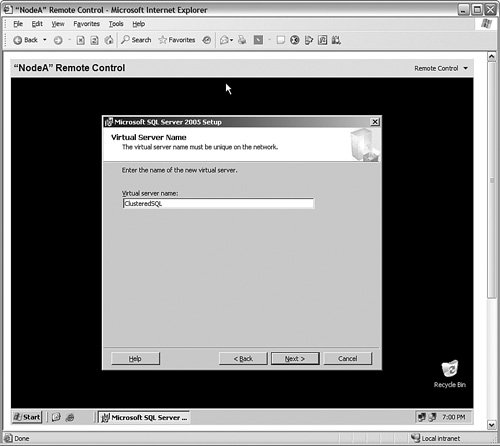
Next, you are asked to set the address the SQL Server Instance will listen on for client requests. In Figure 6-40, I have typed in my public address in this example (10.1.1.5) and clicked the Add button to add the address to the list in the bottom panel. Figure 6-40.[View full size image] 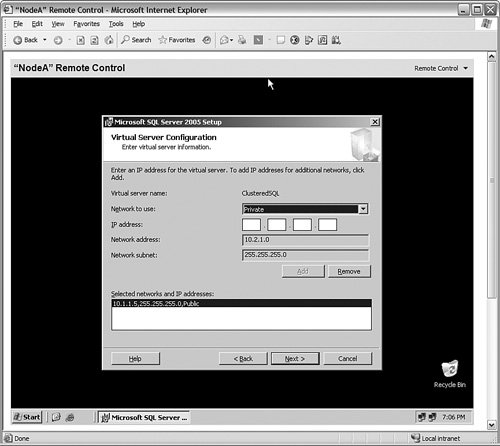
In the panel shown in Figure 6-41, you are asked which cluster group you want the instance to belong to. I have set mine to the only group I have, and set the data files to go to the shared drive on this cluster. Figure 6-41.[View full size image] 
From there, you are asked to select the nodes you want to include in the cluster. You do not have to install SQL Server on each node, but it will only be available on the ones you select. After that panel, you are asked to select an account that will control the SQL Server 2005 services, just as in a single-server installation. You are also asked for the startup groups for each service. After that selection, the installation proceeds through and completes a standard set of setup screens. Managing a Clustered SQL Server InstanceAfter your SQL Server 2005 system is installed, managing the SQL Server is not all that different from managing a stand-alone SQL Server. You still use the SQL Server Management Studio for the relational database engine and Reporting Services and Business Intelligence Development Studio for Analysis Services design work. The only difference is that you connect to the name of the cluster rather than the name of the machine. Once inside the tools, you can follow the same procedures I have shown you throughout the book for all tasks such as creating databases, backing up and restoring them, tuning, and security. In fact, the only time you will notice that you are using a cluster is in some of the properties of the server such as "IsClustered" show the status of the SQL Server system. There are differences in the way you manage the cluster, however. You cannot just shut down or reboot the SQL Server whenever you want, in the way that you are used to. If you shut the primary node down, the secondary node will take over, called a failover event. Although that is not fatal, it is better to handle the interruptions in a controlled manner. You also face differences when you apply service packs to SQL Server or the operating system. Cluster MaintenanceFor the most part, a cluster has the same maintenance processes as a stand-alone system such as backups, defragmentation, and monitoring. When you need to work with the cluster nodes, or recover from a failover, or even install service packs, however, you will manage the system using the Cluster Administrator, under the Administrative Tools section of the Start menu. If you are connecting to this tool on any node other than the primary, you may be prompted to connect to the cluster when you start it. Once inside the tool, you can view the groups defined within the cluster. You can see my system's screen in Figure 6-42. Figure 6-42.[View full size image] 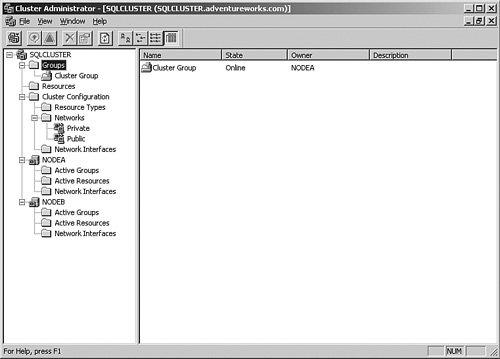
Groups (in my case, I have one called cluster group) contain resources, which are services, programs, or shares presented on the virtual server name. You can see the other the resources I have that deal with SQL Server in Figure 6-43, including the cluster name (SQLCLUSTER) and the IP address (10.1.1.10). Figure 6-43.[View full size image] 
To work with one of the resources, right-click it. That will bring up a menu that allows you to fail the resource, causing it to move to the next node in the chain; take it offline, which stops the resource but does not start it on another node, create a new resource, delete or rename it, or work with its properties. I have selected Properties to show the panel in Figure 6-44. Figure 6-44.[View full size image] 
From this panel, you can change items such as which nodes will support the resource, set or change any dependencies that the resource has, and view or alter the parameters for the resource. If the resource is operating properly, you should not change anything here. If you need to install a service pack on a node but not stop its operation, you should follow a specific process. First, ensure that all nodes are functional. Then, right-click the group that contains the resources and select Move Group from the menu that appears. You'll get a result similar to Figure 6-45. Figure 6-45.[View full size image] 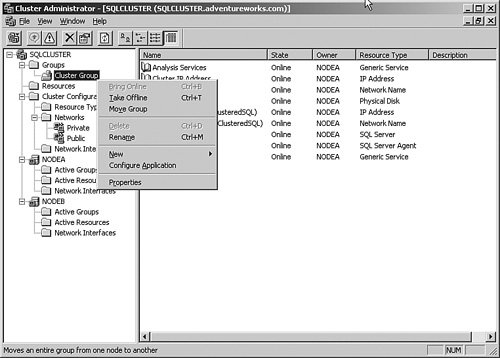
After the resources are moved to another node, ensure that everything is functional. Then right-click the primary node and select Pause Node from the menu that appears to bring up the screen shown in Figure 6-46. Figure 6-46.[View full size image] 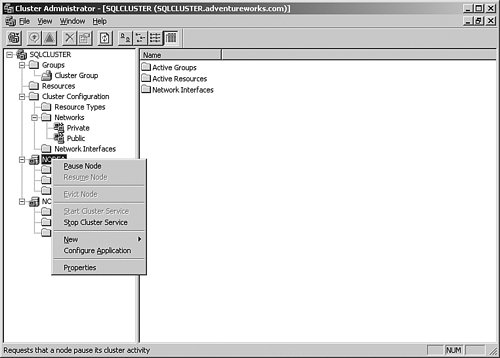
When the node is paused, apply the service packs and reboot that node. When it is back online, connect to the cluster, right-click the paused node, and select Resume Node from the menu that appears. Now reverse the process, and move the group back to the primary node. Pause the second node, log on to it and perform your maintenance, and reboot that node. Connect to the cluster again and resume the second node. Repeat this process for all the nodes in the cluster. To place another node in the cluster, right-click the name of the cluster and select New and then Node from the menu that appears. You will be led through a series of wizard panels that will connect to and enlist the server as a new node in the cluster. The new node will need to be on the domain and meet all of the requirements for clustering. Adding a node this way does not install SQL Server on it. You must run the install program again, answering the questions the same way that you did during the first install. Near the end of the installation program, the system will detect the addition of the node and allow you to select it. You will not really install SQL Server 2005 again on the nodes that already have it; the program will just install the software on the new node. If you want to remove a node from the cluster, right-click it and select Evict Node from the menu that appears. If you do this, the node will no longer participate in the cluster. |


