Near-Real-Time Availability Mechanisms
The first set of mechanisms you have at your disposal involve creating an infrastructure that provides a near-real-time availability of the data. These processes move or copy data from one system to another within a disconnected architecture. The interval you choose for data latency might be almost immediately or span hours, days, or even longer. There are three ways to reach the objective of providing a copy of the data to an application while the server is unavailable. The first is to use various coding techniques to either stage the data the application needs on another server or to request it from a federated set of resources. I do not cover those methods here because they involve programming techniques and architectures. The way you configure and manage SQL Server 2005 while using this mechanism does not change at all from what you have learned in this book. The second mechanism is replication. Replication involves a series of stored procedures and database extensions in the server that "watch" database changes as they occur and store those changes in another location. Depending on the type of replication you implement, the changes are either immediately propagated to another system or picked up at certain intervals. Replication works best when subsets of data are needed by other systems, such as a copy of inventory data sent to a salesperson's local database on their laptop, or when one system depends on data from another. The third mechanism is log shipping. In log shipping, the Transaction Log backups are copied to another server and restored to a copy of the original database there. You can even use log shipping to copy the changes to more than one server. ReplicationWe begin the discussion of replication with a look at how it works from a high level. As the database administrator (DBA), you will often be asked to design, implement, and monitor the process, so you need to understand all of the components it uses, their relationships to each other, and how to maintain them. Replication in SQL Server 2005 is described in terms of the publishing industry. In this metaphor, a publication such as magazine or newspaper is produced by a publishing company. Although a lot of paperwork is generated at a publishing company, only a certain portion of it is meant for publication. Publications such as newspapers are made up of articles. Some larger publishing houses do not keep printing presses and distribution trucks at the same location where the articles are written. They have a remote distribution center to send out all of the newspapers or magazines because that building can be located closer to rail and ports or to major highways. At the end of a newspaper subscription is the subscriberthe person who reads the publication. In SQL Server 2005, the same kind of verbiage is used to describe the replication schema. A server's database contains articles, such as views or tables, which make up a publication. Although an article is the lowest level of work within the SQL Server 2005 replication architecture, just like in the publishing house example, the published data is the publication, not the article. The distributor is the system that stores the publications and sends them on their way. The distributor can be located on the same server as the publisher or another to lighten the load. The subscriber is the system or systems that receive the data. SQL Server 2005 can publish to all kinds of subscribers, even Oracle or Microsoft Access. Subscribers can pick up the data from the distributor, called a pull subscription, or the publication can be sent to them automatically, called a push subscription. The metaphor carries even further. Controlling all these movements is a series of software agents, which are responsible to get the data from one place to another. You can monitor these agents to see just where the data is at any given moment. The publishing house metaphor begins to break down a bit when we talk about the types of replication. SQL Server 2005 can send everything in the publication to the subscribers, called snapshot replication, only the changes, called transactional replication, or it can send and receive changes, called merge replication. With those concepts in mind, let's take a closer look at the design considerations for a replication architecture. We will finish up with a simple replication example. Types of ReplicationYou need to start your design by describing which systems need to see what data. After you have defined those parameters, you can create a layout that will meet the subscriber's needs. For instance, your high-availability requirements might allow for the primary server to be offline for maintenance as long as the parts inventory information is still available. In that case, you can create a publication for the parts inventory data to be pushed out to a shop-floor server working as a subscriber. Within the data needs for the subscriber are the types of data refresh that they need. In the previous example, the entire set of data needs to be current when the primary system is taken down. In that case, all the data can be sent to the subscriber at once. But perhaps that data is too large to be sent all at once, or another need dictates that the subscriber should be kept up to date with more frequent changes. In that case, you want to create a replication architecture that sends only the changes to the subscriber, possibly more often. You might also need to make data changes at the subscriber, and you want to send those changes back to the original publisher. In that case, you need to merge the data together. Let's take a look at the various types of replication to see how they solve each of these problems. Snapshot ReplicationThe first type of replication is a snapshot, where the entire publication is sent from the distributor to the subscribers. It is the simplest type of replication to create and implement. In fact, all replication types start out with a snapshot because the data needs a starting point to implement any changes.
I've seen cases where the original publication is so large that sending it to a distributor and then on to the subscriber over the network is implausible. Microsoft has published several white papers that show you how to implement the initial snapshot publication using a tape backup or another media. If you are bringing a small about of data to the subscriber or the data changes a great deal but not often, a snapshot is the way to go. The data in this case is read-only at the subscriber, because the whole data set is updated when the replication completes. Transactional ReplicationIn transactional replication, the Transaction Log is monitored for changes, and those changes are sent on to the distributor. The subscribers either pull the changes or the changes are pushed to them. The process begins with an initial snapshot, and then changes are gathered as they occur and are stored on the distributor. The changes are available to the subscriber on the schedule that is set up for the subscription. By default, the data from a transactional replication publication is read-only, although you can create an updateable subscription that allows you to propagate the changes at the subscriber back to the publisher. The trickiest part of setting up this arrangement is how to deal with a "clash," where the same data element on both systems is changed. Merge ReplicationMerge replication starts with an initial snapshot, and changes at the publisher are sent to the distributor and then on to the subscriber. The subscriber can change the data, and the results are sent back to the publisher. This brings up the question, "what happens if the same data is changed at both places?" This is called a "conflict," and you can handle it in three ways. The first method states that the publisher always wins. The second states that the subscriber always wins. In the third case, you are asked to resolve each conflict individually through a SQL Server 2005 interface. Replication ServersWithin replication, you can install each function on the same server or separate servers. I explain the various layouts in a moment, but first let's examine what part each function plays in replication. PublisherThe publisher is the system that holds the data you want to publish, or the publications. In most cases, this is the same system that holds the production data. When you configure a system to use replication and become a publisher, substantial changes occur on the server. The Replication Wizard runs several processes that affect the server's operation and new tables and stored procedures are created. DistributorThe distributor holds all the data for the publications. This is actually a two-step process, because the data is sent here first and then is picked up by or sent to the subscribers. The data stays in place until all the subscriptions for it are fulfilled. It is important to understand that this is another copy of the data in the publications. That means if you place both the publisher and distributor functions on the same server, the publication data is stored there twice. If you are working with small publications, that might be acceptable, but with larger data sets, you are not only increasing your storage requirements, you are causing more I/O on your publisher. Depending on how many subscribers hit the system, the distributor also has an increased network load. It is best if the distributor is connected on a fast, dedicated connection to the publisher and then across other connections for the subscribers. SubscriberThe subscriber is the server that either picks up the publication or has it delivered. Subscribers can be any other edition of SQL Server (even the mobile editions) or ODBC-compliant systems such as Oracle or IBM's DB2. You should know a great deal about the subscriber, because that will determine the type of replication you can create and how you set up the schedules. Of special importance is the type of connection from the subscriber to the publisher. The slower this link is, the more creative you will have to be in your design. In a moment, I show you how you incorporate of these design decisions into a replication schema. Replication AgentsAll of the data tagging and movement within the replication system is handled by various stored procedures and jobs, called agents. Each agent has a specific task and is created and operates on specific servers. The agents are controlled by the SQL Server 2005 Agent Service, which runs in the background on the server.
With the SQL Server Agent Service running on the instance of SQL Server 2005 that is participating in replication, the following agents are implemented.
Several jobs run in the background, too. You should be aware of what they do so that you can diagnose and correct any issues.
Replication Architecture DesignHow you set up the disparate parts of SQL Server replication is highly dependent on what you want to accomplish, and you do not want to create a schema based from too little information. You should ensure that you fully understand what the organization wants to accomplish by implementing replication before you start your design. When you understand what the needs are, you need to evaluate your systems to find the best layout. There is a six-step process I use to create an effective replication design:
Let's explore each item in this outline a little further. Replication GoalsFirst, you need to define what the goal for the process is. Possible goals include copying parts of the inventory catalog to a salesperson's laptop, moving data between suppliers or plants, or sending reporting data to another server. Enumerating these goals make decisions as to the type of replication and the systems on all sides of the process. Environmental FactorsThe environment of your system also helps you understand which replication types to implement. If you have a slow network connection to work with between the systems, you need to have a smaller and perhaps more frequent distribution layout. This means that on a slower link, you might not be able to do snapshot replication once a week on a 300MB publication. FrequencyThe frequency for your replication schema is dictated by two factors. The first is what your environment can handle, and the second is the organization's needs. The organization's needs are covered in the first step of the outline, and the second step details what your physical infrastructure can handle. In this step, you combine the two and record each publication and the times that they need to go. Answering the frequency question will also help you decide on the direction of the publication. If the subscriber is connected to the network erratically (such as a salesperson's laptop), you will not have a clear timeframe to push the data. In that case, the publication is pulled from the client on demand. If the system you are publishing to is a reporting system, however, you have control over the schedule and you can push the subscription. Subscriber InformationThe next step is to detail the type of subscriber you are working with. This gives more insight into the type of subscription (push or pull). It also helps you understand how much disk space you need to leave on the distributor. For instance, if the subscriber is in a remote location with a poor link to the system, connects infrequently, and is unreliable, you need to plan for enough space on the distributor's hard drive to store the publication for an extended period of time. Let's look at a concrete example. Assume that your subscriber is that poorly connected unreliable system and that you need to send a 3MB publication to them once a day. When you detail out this step, you realize that it is possible that the subscriber could miss up to three days of publications. In the interim, the distributor will need to retain 9MB of space on its drive to service the request when the subscriber connects. You need to work through this exercise for each of your publications to have an effective plan. Creating the DesignBased on what you find in these three areas, you can begin to create your design to implement the solution. Let's look at a few examples to see how a design effort works. The process is easy to follow: Take the previous steps in the outline and apply it to your situation. Each step in the process is iterative and will further refine your layout. You may find that you need only a few publications from a single server that can also act as the distributor. Your needs might also dictate multiple publishers, one distributor, and a single subscriber, or any other arrangement of servers. Following the outline helps you design the proper sizes and layouts for your schema. Develop a Fallback StrategyAs you can imagine, in a complex replication schema, things can go wrong in lots of places. Microsoft SQL Server 2005 contains a plethora of graphical and command-based monitoring mechanisms, which you must stay on top of to correct problems. Never wait until you have a problem to develop a strategy to deal with it. For each publication, document what you will do in case it fails. You can retry the replication, wait until the next replication cycle, or even break the replication and re-create it, sending an entirely new snapshot. The goals from the first step and the factors from the second will dictate the route you take. Whatever the case, the time to create your strategy is before you implement it. You should also test that fallback before you implement in production to ensure that the strategy is viable. Implementing ReplicationWith the terms, theory, and processes in mind, let's work our way through an entire exercise. The requirements from the organization state that we need to provide current inventory levels from the Manufacturing database on the NodeA server in the headquarters cluster to the Tampa, Florida, site in the United States. We have determined that the CurrentInventory table in the CLUSTEREDSQL instance of SQL Server 2005 holds the data that we need and that we need to send it in total to the Tampa server each day. The data is less than a few thousand rows, and it changes by more than 50 percent each day. That means we need a snapshot replication type. If the data changed less frequently or needed to be more up-to-date, we might choose to implement a transactional replication type. We've evaluated the environmental factors and determined that we have fast network links between powerful servers. The subscriber system is a duplicate of the publisher system. It is constantly connected to the same network backbone. Our fallback strategy is to first allow the replication to retry, waiting two cycles for a success factor. Barring that success, we will break and recreate the replication. Setting Up Replication: A Step-by-Step ExampleUsing the information from the outline I explained earlier, I will proceed through the physical process of setting up the replication schema.
In this example, I'm replicating to and from the same server, but the same process applies to working with multiple servers. Working with a single server allows you to practice along with this exercise on a test machine. First, we need to configure the distributor and the publisher. I open SQL Server Management Studio, locate my server, and right-click the Replication object in the Object Explorer. The results are shown in Figure 6-1. Figure 6-1.[View full size image] 
With that menu item open, I select Configure Distribution. The first panel that comes up is an introduction to the wizard. I click Next on that panel to bring up the screen shown in Figure 6-2. Figure 6-2.
On this panel, I select the system that acts as the distributor. The outline we followed earlier dictated that this system acts as the machine that creates the distribution databases, share locations, and files that the replication schema needs. When I have made this selection, I click Next to show a panel that has a selection for the SQL Server Agent Start. I leave this one at the default for this test system and then move on to the next panel, shown in Figure 6-3. Figure 6-3.
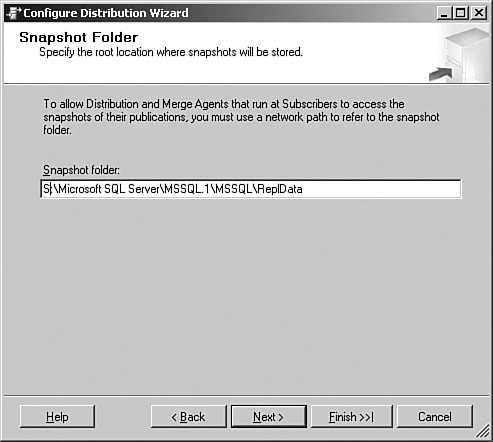
Each publication, regardless of type, needs an initial snapshot of the data to get started. This provides the initial data numbering that replication needs to store to track what goes next. It is a directory that is shared to all of the replication agents. In this panel, I have set that to my S: drive, which has plenty of space. With that selection made, I click Next to continue to the panel shown in Figure 6-4. Figure 6-4.
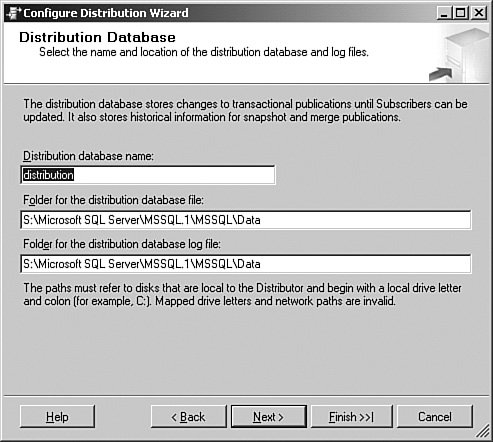
This panel sets up the distribution database the distributor needs to track what it is doing. I can also set up the location for the distributor databases and logs here. When that is complete, I select Next to show the screen in Figure 6-5. Figure 6-5.
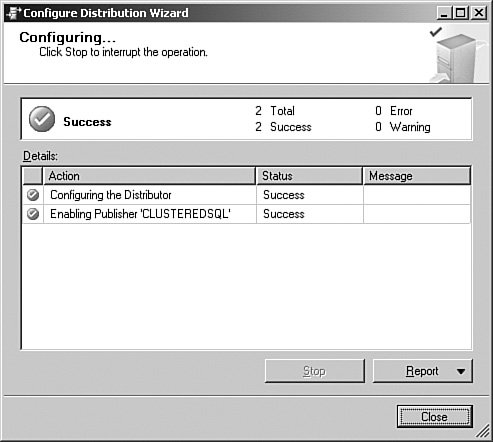
This panel shows the servers on the network and allows you to select the publishers that use this system as a distributor. In this example, I am using the same server for all three functionsdistributor, publisher, and subscriberbut in production, you would set the servers based on the layout you created in your outline. After I choose the server name, I click Next to continue. In Figure 6-6, I can begin the process of creating the distributor, or just save it out to a file to create the distributor later. Using a script, I can re-create the process on multiple servers with just a little editing. In this case, I create the distributor as I have detailed in the previous screens. I click Next to continue, and the wizard recaps the process for me, giving one more chance to click the Back button. I click Finish, and I am shown the progress screen shown in Figure 6-7. Figure 6-6.
Figure 6-7.
When that process completes, I have a distributor set up and ready. I now need to create the publisher, articles, and publications that I want to replicate. Once again, I right-click the Replication item in the Object Explorer and select publisher Properties from the menu that appears, which brings up the screen in Figure 6-8. Figure 6-8.[View full size image] 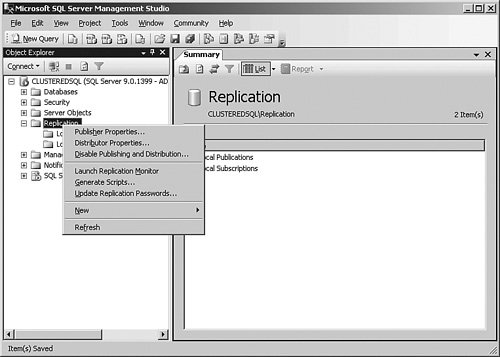
First, I need to select the database I want to work with. In this case, I want the Manufacturing database. After I do that, I click the OK button. That process marks the database for the Replication objects I need to continue, as shown in Figure 6-9. Figure 6-9.[View full size image] 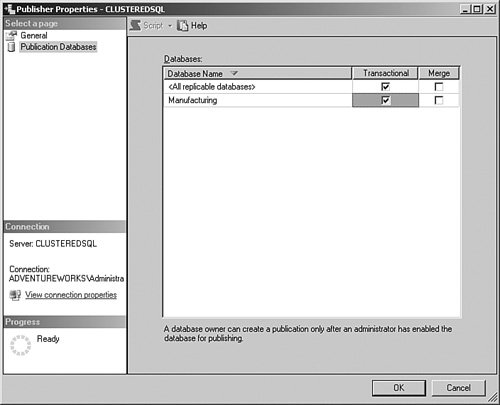
Next, I need to create the publication for the inventory data. Under the Replication object in the Object Explorer, I right-click the Local Publications item and then select New Publication… from the menu that appears. The screen shown in Figure 6-10 is the introduction to the wizard. I click the Next button to continue. Figure 6-10.[View full size image] 
In Figure 6-11, we are shown the database list from the previous step. In my case, I only enabled the Manufacturing database, so that is what is selected. I will select that database and click Next to show Figure 6-12. Figure 6-11.
Figure 6-12.[View full size image] 
In this screen, I select the type of replication I need. From my outline, I know that I need a snapshot type of replication, which is shown and described on this screen. You can also read about the other types here. After I have made that selection, I click Next to continue. In Figure 6-13, I have selected the table I need to send to the subscriber. Clicking the Article Properties button allows me to set up the properties of the items I want to replicate. When I have made my selections, I click the Next button to bring up the next screen, as shown in Figure 6-14. Figure 6-13.[View full size image] 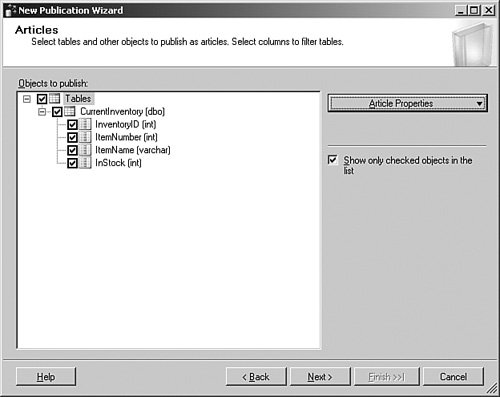
Figure 6-14.[View full size image] 
This panel lets me limit the data that is stored in the article, which I do not need in this case. I want all the rows, so I just click Next to continue. In Figure 6-15, I can create the initial snapshot of the data or schedule it to run later. The schedule runs using a Snapshot Agent, which I explain later. In this case, I create the snapshot now and click Next to bring up the next panel. Figure 6-15.[View full size image] 
Although you see only the result in Figure 6-16, I actually had to click the Security Settings button to select the account that the agent uses to talk between the servers. Remember that this account needs access to both systems, and the ability to work with the data on both sides. Pressing that button allows you to set up a Windows or SQL Server account to do this. Figure 6-16.[View full size image] 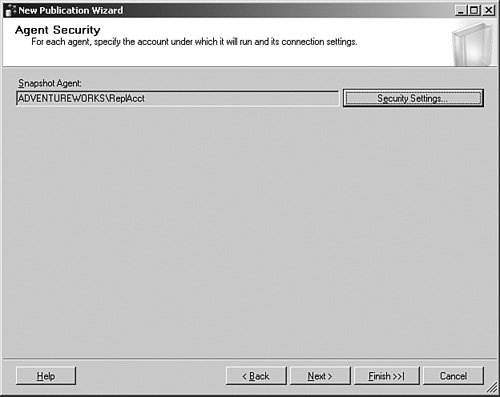
In my case, I have a Windows account I created with the proper permissions and rights on both sides of the replication schema that I can use for the transfer. With that complete, I click Next to continue. As shown in Figure 6-17, I have the ability to immediately create the publication or create a script. I will select the immediate choice and click Next to bring up the screen shown in Figure 6-18. Figure 6-17.[View full size image] 
Figure 6-18.[View full size image] 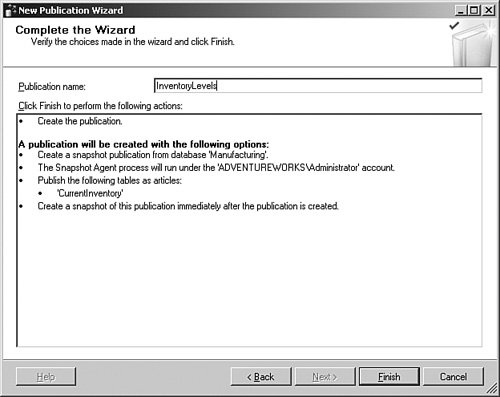
At the final screen of the wizard, I name the publication. You can use any name you like, but I try to keep them descriptive, short, and use either underlines or upper- and lowercase. This is not required, but it is better when you work with scripts not to have lengthy names with spaces in them. When I click Finish, the final panel displays, as you can see in Figure 6-19. Figure 6-19.[View full size image] 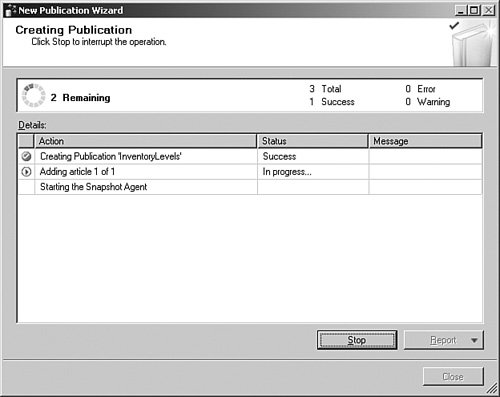
I now have a distributor and a publisher, along with an article and publication. All that is left is to create the subscriber, the subscription, and the schedule. Once again, I am using the same system for the subscriber as the one I used for both the distributor and publisher. Although this is not the most common way you will replicate, I actually have used this in production. Once again, we are in the SQL Server Management Studio, in the Object Explorer under the Replication item. This time I right-click the Local Subscriptions item. I select New Subscriptions from the menu that appears. It is important to remember I am doing this on the subscriber. I have skipped the introduction screen once again by clicking the Next button. That brings up the screen shown in Figure 6-20. Figure 6-20.[View full size image] 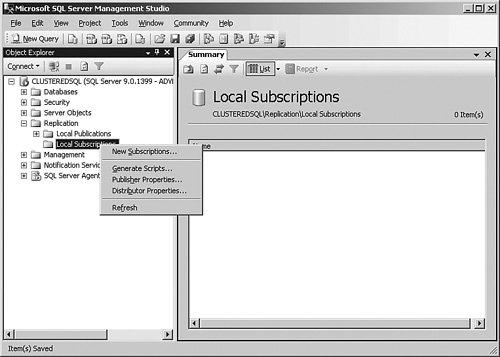
In Figure 6-21, I have selected the publishing server, and then the InventoryLevels Publication. Once I have done that, I click Next to continue. Figure 6-21.
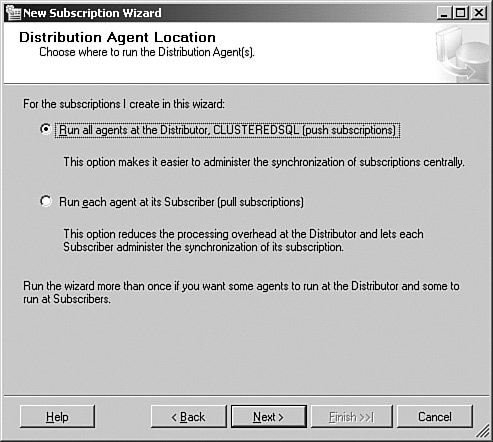
In Figure 6-22, I select whether I want to pull the subscription or have it pushed to me. Because our initial outline stated that we have a good connection and a powerful subscriber, I select Push here. With that selection made, I click the Next button to bring up the screen shown in Figure 6-23. Figure 6-22.
Figure 6-23.
Here I need to set the server that acts as the subscriber and the database where I want the publication to end up. It is important to remember that I might have published an entire database. In that case, I have to make other choices to allow people to read the data or make updates to it. But in this case, I am only pushing a single table across, so my TampaManufacturing database might have other tables that are both read and write to the local users. That is a common arrangement, and in fact it is the one I have here. When I complete my selections, I click Next to continue to the screen shown in Figure 6-24. Figure 6-24.
Once again, I need to select the security I will use, this time for connecting to the subscription. I will use the same account, but this time I will click the ellipses button on the first line and show the security panel you can see in Figure 6-25. Figure 6-25.[View full size image] 
You have quite a few options here that you can choose for the Distribution Agent. I will use the account I explained earlier and click the OK button. When I do that, I am placed back at the previous graphic, and I click Next there to show the panel shown in Figure 6-26. Figure 6-26.
Here I am setting the schedule for the replication synchronization. In this example, I am using a manual replication, but I rarely do that in production. Most of the time, I run on a schedule; and if I am using a transactional replication, I select Run continuously to keep two systems in sync. Again, your outline will define your choices. I then click Next to continue to the screen shown in Figure 6-27. Figure 6-27.
Here I set when the initialization starts. I have selected this to happen immediately. With that selection made, I select Next to move to the next screen, shown in Figure 6-28. Figure 6-28.
On the summary screen and the final screens, I continue through the displays and watch the progress of the subscription. If you do not select to immediately create the subscription, you can right-click it later to initialize it. You must have the subscription initialized before you synchronize it. This is done for me by the wizard because that is what I selected earlier. I have now completed the entire process to create the distributor, publisher, subscriber, and all the articles and publications, and also the initialization of the process. At any point in the process, we might want to see what the current status is. It is a simple matter of right-clicking the publication and selecting View Synchronization Status. That brings up the panel shown in Figure 6-29. Figure 6-29.[View full size image] 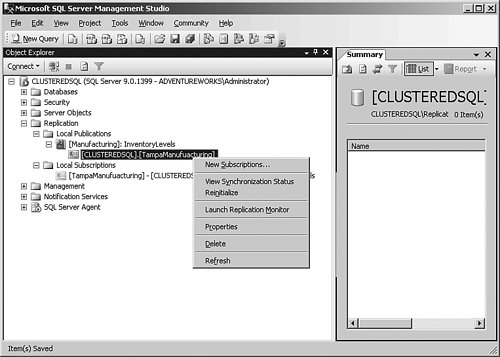
When I click this menu item, I am shown the status of the publication, as you can see in Figure 6-30. Figure 6-30.[View full size image] 
Often, you need more information about what is happening within replication. There are several log locations and other methods to evaluate the process, but a simple method is to either select the Launch Replication Monitor menu item in the graphic shown two steps earlier or click the Monitor button on this panel. If you click that button or the menu item in the Object Explorer, you are shown a panel similar to Figure 6-31. Figure 6-31.[View full size image] 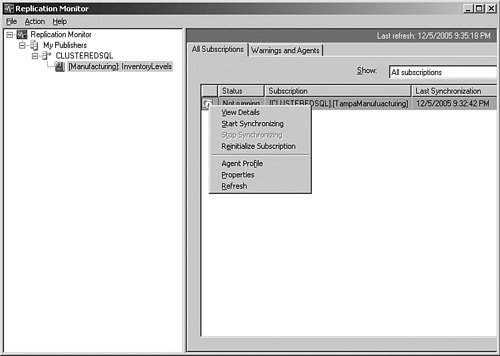
This panel allows you to control many aspects of publication; you can view the details, and you can also start the synchronization process. Because I selected a manual synchronization earlier, I need to kick that off now. Let's stop for a moment and understand the difference between initializing and synchronizing. Initializing the subscription sets up all the plumbing, and synchronizing replicates the data. In Figure 6-32, I have pulled up a query on both the source and destination databases after I completed all these steps. There is only one row, but they are identical. Figure 6-32.[View full size image] 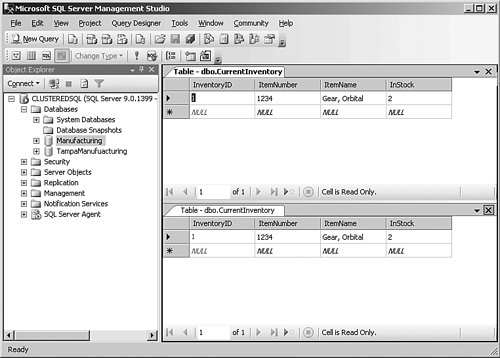
Replication is one of those concepts like the game of chessfairly simple to implement but can become quite complex in the implementation. Just as in a chess game, the components are to understand what all the pieces do and then evaluate what your goals are. From there you develop a strategy. If you implemented this example along with me on your system, try breaking it and finding the solutions from what you have learned here. If you cannot fix it, try checking Books Online for more information to locate the internals of the process. Log ShippingAnother form of copying your data from one location to another is called log shipping. In this process, the Transaction Log from one database is backed up to disk and then copied and applied to another database. You could actually manually create this kind of process, but Microsoft provides a wizard to lead you through the setup and jobs that monitor it for you. When you apply the Transaction Logs, the other database (called the secondary database) can be in Standby or Recovery mode. In Standby mode, users can query the secondary server database in a read-only fashion, useful to offload some work from the primary server. In Recovery mode, the database is not available to the users for data access. This is more useful to protect the data in the case of a problem with the primary server. In either case, switching from the primary to the secondary server as the main database system is a manual process. Switching back is also a manual process, and requires a little planning and forethought to do properly. There is another function within the log shipping scenario that "watches" the processes to ensure they are working and to display the current status. This monitoring process can live on another server or on the primary server. There are four jobs that make up the log shipping operation, as follows:
The backup job backs up the primary database, logs history and monitoring information, and deletes old information. It runs every two minutes by default, but you can change that interval during the setup. The copy job runs on the secondary server and copies the log backup files from the primary database to the secondary server. The restore job applies the copied database log files on the secondary server. The alert job is responsible to send out alerts if there is an issue with the process, and they run on the monitoring server (if you have one) or on the primary and secondary servers. The normal process for setting up log shipping using the SQL Server 2005 wizards involves ensuring that you have a few things in place ahead of time. You need an edition of SQL Server 2005 that supports log shipping (Standard, Workgroup, or Enterprise). The database you want to ship needs to be in the Full or Bulk-Logged Recovery Model. You will need a share location on the secondary server to place the logs on, and you will need to establish an account between the two servers to facilitate the data transfer. If the primary server fails, apply any remaining Transaction Log backups on the secondary server. Use the WITH RECOVERY mode of the restore operation to give the secondary server the ability to read and write data. Any code you have needs to be able to point to the new server name, because the two servers retain their original identities. If you want to switch back to the primary server, you have a couple of options. The first is to back up the database on the secondary server and restore it over the top of the original database on the primary server when it comes back online. To follow this method, you will need to get everyone off of the secondary server, back up the database, restore it to the primary server, and then change the applications to point back to the primary server. This is the process you should follow to use log shipping as a recovery method. Make sure you test the process and document the interval the application is unavailable. The second method is more useful if you are using the system as a failover mechanism in the case of upgrades or maintenance. In this case, you know ahead of time that the server will be taken offline. Have the users log off of the application, and back up the Transaction Log manually, using the WITH NO RECOVERY mode of the log backup operation. This leaves the database ready to accept the Transaction Log backup of the secondary server when you are ready to "fall back" to the primary server when your maintenance is complete. Restore the log backup on the secondary server with the WITH RECOVERY mode of the restore operation to bring it up to the latest state and point your applications to the new server. When the primary server is ready to return to service, reverse the above process. Setting Up Log ShippingLet's take an example of the entire process using the wizards. On a production server, you will have at least two servers involved in log shipping; if you want to, however, you can follow along on your test server. I demonstrate running the setup on a single server. First, ensure that your test database is in the Full Recovery Model by right-clicking it and selecting Properties. With that complete, on this test system (called \\SQL), I have created a share for the backups called \\SQL\Backups. Everything is now ready to start the wizard. I right-click the database name and select Tasks from the menu and then Ship Transaction Logs. You can see the results in Figure 6-33. Figure 6-33.[View full size image] 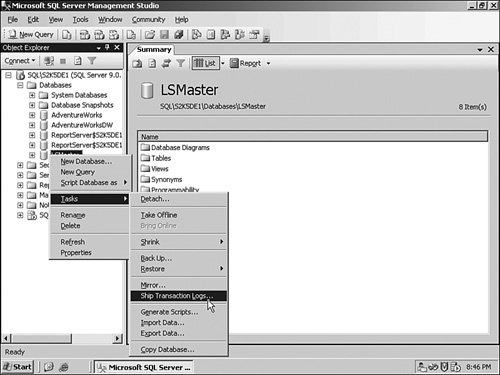
Because I am demonstrating the process on a single system, I have two instances (SQL\S2K5DE1 and SQL\S2K5DE2). I will Log Ship from the LSMaster database on the first instance to the second. Inside the main panel, I click the Enable… check box. You can see that in Figure 6-34. Figure 6-34.[View full size image] 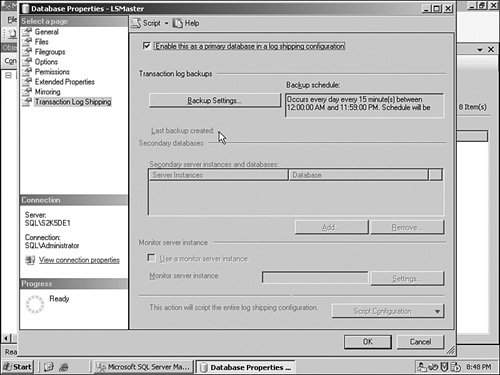
With that selection made, I click the Backup Settings button to set up the log backups for transfer. Inside the panel shown in Figure 6-35, I set up that network path for the share, and set the delete and alert job time schedules. I leave the backup job name alone, because it is descriptive enough. I click the OK button to leave this panel. Figure 6-35.[View full size image] 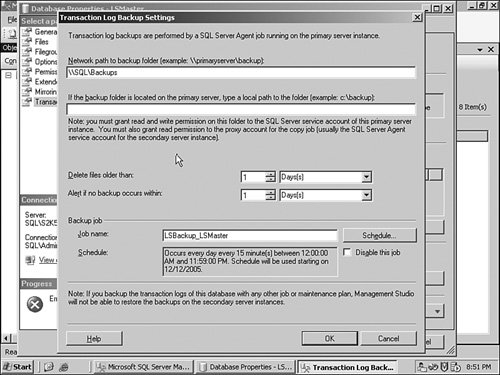
Back on the main panel, I am now ready to set up the destination for the process. I click the Add button to show the screen shown in Figure 6-36. Figure 6-36.[View full size image] 
This panel has three tabs. In this first (shown here), I have picked the second instance on my server, set the database name, and because it does not exit yet, I have instructed the wizard to create a backup and apply it for me. The second tab, called Copy Files, has locations for the copied log files and a schedule and name for the deletion jobs. I have set mine to use the C:\temp directory, but if you are using this in production, you will want a dedicated location on the server that has enough disk space and is properly secured. The last tab on this panel sets the mode the database is in when the restore is completeStandby or No recovery. Remember that only Standby allows queries against the shipped database. This panel also sets the recovery and warning intervals as well as the name of the restore job. With those selections complete, I click the OK button to return to the main panel and OK again to begin the process. The wizard completes and the log shipping begins. |