Take Away
This chapter helps you understand what you need to know about working with highly available systems, but you cannot learn everything just by reading a book, any more than you can learn to play the piano by reading a book. Most people learn by doing. The purpose of a cluster is to prevent a loss of accessibility. But to learn how all that works, you need to be able to fail the system and test things. You cannot "play around" on the production system because you would expose the company to a data interruption while you are testing a failover. Because of the cost and difficulty of setting up a copy of the production cluster, you might not have a development or test environment. That is where virtual machine (VM) technology comes in. A VM is literally thatsoftware that emulates hardware. What the VM does is to run a program whose sole purpose it is to provide a processor, a BIOS, video output, hard drives, network cards, and inputs such as a mouse and keyboard. It "carves out" parts of your processing power, memory, and disk space to emulate computer hardware. When that environment is running inside a window on your screen, to any other software it looks like a computer. You can install any operating system on it, turn it on and off, and so forth. When you are "inside," you are working with a full computer. This allows you to run Linux on Windows, Windows on Linux, and so forth. Most of these VM software packages emulate an Intel or AMD processor. Newer processors include "hooks" and other technology specifically designed to work with VM software. Both Intel and AMD are including more and more of these features in their architectures with each release. There are a few major software vendors in the VM space, most notably Microsoft and VMWare. VMWare has three primary versions as of this writing, from Workstation to GSX out to a version called ESX. Each progression allows more memory, CPUs, and other features, and of course the higher versions cost more than the less-capable ones. Microsoft's offerings are Virtual PC for workstation-level use and Virtual Server for higher features. I have used all these vendors and versions, and each works well. In the following example, I use Microsoft's version because I have found the process for creating some of the shared components a little easier, but I have built clusters with VMware's offerings, too. Regardless of which vendor you choose, pick a version that can share a SCSI bus between two or more machines. Most of the "personal" or "workstation" versions do not do that. You need a single computer to create the VMs on. I recommend an inexpensive, highly capable workstation-class computer, something you might build yourself. I use a powerful x64 system with several gigabytes of RAM and a few inexpensive large hard drives that cost me only a few hundred dollars. With that, I have set up entire networks, including clusters, replication, database mirroring, and even transfers to other database systems such as Oracle and MySQL. Before you begin, make sure you are comfortable with creating virtual machines on your platform, whether you are using VMWare, Microsoft, or some other vendor. I do not spend the time going through each individual step for that. Setting Up a Two-Node Cluster Using Virtual Machine TechnologyI use Microsoft's Virtual Server for this example, and I give you a simple outline of the process so that you can extrapolate to whatever VM software you have. Whatever you use, the only requirement is that it supports multiple disks, network cards, and a shared SCSI bus between two or more machines. You also need to meet the software requirements for a cluster. If you do not have an MSDN license for the server software and SQL Server, you can use evaluation versions of both for the exercise. In this example, I am using Windows Server 2003 Enterprise Edition with SQL Server 2005. Planning the RequirementsBefore you design any system, even a test one, you need to have a layout planned. I create a plan for my test system and then develop the VM servers based on that plan. My system will be a two-node, active-active cluster. I plan to have only one large database on a single shared drive. Because a cluster needs to be located in a domain, I will make the first node of the cluster the domain controller and also house the Active Directory and DNS there. That plan means I will need the following inventory of hardware.
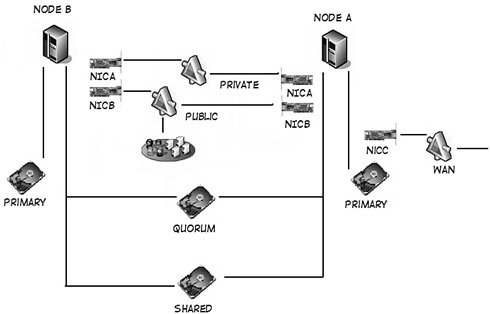
I like to create a graphic that shows the layout. Although the text descriptions are the final word, the picture shown in Figure 6-47 helps me keep everything straight. Figure 6-47.
Here is the basic process to create the cluster:
Creating the HardwareWith the requirements and this outline in mind, I can now begin to build the "hardware" to support the cluster. First, I will set up the network cards I need by opening virtual server administration screen as shown in Figure 6-48 and creating three virtual networks, similar to creating a router connection, with the following information. Figure 6-48.[View full size image] 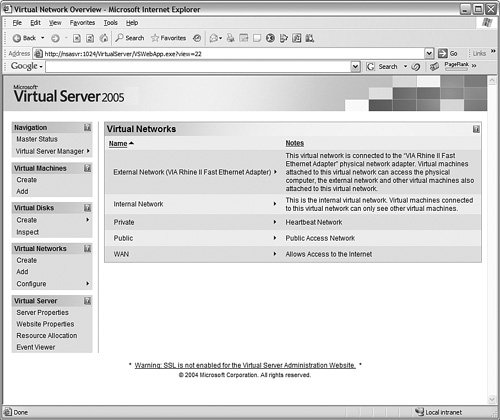
Now I will make the three virtual drives needed for the cluster. The results are shown in Figure 6-49. Figure 6-49.[View full size image] 
With all the virtual equipment ready, I can set up the two machines and tie them to the network cards and drives.
Throughout this process, I had to switch back and forth between the virtual CD to install the extensions and the physical CD to install things from the Windows 2003 CD. Make sure you understand how to do this on your platform before you begin. Creating the ServersIn Figure 6-50, I create a new virtual machine with the name NodeA. I give it 512MB of RAM and set it to use the drive I created earlier called PrimaryNodeA, using an IDE bus. I also add a network adapter to the public network I created. Figure 6-50.[View full size image] 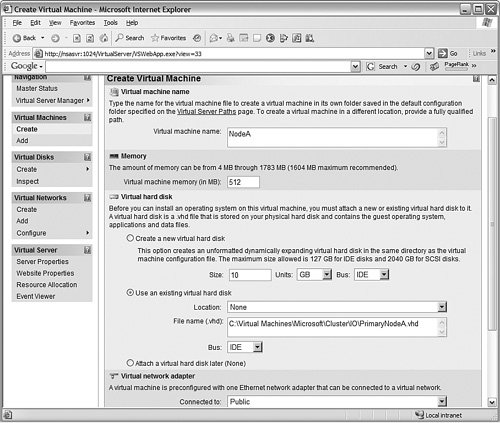
Next, I add a shared SCSI adaptor so that I can connect it to the quorum drive. I give it a SCSI ID of 6 so that this node has a different address from the other node I create later. You can see that process in Figure 6-51. Figure 6-51.[View full size image] 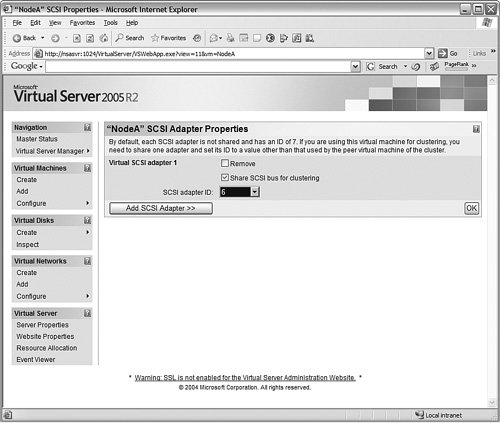
And as a final step for this machine, I create another network card for the "heartbeat," connecting it to the private network. I am now ready to install the operating system on the first node. You can see the beginning of that installation in Figure 6-52. Figure 6-52.[View full size image] 
Installing the Operating SystemsI set the name for this first system to NodeA. I will install the operating system with default options, other than the IP addresses on the cards. I will configure those cards with a 10.1.1.1 address for the public connections (as you can see in Figure 6-53), and a 10.2.1.1 address for the private heartbeat connection. I disable the second network card until I start the cluster installation, but you do not have to do this. I just find that it speeds the wizards along to only deal with one card. Figure 6-53.[View full size image] 
Next, I will log in to the system and install the Microsoft Virtual Server extensions. Now I set that SCSI drive I created on the shared SCSI bus into two drivesa Q: drive with 500MB of space and an S: drive with 9.5GB of space. You can see those drives in Figure 6-54. Figure 6-54.[View full size image] 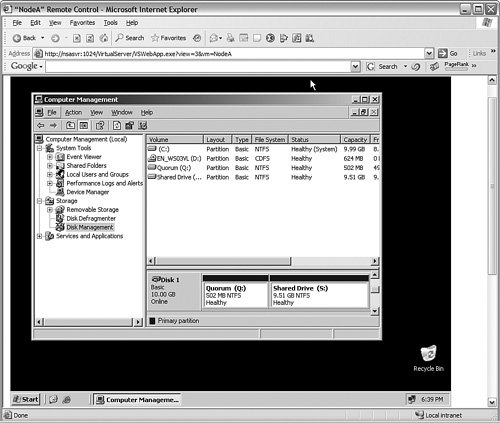
When that is complete, I run the dcpromo command to make this system a domain controller, and allow it to create a DNS server. You can see in Figure 6-55 that the Domain Controller installation process is just ending.
You cannot really create a functional cluster as I have here with only two nodes. The reason is that the clustering function depends on DNS, Active Directory(AD), and so forth. If you take the primary node down to simulate a failure, you take the DNS and AD offline, so the cluster will not work. You can mitigate this by making the second node a domain controller, installing another DNS pointing the first and vice versa, and so on. You can also make the primary node the system without the AD and DNS, and then practice failing only the non-DNS system. Figure 6-55.[View full size image] 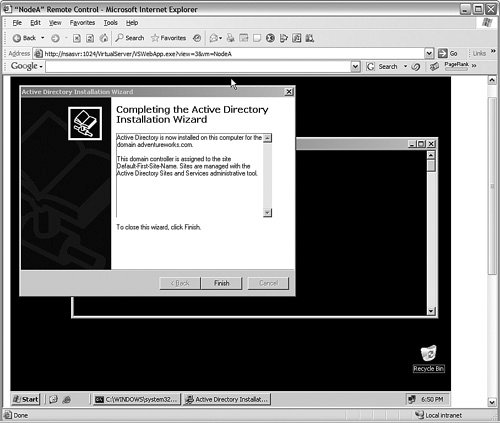
After I shut the first machine down completely (very important for the Microsoft VM), I will build the second machine just like the first, with the following exceptions:
I progress with setting that server up, I install the extensions, and format the Q: and S: drives, just like before. Now I start up NODEA again. Installing the ClusterI enable that second NIC (the one with 10.2.1.1) on NODEA, and now I have everything set up to install clustering. I start the Cluster Installation Wizard by accessing the Clustering Services Manager from the Start menu. You can see the wizard's first screen in Figure 6-56. Figure 6-56.[View full size image] 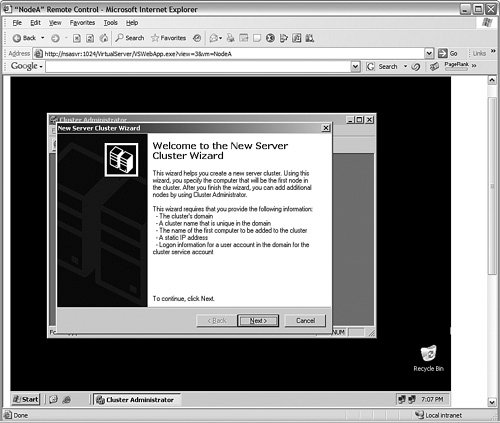
I name this cluster SQLCLUSTER, and set the quorum to use the Q: drive and published the S: drive as a shared resource. I set the cluster management tools to use an IP address of 10.1.1.10. When that wizard completes, I start up NODEB and then add a node (NODEB) to the cluster using the same wizard. This time, I join the SQLCLUSTER cluster rather than create a new one. Now the cluster is complete. All there is to do now is to install the service packs and SQL Server 2005 on it, as I described earlier in the chapter. If you follow this process, you can manually fail the cluster to the second node by using the Cluster Administrator, without having to take the first node down. Try connecting to the cluster using a client machine with the SQL Server Management Studio to see that the resources continue to respond even after the cluster fails to the second node. |