Take Away
The information you learned in the first part of this chapter will help you understand, diagnose, and design your system from a conceptual standpoint. In this section, I demonstrate how you can combine that knowledge with a few of the tools explained this chapter in a practical way. I begin this exercise by showing you how to create a project, move on to creating a database, and then populate that database with a table. I populate that table with a few values using a stored procedure, and then I create a view to query the table. You can follow along on your test or development system in your environment. This is not just an exercise, however. You can actually use this setup to create a useful database for your systems. You can use the information you find throughout this book to extend what you capture and track using this database. Every database project should start with a plan, and this project is no different. Because we are focusing on an administration view of SQL Server 2005, I do not spend time covering that plan now. Along the way, I make comments about the design, but the idea here is to learn more about what we are doing and how we are doing it than why. This database is one I create in most of the systems I manage. It provides a historical view of metadata that you can use to monitor one or more servers. I demonstrate some code along the way, but it is not necessary to understand each line of the scripts just to learn to use the tools. Most of the data you will store in this database derives from system functions that you can run any time. So why store that data if you can get it any time? The reason is that some of the data changes over time. Storing snapshots of this information allows you to watch the trends and predict growth patterns. Other data, such as a server's name, does not change, at least not often. Storing the name of the server in a table anyway allows you to create a "master" version of this system to monitor lots of servers, and create system-wide metrics such as overall growth patterns, which databases have not been backed up recently, and so forth. Even if you do not plan to use this database, read through the examples. Nothing helps you learn faster than actually doing the work. SQL Server Management Studio TasksSQL Server Management Studio is the primary tool you will use to interface with your system. Just as in real life, real estate is king. Find a method of working with the screens that you like and are comfortable with. At first there are so many options, panels, and information displayed that it is all a bit overwhelming. Take your time and practice with the tools and you will be comfortable with it in no time. You can group the things you are working on into a solution. Within Solutions are projects, which are groups of connections and files that form a unit of work. Our example begins with a solution consisting of a single project. Creating a ProjectMicrosoft provides a sample database that you can install on your server called AdventureWorks. I make use of that database in several of the chapters, but I also create a database that is much smaller. Although this is not a database design book, it is useful to know a little about the objects on your system, so I am going to show you how to create a database for yourself. You can follow the examples I have here and create your own copy of this system. You do not have to create a project in SQL Server to work with a database. If you are just running a backup or some other maintenance task, it is not necessary to create a project. You can use the Object Browser or run a query from sqlcmd to do what you want, and then close the connection when you are through. Projects collect information about connections to a system and store scripts and other files in one place. SQL Server Management Studio stores the connections and files in a directory on your system so that you can group them and back them up, or transport them to another system. If you plan to work iteratively through a software development cycle, then projects are useful. To create a project, open SQL Server Management Studio from the Start menu. Click File, then New, and then Project. You could also just press Ctrl-Shift-N once inside the Management Studio. You are given a panel that sets the name, location, and type of project to create. Select SQL Server Scripts as the type and name the project DBAMDT (Short for Database Administrator's Meta-Data Tool). Enter the location to save the project and allow the system to create a directory for it. You now have a project with three empty folders: Connections, Queries, and Miscellaneous. Right-click the Connections folder and select New Connection from the dialog box. Complete the panel that pops up with the name of the server where you will house the database and enter your security information. That forms the beginning of your project. Next, you will run some scripts to create objects on the server using the connection you just defined. Creating a DatabaseI break out this project example into three sections. In the first, you create the objects, and in the second, you populate it. In the third phase, you use the view you create to query the objects you have created. Although you can quickly and easily create a database graphically, in this case you use a template to create the database. You can then transport this script easily from server to server, and update it and track it as the versions change. Click View and then Template Explorer in the menu bar. Drill down to the Database, and then create a database template and double-click it. You will be asked to connect to a server again. Go ahead and do that. I am going to ask you to change the text of this script a bit. As mentioned earlier, I like to use block comments rather than in-line comments, and I will add some specific code to get the result we want. Edit your script to look like this: /*
Create_DBAMDT_DB.SQL
Use: Creates the Meta-Data Tool database
Created: 11/22/05, Buck Woody
Last Edited:
Change Log:
*/
/* Set the database to begin working in */
USE master
GO
/* Drop the database if it already exists.
If you run this again, it will erase what you
have and create a blank database!
*/
IF EXISTS (
SELECT name
FROM sys.databases
WHERE name = N'DBAMDT'
)
DROP DATABASE DBAMDT
GO
/* Create the Database using the default drives */
CREATE DATABASE DBAMDT
GOOn a new system, adding all these comments and checking for the existence of a database is not strictly necessary, but you should do it anyway. It develops good habits. This script creates a database on the default drive with a minimal size. Later in the book, you will learn to move the files to another location and change the size. To save this script into your project, click File, then click Move SQLQuery1.sql Into… and then click DBAMDT. Name the script Create_DBAMDT_DB.SQL. If you hide the Template Explorer pane and switch to the project view, you will see the file in the Queries folder. Press F5 or click the Execute button to create the database. Creating a TableNow you will create a table to hold the server's information. We will be adding to this structure throughout the book, so for now focus on interacting with the tools. Slide out the Template Explorer pane again and locate the Table and then Create table template. It is a little wordy, so edit it to look like this: /*
Create_DBAMDT_Tables.SQL
Use: Creates the Meta-Data Tool tables
Created: 11/22/05, Buck Woody
Last Edited:
Change Log:
*/
USE DBAMDT
GO
/* Create table to hold server-wide data */
CREATE TABLE ServerInfo
(
ServerInfoKey INT IDENTITY(1,1) PRIMARY KEY
, ServerName VARCHAR(50) NULL
, DBAName VARCHAR(50) NULL
, LastUpdated DATETIME DEFAULT GETDATE()
)
GOTo save this script into your project, click File, then Move SQLQuery2.sql Into… and then click DBAMDT. Name the script Create_DBAMDT_Tables.SQL. Now press F5 or click the Execute button to create the table. You might have noticed that I keep my commas at the beginning of the line. I do that so that I do not forget any. If you would rather place yours at the end, that is fine, too. You are going to use the same script file to create all the tables, so I have indicated that in the header comments. I also took out the table check and DROP statements to make the code shorter. All you are storing so far is a key to the table, the name of the server and administrator and a timestamp every time changes are made to the table. The DEFAULT statement on this field enters the date each time you change a row. We do not have enough columns to store the data you will want to see. You will want to capture things that can change over time, so we need to add an operating system, service pack level, and server information (such as processor, memory, storage information, and network card type). We can continue the process of entering more fields by using T-SQL code, but there is another way to alter the table and produce a script at the same time. Open the Object Browser, and then drill down to the table called dbo.ServerInfo. Right-click that table and select Modify from the menu. Now you can graphically add the columns you want to add, as you can see in Figure 2-19. Figure 2-19.[View full size image] 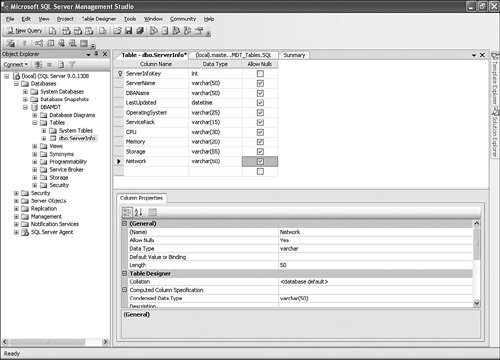
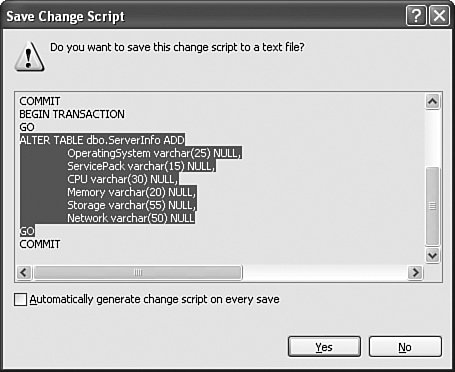
After you have made your changes, click the button on the far left, third line from the top, called Generate Change Script. It looks like a small scroll over a computer disk. Select the part from ALTER TABLE to the next GO and copy it with Ctrl-C. Now you can paste that into the original script. You do not need to save it out to file because you are pasting what you care about in the main script. You can see that in Figure 2-20. Figure 2-20.
Paste the results at the bottom of the script, which should be still available as a tab in the main panel. The table script should now look something like this: /*
Create_DBAMDT_Tables.SQL
Use: Creates the Meta-Data Tool tables
Created: 11/22/05, Buck Woody
Last Edited:
Change Log:
*/
USE DBAMDT
GO
/* Create table to hold server-wide data */
CREATE TABLE ServerInfo
(
ServerInfoKey INT IDENTITY(1,1) PRIMARY KEY
, ServerName VARCHAR(50) NULL
, DBAName VARCHAR(50) NULL
, LastUpdated DATETIME DEFAULT GETDATE()
)
GO
ALTER TABLE dbo.ServerInfo ADD
OperatingSystem varchar(25) NULL,
ServicePack varchar(15) NULL,
CPU varchar(30) NULL,
Memory varchar(20) NULL,
Storage varchar(55) NULL,
Network varchar(50) NULL
GOUse the mouse or keyboard to highlight the lines you just pasted, starting with the ALTER TABLE statement all the way through the last GO statement. When you highlight an area of a script and press F5, only the highlighted portion of the code runs. Do that now. Press Ctrl-S to save the changes to the script. Now you have seen three ways to create your scripts: using templates, typing them directly, and designing objects graphically and creating a script from there. Creating a Stored ProcedureYou can insert data into the table easily with a graphical tool or by using an INSERT statement. I am going to show you how to create a simple stored procedure to do the same thing, to demonstrate how stored procedures work. First, let's take a look at a statement that will insert data into the table: USE DBAMDT
GO
INSERT INTO ServerInfo (
ServerName
, DBAName
, OperatingSystem
, ServicePack
, CPU
, Memory
, Storage
, Network
)
VALUES (
'BuckSoftTS1'
, 'Buck Woody - woodyb@hotmail.com'
, 'Windows 2003 Server, 64-bit'
, 'None'
, 'Athlon x64'
, '2048'
, '200GB SCSI Internal'
, '1Genet'
);Do not concern yourself with the actual syntax at this point, just that some of the information stays the same, such as INSERT INTO, GO, and so forth, and others change, such as the server name, the operating system, and the like. To keep the things that will stay the same but allow different inputs, you can use a stored procedure. Using a stored procedure also allows you to change the table later and still access it with the same commands. To create a stored procedure that does the same thing as the INSERT statements while allowing variables, right-click the Stored Procedures object under the database name and then Programmability. Click New Stored Procedure on the menu that appears, shown in Figure 2-21. Figure 2-21.[View full size image] 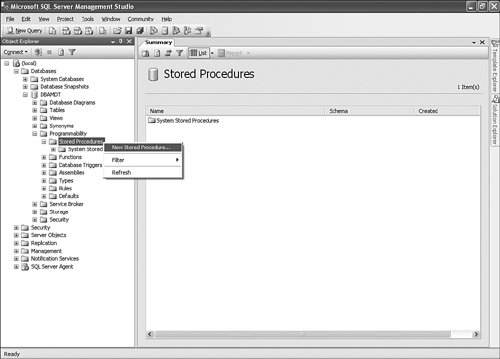
Edit the stored procedure to have this text: /*
Create_DBAMDT_Stored Procedures.sql
Use: Creates the Meta-Data Tool Stored Procedures
Created: 11/22/05, Buck Woody
Last Edited:
Change Log:
*/
USE DBAMDT
GO
CREATE PROCEDURE usp_Insert_Server_Info
@ServerName VARCHAR(50)
, @DBAName VARCHAR(50)
, @OperatingSystem VARCHAR(25)
, @ServicePack VARCHAR(15)
, @CPU VARCHAR(30)
, @Memory VARCHAR(20)
, @Storage VARCHAR(55)
, @Network VARCHAR(50)
AS
/*
usp_Insert_Server_Info
Use: Inserts new data into the ServerInfo table
Created: 11/22/05, Buck Woody
Last Edited:
Change Log:
*/
BEGIN
SET NOCOUNT ON;
INSERT INTO ServerInfo (
ServerName
, DBAName
, OperatingSystem
, ServicePack
, CPU
, Memory
, Storage
, Network
)
VALUES (
@ServerName
, @DBAName
, @OperatingSystem
, @ServicePack
, @CPU
, @Memory
, @Storage
, @Network
); v
END
GOPlacing the comments below the beginning of the stored procedure ensures that the text will stay within the text of the stored procedure. Later I show you how to display this text. Move that script into the project, with the name Create_DBAMDT_Stored_Procedures.sql. Create the stored procedure by pressing F5 or click the Execute button in the Query screen. To use the stored procedure and enter some data, open another Query window (by pressing Ctrl-N) and type the following statement, using your own variables in between the ' and ' (called tick marks): USE DBAMDT
GO
EXEC usp_Insert_Server_Info
'BuckSoftTS1'
, 'Buck Woody - woodyb@hotmail.com'
, 'Windows 2003 Server, 64-bit'
, 'None'
, 'Athlon x64'
, '2048'
, '200GB SCSI Internal'
, '1Genet'
GONow you have data in the table and can use this stored procedure to insert more when it changes. That will maintain a history of the server name, operating system parameters, and administrator information. The primary key and date stamps are inserted for you automatically. Creating a ViewYou can get data out of a table in several ways. You can use a SELECT statement or a stored procedure. I normally advocate the use of views for a couple of good reasons. For one, you can change the underlying structure of the table and not have to recode, just like a stored procedure. A view looks similar to a table, and users are often more familiar with it. Even if the view shows the same data as the table, this abstraction layer is useful. To create a view that shows the server information, slide out the Solution Explorer and right-click the Queries object. Select New Query from the menu and type this information: /*
Create_DBMDT_Views.SQL
Use: Creates the Meta-Data Tool Stored Procedures
Created: 11/22/05, Buck Woody
Last Edited:
Change Log:
*/
USE DBAMDT
GO
CREATE VIEW vw_ServerInfo
AS
SELECT
ServerName
, DBAName
, LastUpdated
, OperatingSystem
, ServicePack
, CPU
, Memory
, Storage
, Network
FROM
ServerInfo
GOPress F5 or click the Execute button in the Query screen to create the view. Save this script into the project as Create_DBMDT_Views.SQL. To use the view, you can treat it like a table. Here is a SELECT statement that you can run in a query to return all the rows and columns: USE DBAMDT GO SELECT * FROM vw_ServerInfo GO You will add to these scripts throughout the text. Go ahead and type them inmost people learn better when they create the scripts by hand and make a few mistakes along the way. This kind of code is typical of what you will be asked to do as a DBA. In the next few chapters, I show you how to fill these tables using system views. SQL Server ProfilerAs you saw earlier in this chapter, using the Profiler is not difficult at all. One of the easiest and most valuable uses for this tool is to check for the queries in an application that take a long time to run. With new coding methods, it is sometimes difficult to check what each application component does, because it will often morph into various uses depending on how it is called. Another reason that developers cannot always tell how fast a query is running is that the server might have multiple applications running against it. You cannot always tell how one query might affect another. The solution is to monitor what is happening from the back end. The Profiler can tell you exactly what is happening; and in this case, you can limit it to show just the queries that run for a period of time. Finding a Long-Running QueryTo find a long-running query, start the Profiler as before and create a new trace. Connect to your server, name the trace, and as a template select TSQL_Duration. In the Events Selection tab, you will see that both stored procedures and T-SQL (called Dynamic SQL) have already been selected. All that is left to do is to restrict the length of the queries that the tool will capture. Click the Column Filters button, and then click the Duration section. Expand the Greater Than or Equal To object and enter the duration you want to filter. This duration is in milliseconds, so calculate accordingly. Your developers should be able to tell you what value they want to check. If not, measure for things that run longer than 30 seconds and present the results in a spreadsheet or table for them to evaluate. Be sure and save this session as a template. You will find yourself coming back to it again. |