Reporting Security
|
Report security is another one of those "it all depends" kind of discussions. It depends because there is more than one way to set up the security, so there is more than one way to manage it. I will try and de-mystify the process, at least from a high level. The primary concept is that Reporting Services is Web based, so the security within Reporting Services first goes through the IIS. To explore this security, open your Windows Start menu and select Administrative Tools and then Internet Information Services (IIS) Manager. Note that this item might be in a different menu location based on the operating system you are using. Drill down in the Web Sites object and expand the Default Web Site item. If you took the default installation, you will find two virtual directories there, one starting with the word Reports and the other with the words ReportServer. Right-click the Reports site and select Properties. From there, click the Directory Security tab, as shown in Figure 9-42. Figure 9-42.[View full size image] 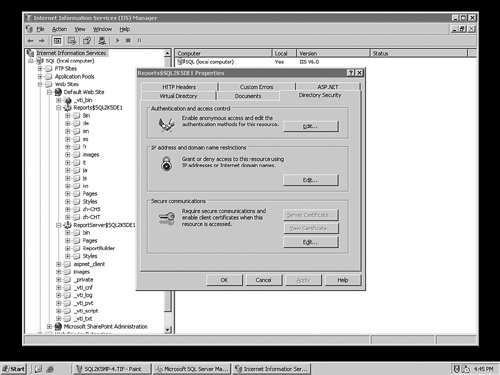
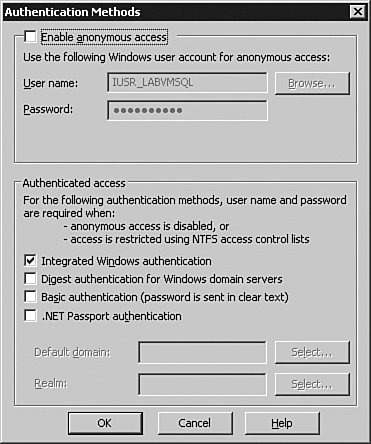
Click the Edit button under the Authentication and Access control field to set the security for the Report Manager (in the Reports site) or the SOAP access for running reports from application (in the Report-Server site), as shown in Figure 9-43. Figure 9-43.
You have several options, from using Windows integrated authentication for those systems connected to your network, to Basic, which pops up a box on the user's screen and sends information in clear text. Digest authentication is not used in SQL Server Reporting Services.
You can also configure your trusted or other Internet Explorer site to prompt the user for credentials even with Windows authentication selected. Security LayersThink of the IIS security as the front desk in the lobby, with the directories for the reports as doors behind the receptionist. The IIS server is the first layer of security. That security only allows users access to the systemnot any particular report. From there, the folders and objects (such as reports) are configured to allow those accounts access. When the security method is set in IIS, there are three categories of methods that you can use to secure the folders and reports. The first, and by far the simplest for you, is to use application authentication. In this method, your developers use a Windows account that the application accesses on behalf of the users. This account has full permissions on all folders and objects, but the name and password are known only to the developers. You lose a great deal of control in this method, but in a strong development shop this is commonly implemented. The second method you can use to secure your reports is to tie Windows accounts to roles within Reporting Services and then tie those roles to folders and objects. Roles are groups that you can use or create, and this is the normal method for securing the system. The final method is to manage security using a security extension, which is a program your developers can create to fold in to the authentication methods trusted by Windows. I do not spend any time on that process here because it completely depends on how they write and implement it. If you are interested in seeing a practical example of this type of security, look up "Security Extension Example" in Books Online. Regardless of which method you choose, you can use SQL Server Management Studio or the Report Manager to implement and manage the roles. On my test system, I have seven accounts created, named for what they do in a fictional company.
Let's take a look at assigning a couple of these accounts to roles within Reporting Services, and then we will assign those roles to folders and reports. Managing Security with SQL Server Management StudioYou can connect to a Reporting Services instance either by registering it or connecting to it after you are in the Management Studio. Once inside, you can drill down to the Security item and then expand the Roles object. You can see the results of that process in Figure 9-44. Figure 9-44.[View full size image] 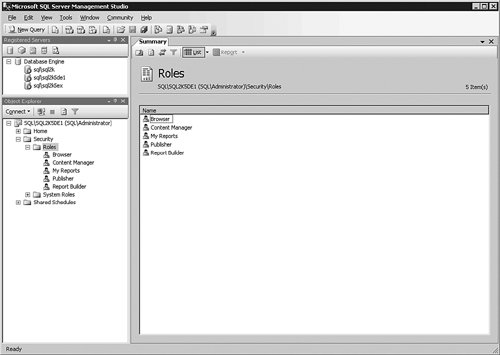
Several roles are already created for you, with most of the common tasks that the users need to do. Double-click the role name to view and set what the privileges the role contains. Figure 9-45 shows a view of what the Browser Role can do. Figure 9-45.[View full size image] 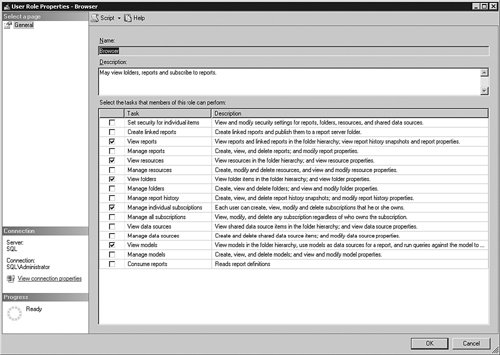
It is best not to change the roles that come configured with Reporting Services. A better practice is to create a new role and assign the types of things the user can do in a new object. After the roles are created, you can assign them to objects and to user accounts at the same time. On my system, I have a report called Contacts in the User Reports folder. I will right-click that folder and then choose Properties from the menu. Once inside, I select the Permissions panel, as you can see in Figure 9-46. Figure 9-46.[View full size image] 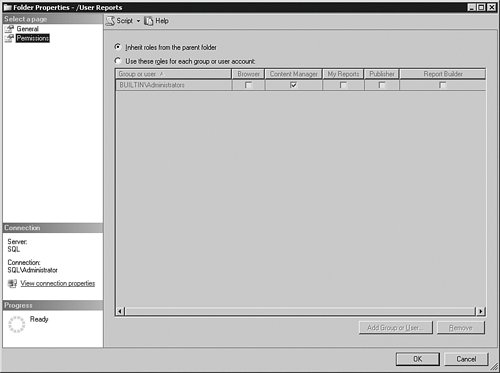
This folder inherits the security from the one above it. That is a important concept in Reporting Services security. As you create folders underneath each other, by default they retain the security from the parent. You can change the security for each successive folder. Objects in the folder inherit the folder's security. You can change the security for any object, as I do here for this folder. To make the change, I click the radio button that starts with Use these roles… and then click the Add Group or User button. That process allows me to enter the name of a Windows group or user and assign them to one or more Reporting Services roles for that object. I will allow Mary Manager to browse, publish, and build reports in and to that folder by adding her Windows login to this panel and assigning her to the Reporting Services roles that have those rights. If you are interested in performing this on your own test system, create some Windows accounts and experiment with the test reports we created earlier. Figure 9-47 shows the results. Figure 9-47.[View full size image] 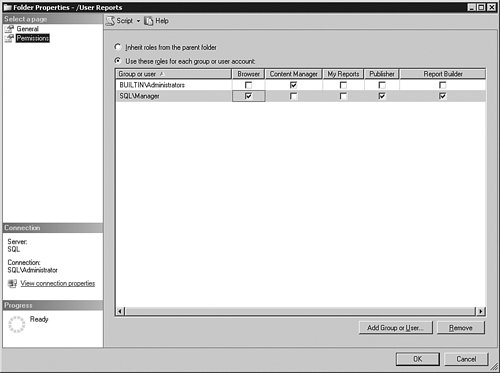
That brings all the security together. The IIS server authentication "discovers" the user who is accessing the site, and the roles that account is assigned to set the rights he or she has on the folders and objects. If you have users who need to access reports but they are not members of your company, the simplest method to provide reports is to create a low-privilege Windows account and then have the developers create reports that request credentials. When users run the report, they provide both the Windows account and the credentials requested by the report. Managing Security with Report ManagerAlthough the Management Studio has the richer interface for managing security, you can also connect to Report Manager with a browser and assign roles and users there. You have the same abilities using the Web-based Report Manager, but things are in a little different arrangement. To see the properties for an object, click it in the Report Manager and then click the Properties tab link near the top of the page, shown in Figure 9-48. From there, you can set whatever options are available, including security. Figure 9-48.[View full size image] 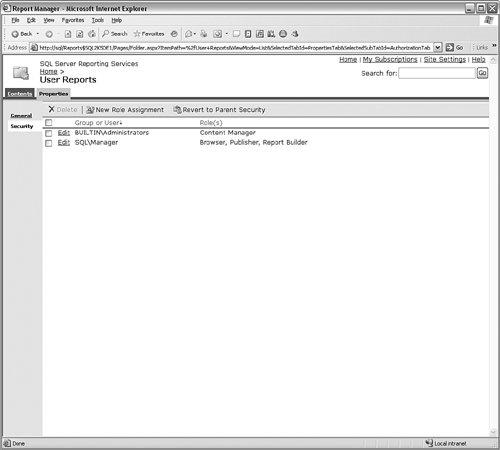
In this example, I set Dianne Developer to have a high level of privilege on the entire site. I have navigated to the Reports Web site on my Reporting Services server and clicked the Site Settings link in the upper right of the page. Once inside that page, I clicked the Configure site-wide security link under the Security heading. Once there, I clicked the New Role Assignment button. You can see the results in Figure 9-49. Figure 9-49.[View full size image] 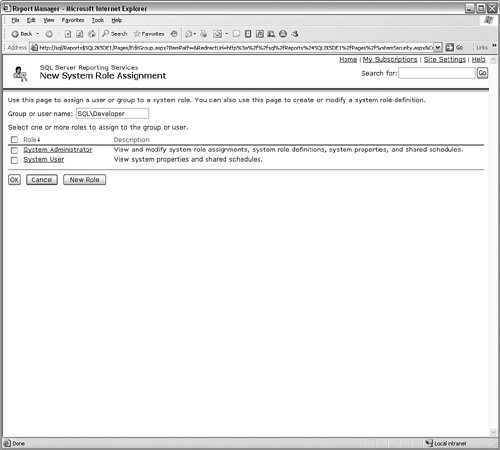
I enter the name of the Windows account, select a role assignment, and then click the OK button to continue. Although you can use this tool in much the same way as the SQL Server Management Studio, you do not have as many protections or helps built in. Still, it is a great interface when you cannot connect through other means. |