Installation Process
|
All Microsoft software includes a simple installation program. Gone are the days when the system administrator had to set aside an entire week to install and configure the software. What I cover here is not the entire installation process, but the overall decisions you have to make during the install.
When you install SQL Server for the first time, you can choose to have a named instance or a "default" instance. Using the default instance, your applications will refer to the server name alone as SQL Server; when you use a named instance, the format to refer to the SQL Server is SERVERNAME\INSTANCENAME. So, assuming you have installed SQL Server 2005 on a server named SVR1, you refer to the SQL Server default instance as SVR1. If you install the software again, this time as a named instance called INST2, you refer to it as SVR1\INST2. When you install another instance of SQL Server, make sure you account for the increase in resources necessary to run it. Do not spend the same hardware twice without realizing that you have not added enough I/O and memory to carry the increased load. Instances are a convenience, not a way to buy fewer servers for the same load. After you have read this chapter and planned out your system landscape, you will begin the actual installation. When you begin the installation, the primary choices you make are drive layouts and service accounts. Before you install SQL Server, make sure you have your operating system current with the latest patches and security fixes and have all the utilities you need. In previous versions of SQL Server, it was also useful to have a mail client installed, but that is no longer the case. First, you need to decide where you want to keep the binaries of the program and where you want to store data files. The optimal solution is to keep at least these five things apart: the SQL Server program files, data files, log files, index files, and the tempdb database files. Next, pick a Windows account to run the SQL Server services. This account does not need administrative privileges on the local server or domain or enterprise admin rights. The installation handles assigning the account the proper privileges. At least two services will be installed. One service will operate the SQL Server engine, another will operate the SQL Server Agent, which automates tasks and provides alerts and notifications. Use a separate account for each function and ensure that each is a specific Windows user account for that service. Make sure you set the password to something complex and set it not to expire. Do not use those accounts for anything else. You will get one set of services for each instance. Use a separate set of accounts for each instance. The reason is that certain stored procedures (Transact-SQL code that runs on the server) might be allowed to access the operating system. If these are enabled (not always a wise choice anyway), using the same account across all instances loses the ability to track who has made changes to the system. As you can see in Figure 1-1, when the installation program starts, it first installs the Windows Installer 2.0, the .NET Framework 2.0, and several SQL Server Setup support files. When that completes, it runs a system consistency check, which is a series of checks to ensure there is enough drive space, that the operating system is correct, and other housekeeping. You can see the output on my test system in Figure 1-2. Figure 1-1.[View full size image] 
Figure 1-2.[View full size image] 
After the check runs, the system presents you with a list of options for the feature set you are interested in. Do not install everything just because you think you might need it. That takes up space and makes significant changes to the way your installation is automatically configured. You can always come back and add features to the software later using this same installation program. On the other hand, if you are installing a test system (not production!) now, you can select everything. If you do not, we will add it later when we come to that feature in the book. In Figure 1-3, I've selected everything on this test installation. Figure 1-3.[View full size image] 
Next you are asked about installing the software as a default versus a named instance. You are also asked where the programs and data should live and which account to use to start all the services. Because you have planned your installation, you are better able to intelligently answer these questions. Two options at the end of the process might give you pause. The first option involves sending error reports to Microsoft in the case of a problem. The second deals with the usage of the tools you are using in SQL Server. In Figure 1-4, I've made both of these selections. Figure 1-4.[View full size image] 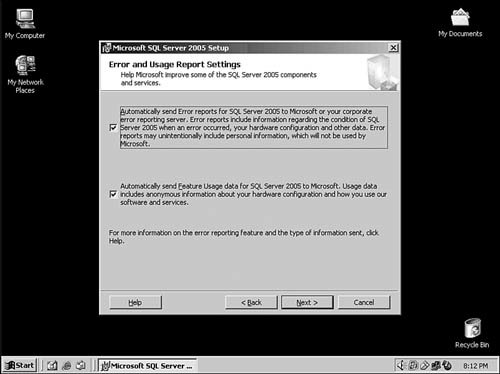
Think long and hard about these choices. The first reaction most technical professionals have is to clear these choices, because they are afraid of a privacy compromise. If you feel uncomfortable with these options or your organization policy prohibits them being set, then by all means deselect them. If you are willing to tolerate a little Big Brother, however, the information Microsoft receives from these choices can go a really long way toward making SQL Server a better, more secure platform. As you will learn in Appendix A, these installation check boxes make everyone's upgrade a little better. If you take the defaults during the installation, you will not have any of the sample databases and code. This is desirable on a production server, but you will want to install these on development systems. To do that, go through the Control Panel in Windows and then select Add or Remove Programs. Select the Microsoft SQL Server 2005 Tools item and then click the Change button. I usually add all the sample databases and examples on a development system, which will install the AdventureWorks database and (if you pick everything as I do) the AdventureWorks OLAP database, too. You might want to make other changes after the system is installed. To do that, you use the SQL Server Surface Area Configuration tool. I cover that tool in a few chapters throughout the book. Operating System VariablesDepending on the version of Windows your server is running, you need to set various switches and operating system variables. Windows Server 2003 and higher provides significant performance and security advantages over the earlier versions of Windows operating systems. Regardless of the operating system version, keep in mind a few base settings. For starters, ensure that the system runs only SQL Server. Unless the installation is quite small, such as an Express Edition installation, you do not want to put any other applications on the server other than management utilities and backup software. It is tempting to put lots of applications on the new, not-heavily-used-yet SQL Server, but it could eventually conflict with SQL Server, and at the very least it will cause performance issues. Leave the SQL Server box for SQL Server. Carefully consider the drive layout. The binaries for the operating system and other software should get its own physical drive, preferably inside the server hardware itself. The paging file should go on its own physical drive, too, and both of these should be kept away from the data, indexes, and tempdb files used by SQL Server. If you are running Windows 2000 Server Editions, you need to set a few switches and options to take advantage of higher RAM amounts. If you are using more than 3GB of memory on a 32-bit CPU, you may want to enable the /3GB switch in the BOOT.INI file of the operating system. If you are using more than 4GB of RAM, you may want to use the /PAE switch, too. Several caveats apply to these switches. You can find these in Books Online under the topic of "Enabling Memory Support for Over 4 GB of Physical Memory." The various settings and processes to follow depend on the operating system, processor type (32 or 64 bit), and the specific edition you are using. The SQL Server Web site at Microsoft also has several white papers on this topic; because each service pack might change these settings, check those resources for the most up-to-date information. Post-Installation ConfigurationWith the planning for the server landscape complete, the final step is to predict the growth of the system. There are lots of fancy formulas to help you with this, and most of them amount to nothing more than an educated guess. The better option is to monitor the system when it is in place and then use those numbers to do predictive analysis in the future. I explain more about that process in a bit. For the short term, plan for the growth you expect and add 10 to 25 percent, whichever your budget will allow. Most important of all, make sure the system you purchase can accept more CPUs and memory and is generally expandable. After installation, gather metrics as you use the system. I show you how to do that in Chapter 5. Evaluate the metrics at least monthly and provide feedback to the site IT managers or whoever makes budget decisions. Most managers do not mind spending a little overtime to keep the infrastructure current, as opposed to a huge bill to change out the entire system. There are many other factors in this decision process, but these are the primary ones to keep in mind. The "Take Away" section that follows shows a more complete exercise. I have explained the versions and their capabilities and detailed the hardware components. Now it is time to put it all together and build your environment. In the following section, I have developed some processes that will help you document your variables, create a decision matrix, and then create a monitoring system for future growth. |


