Automation
|
You will use many applications for automation. Scheduled tasks, imports for the business intelligence system, and most important, maintenance are all things that you can set up to use the automation features of SQL Server 2005. The automation features in SQL Server 2005 use a service called SQL Server Agent and the msdb system database in conjunction. The service runs in the background all the time, and the msdb database stores the schedules and tasks that the SQL Agent performs. Another component of automation is an operator. An operator is a set of contact information stored in the msdb database. Within each job, you can send information to an operator using this information. The SQL Server AgentThe SQL Server Agent runs as a service on the server with the name SQLAgent for the default instance. Each instance has its own SQL Server Agent Service, using the naming convention of SQLAgent$InstanceName. The service runs either under a user account or the Windows System account. When you installed SQL Server 2005, you selected this account, and you selected whether it will start automatically or manually. It is normally not a good idea to run SQL services as the Windows System account. You want to make sure the service is running under a user account so that the jobs you run will have access to user-privileged activities such as connecting to a drive, sending mail, and so forth. I try to use an account that has the least privileges possible. I also use a different account for each instance. The primary reason for user accounts and for keeping them distinct is for tracking. In the various logs that I explained earlier and in much of the monitoring that I show you later, there are references to the security principal associated with the activity. It is important that you can track the activity back to the affected account. By default, the SQL Server Agent is not started automatically in Windows, although you may have changed that during the installation. You can use the SQL Server Configuration Manager tool I explained in Chapter 2.
All the service identities can be changed using SQL Server Configuration Manager, but the Reporting Services account is managed separately. When you alter the account for that service using the SQL Server Configuration Manager, you are redirected to the Reporting Services management tool, which I cover in Chapter 10, "Analysis Services." SQL Server Agent uses the msdb database to store all of its information. There are also dynamic views that show some SQL Server Agent activity, which I cover in Chapter 5. To control the SQL Serve Agent, open SQL Server Management Studio and locate the SQL Server Agent item in the Object Browser pane. Right-click that object and select Properties from the menu that appears, as shown in Figure 3-15. Figure 3-15.[View full size image] 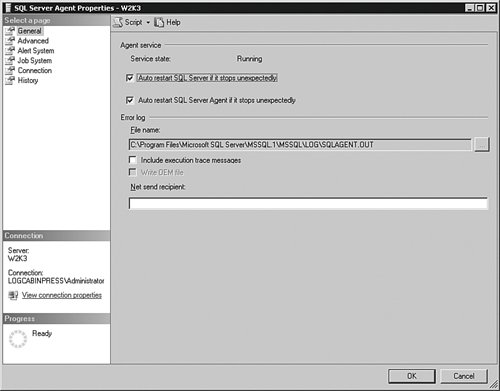
This panel has several areas, beginning with the General settings. Here you can set the SQL Server database engine and the SQL Server Agent services to start automatically if they stop. Keep in mind that if either service terminates, there is a reason. It might be that someone accidentally stopped one of them; but if the services stopped due to an error, it is not always a good idea to just restart them. If something bad happened, SQL Server may have terminated itself to protect its databases. Having the service restart automatically might cause more damage than it saves you time. Set these according to your preference. In any case, the SQL Server Agent service must be running to automate anything.
The SQL Server Agent uses the msdb database. If you choose to auto-start the SQL Server Agent, you probably want to choose the database option, too, because both are needed. You do not have to restart the SQL Server Agent if you just want to select the database option, however. You can also set the location for the error logs on this section as well include a net send address for notifications when the agent sends messages to the error log. The Advanced settings involve forwarding errors to a central server. I show you how to set that up in the "Take Away" section. Certain actions only take affect when the CPU is at an "idle" condition. Some servers always have a certain level of activity, so the CPU would never show an idle state. This section allows you to change the value and duration for that condition, which you can see in Figure 3-16. The next section covers the Alert System. Figure 3-16.[View full size image] 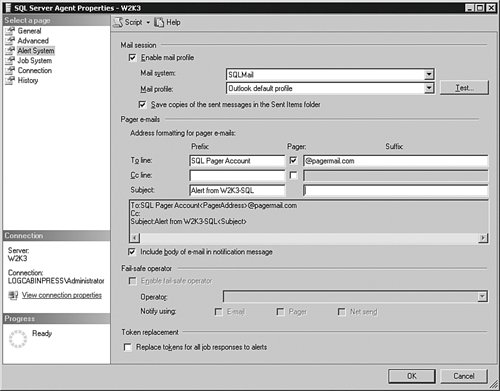
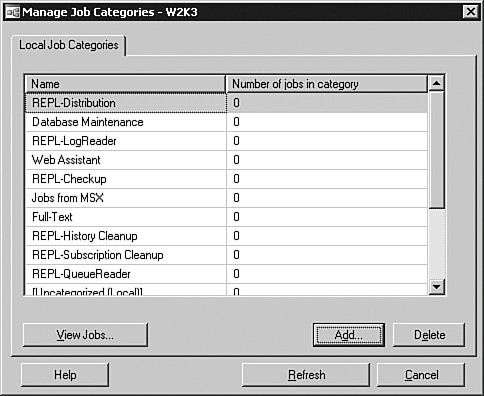
There are two kinds of mail systems in SQL Server 2005. The first is SQL Mail, which uses a standard Mail API (MAPI) call down to the mail system installed on the server. This means that to use this type of mail, you must install a Microsoft Exchange client locally on the machine and configure a mail profile that the SQLAgent service account has access to. Sensing the limitations of this configuration, Microsoft created a complete mail system within SQL Server 2005, called Database Mail. Before you can use the Database Mail system, you need to move over to the Management item in the Object Browser, right-click the Database Mail item there, and select Configure Database Mail. A wizard will guide you from there. Several items in this tab deal with operators, and I cover those in a moment. In the Job System section, you can change the time a particular job will wait without response to determine a job has failed. You can also set a proxy account for the jobs to run in case the account in the job does not have proper permissions, and I explain that choice further in the chapter on security. If you cannot connect to the local server using the server's name or IP address, you can set alias information in the Connection section. In the History section, you can change the number of rows that SQL Agent uses in the msdb database history tables. You can change how many rows the entire table consumes with the Log Size setting, and you can also change the number of rows per job. I suggest you leave this at the default unless you know you are going to run into trouble with it, and then experiment with it until you get what you want. In this section, you can also automatically remove agent history by time, if you know the information will become "stale" after a certain period. JobsAlthough jobs are just one component of automation, they serve as the heart of the process. Jobs are packages of steps that you can run by using graphical tools, on a schedule, using commands, and in response to alerts that I explained earlier. Before I explain how to create a job, I explain job categories. Job categories are named groupings that you can place jobs into. To examine, edit, or create new job categories, open the SQL Server Management Studio and right-click the Jobs object. Select Manage Job Categories from the menu that appears, as shown in Figure 3-17. Figure 3-17.
You will see a button on this panel for creating new categories. After you have created categories for your jobs, right-click the Jobs item in the Object Browser and select New Job… from the menu that appears. You are placed in the General section of the new job definition, shown in Figure 3-18. Figure 3-18.[View full size image] 
In this section, you name and select a category for the job. You can also set a verbose description for the job, which is always a good idea. Jobs are easy to create and have a short name. Providing more detail here ensures that obsolete jobs are removed later and current jobs stay in place. You can also enable and disable jobs here. Jobs are made up of smaller parts, called steps. In the Steps section, you can review, edit, and add new steps. Steps can be anything from T-SQL code to replication operations, operating system commands, and more. Once in the Steps area, click the New Step button to open another panel, similar to Figure 3-19. Figure 3-19.[View full size image] 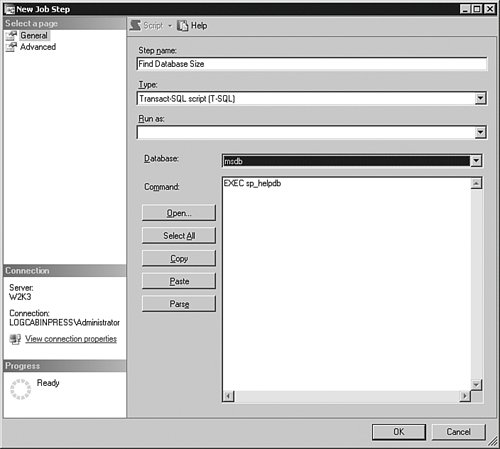
In the General section of the Steps panel, you set the name of the step, which account it runs under, the database, and the type of step. In this example, I have selected a T-SQL command to show me the space in my databases. You can open a script file, paste the contents of a set of scripts in memory, and even parse the statements to make sure they are syntactically correct, all from this screen. The Advanced section, shown in Figure 3-20, sets the success and failure conditions. Using this panel, you can create a simple program flow, such as "do the next step" if the step is successful, and "send an alert" if it fails. You can also set timeouts and even control the account to use for a particular step. Figure 3-20.[View full size image] 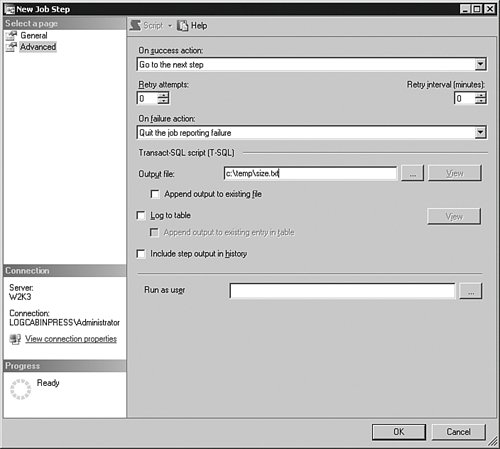
You can also record the activity of each step. I have set the output of the commands in this example to be sent to a text file, allowing me to automate the sizing check for the database that I spoke about in the last section of this chapter. After you have added all the steps you want, click the OK button to return to the New Job panel. The next section, Schedules, allows you to set an amazing array of timed options for the job, including multiple options for recurrence. The Alerts section sets up the alerts for this job. I explain those further in a moment. Alerts can place notifications from the job in the event logs. The Notifications section sends the ending status of the job to an operator, which we will set up in a moment. You can send a notification when the job completes, when it is successful, or when it fails. Although the temptation is to send the notification only when the job fails, that is not always the best course of action. If the SQL Agent service fails, you will not get a failure notice, and you will think everything is okay when it is not. Although it is sometimes difficult to deal with, it is better if the job sends a notification when it runs, regardless of the outcome. That way, when you do not get any mail, you will know to check the server. Of course, if you have hundreds of jobs, this advice does not always hold. You can send notifications to an e-mail, a pager, using a net send command, and by writing to the Windows Application event log.
The net send command only works if the recipient is online. Do not rely on this method alone to send notifications. You can also make the job run once and then go away by combining a one-time schedule and the Automatically delete job selection you see in the Notifications section, choosing whether it deletes on completion, success, or failure. Click the OK button to create the job with the steps you defined. To manage the jobs, check the results they send when they run. You can also check them as they run by using the Job Activity Monitor located directly underneath the Jobs item in the Object Browser. You can right-click any job and select View Job History from the menu that appears. The entries you see here are stored in the msdb database, and you made selections along the way that affect how many of these entries you will see. Another management requirement is checking the efficacy of your jobs. Over time, you will develop lots of jobs, and sometimes a job becomes obsolete but is not removed. In Chapter 5, I explain how to check the jobs and their histories automatically. With your new job created, you can use several methods to start it. The simplest is to right-click the job name and select Start Job from the menu that appears. Your job will also run in response to an alert, which I show you in a moment. Your job will also run using any schedules that you created for the job. You can control jobs using two stored procedures that Microsoft provides: sp_start_job and sp_stop_job. The simplest form is to call the stored procedure with the name of the job as a parameter, like this: sp_start_job'JobName' The sp_start_job stored procedure has more parameters that can set the error flag for the return code, the job name, the server name, and even the step to start with. Here is the full syntax: sp_start_job 'job_name' , error_flag , 'server_name' , 'step_name' AlertsI covered the definition of alerts in Chapter 2. You may recall that alerts have an error level, a severity, and text. Alerts are entered into the event logs, and SQL Server 2005 reads those logs and responds to them based on the settings you define in this area. Alerts can do more than just fire on an event. You can also create alerts for a Performance Monitor condition, which I demonstrate in Chapter 5. If you are using Windows Management Interface (WMI) programming, you can also create alerts on WMI events. The interface here is simple. You can create a new alert by right-clicking the Alerts item in the Object Browser and then selecting New Alert… from the menu that appears, shown in Figure 3-21. Figure 3-21.[View full size image] 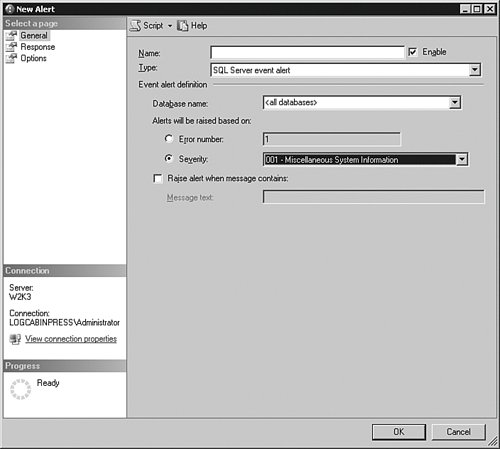
Once inside, you create the conditions and responses for the alert. You can also set various notification options in this set of panels. OperatorsAn operator is a collection of contact information stored in the msdb database. The contact information includes a name, a network account identification, an e-mail account, and pager information. You can also set a schedule for notifications so that you do not page an operator at two in the morning to tell him or her that a backup just finished. Operators are simple to create. Right-click the Operators item in the Object Browser and select New Operator from the menu that appears, as you can see in Figure 3-22. Figure 3-22.[View full size image] 
You can see in this example I have set myself up to be able to receive e-mail, network notifications, and pager alerts, although I have given myself a fairly easy schedule. The Notifications section of this panel displays the alerts that the operator will receive. This is the corollary to the Operators section in the alerts and jobs we just examined. What you assign there shows up here. At least one operator should be set to receive all the built-in system alerts, so after you create an operator you should return to the Alerts area and set one for those. The History section of this panel shows the e-mails, pager, and network notifications this operator has received. Creating a Maintenance PlanAfter learning all the concepts and manual steps for performing maintenance, you may be surprised to learn there is a simple, flexible wizard that will create an entire plan and schedule it for you, complete with notifications. It is common to see someone learn only about the Maintenance Plan Wizard and not probe any further into what it does. I think that understanding the individual steps in a maintenance plan will help you know when to use the wizard, and when to deviate from it. It is great to start with a wizard and then edit the plan it creates to suit your own needs. To create a maintenance plan using the wizard, right-click the Maintenance Plan item in the Object Browser and select Maintenance Plan Wizard from the menu that appears. You will be led through several steps where you can set the actions, schedule, and order of the maintenance I have described in this chapter. When you complete the wizard, you can double-click the maintenance plan to edit any of the steps within it. I cover a complete exercise of this process in Chapter 8, "Integration Services." You can also create a plan without a wizard. You can right-click the Maintenance Plan item again and select New Maintenance Plan… from the menu and start with a "blank slate." You are presented with a graphical tool, shown in Figure 3-23, where you can drag actions from a toolbox and create a comprehensive plan. Figure 3-23.[View full size image] 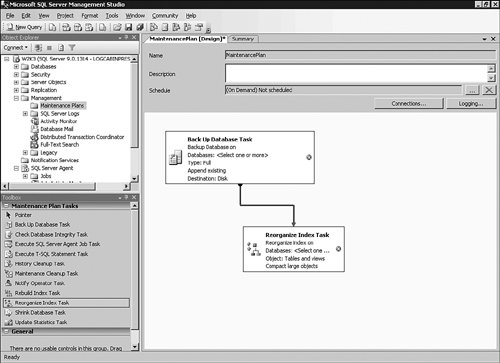
When you drag an item from the toolbox to the pane on the right, you can double-click it to fill out the properties for that item. In the case of the backup operation, you enter the type of backup, database name, and other information for the operation. When you are done placing items, you can drag the conditional arrows to them to create the maintenance flow. Using these objects and conditional flow connectors is an efficient, clean way to perform all the maintenance I have explained in this chapter. You do not have to remember the commands to defragment a database because the toolbox has an item for that. It is, however, important to understand all the manual methods for your maintenance so that you can use the most effective methods when called for. In other words, the tools should assist you, not do the work for you. Although it takes extra time, make sure you use the conditional logic on all steps. As mentioned earlier, you only need a recovery strategy and maintenance when things do not go well. Of course, when you need it, it is too late to create it. |