User Security (Principals)
Entry to SQL Server 2005 and the database objects on it is controlled with user accounts, called security principles. You have two kinds of security accounts to work with: accounts that you create in Windows and those that you create using SQL Server 2005. I describe those further in a moment. Let's take a look at some of the broader concepts you should be aware of no matter which accounts you choose. Password and Account PoliciesPolicies are the formal or informal conditions you place around passwords and accounts. Enforcing these policies helps you protect against a principal specifying a simple or easily broken password, or leaving a password unchanged for an extended period of times. If you use Windows accounts for SQL Server security, you do not have to control these settings. The operating system or networking layer affects how strong the passwords are and how often they are changed. This relieves the burden of securing the accounts from SQL Server. Using this type of security, you are only responsible for securing the databases and their objects. There are times, however, when you need to allow access to a database but the principal either is not in your domain or is using a different type of security altogether. For those, you can create SQL Server 2005 accounts. Although they do not offer the same level of protection as the operating system, you can still apply polices to them. I show you how in a moment. The first policy that you need to consider for principals is password complexity. This means that the password the principal selects should contain upper- and lowercase alphabetic characters, and not a dictionary-definable word. Complexity also involves using nonalphabetic characters such as punctuation and numbers. Used in combination, this policy makes the password more difficult to derive. One note of caution here: Substituting obvious punctuation for characters is still considered a dictionary-defined word. For example, password and pa33word are easily discovered with modern password-breaking tools. Spaces are an interesting case. Although they are allowed in a Windows password and make it easier to create complex passwords, they are not counted by the Windows system as a complex character. They also are not counted as an alphabetic character. There is no harm in creating a complex password with multiple spaces in it, but it is best not to end a password with a space because some applications may trim it. No password should consist of repeating characters. More than three or four repetitions of a character allows a password-cracking algorithm to find a numeric pattern in the password. The next line of defense is the length of the password. A short password, even if it is complex, is still easily derived. The longer you make the password, the harder it is for a system to guess. Without delving too far into the Windows security model, passwords greater than 15 characters are usually best. This is due to the fact that the older LAN Manager hashing algorithms breaks into two seven-character parts. Setting a password to a higher value than 14 characters causes a curious side effect that stores the hash incorrectly, making it almost impossible to track back to the login by the password-cracking algorithms. You should only allow a password to remain in effect for a short period of time. Requiring the principals to change their passwords every few months gives less time for the password attacks, and if the password is ever compromised, only allows a discrete period of breach. Enforcing a historical aspect to the password also increases security. This means not allowing a principal to rotate through a few passwords, developing another pattern so important to the password-breaking programs. Setting a length of time of around five passwords or more creates a fairly secure environment. Along with this requirement, the password complexity can often be set not to allow the principal to change just one or two letters of the password to cheat this system. The final area for password and principals to enforce is the reset policy. If an attempt is made against an account multiple times, you can enforce how many times the password can be entered incorrectly before the account is locked. When the account is locked, you can control how the account is unlocked. You can require a manual account unlock or you can set a length of time the principal must wait before their account is automatically unlocked. Both policies have advantages and disadvantages. If you require a manual unlock, you need to be responsive to the principals when they contact you; if you use the timed method, your principals will have to wait and the system will be less secure.
All of these policies fall within the concepts of using passwords for security, which itself is the subject of several books. There is quite a bit of math behind creating and deriving passwords, including the formulas given by the U.S. government publication called Federal Standard 1037C. That reference uses this formula to calculate optimal password length: (log S )/(log N ), where S is the size of the password space and N is the number of characters available. The password space (S) formula is LR /P, where L is the maximum lifetime of a password and R is the number of guesses per unit of time. Most passwords are not this advanced; if you need a password formula, however, this is a good one to use. The longer you allow an attacker to attempt the password, the more probable the attempts will eventually succeed. Keep these policies in mind as I explain the security on the server and the databases and its objects. If you are using the Windows Server 2003 operating system or higher, you can use some of the same policies as the operating system, but in general the operating systems has a higher level of security options than SQL Server created accounts. Whatever your account policies, add them to your security audit. It is useful to have this information available for new DBAs and others who create accounts. You can also present this information to security auditors. User AccountsAs mentioned earlier, there are two methods to allow access to SQL Server 2005 and the databases. The first uses the Windows operating system, and the second uses SQL Server 2005 to create and manage the accounts. When you install an instance of SQL Server, you select the security access that you want to allow. You can select Windows accounts or you can allow both Windows and SQL Server 2005 generated accounts. If your principals are all on your NTLM or Active Directory domain or are trusted by them, you should use Windows accounts. It simplifies the security and places it in a stronger framework. If you have principals that will not be part of your NTLM or Active Directory domain, you will need to create accounts in SQL Server 2005. Windows LoginsWith your policies documented and your account strategy laid out, you can create the accounts using graphical methods or in code. I only cover creating the user in Windows briefly because a full discussion of Windows security is beyond the scope of this book and different versions of Windows have a different place to create the users. I do, however, want to cover the basics of creating a Windows user in case you are asked to manage the Windows server along with your database. There are different tools to use depending on whether the server is part of an Active Directory domain or whether it uses local security. For Active Directory, you control the user accounts and policies from a domain controller. If the SQL Server 2005 system is not part of a domain, you control the Windows accounts from the SQL Server system. In either case, you are leveraging the accounts from the Windows operating system, so you need that account set up first. Creating Windows AccountsLet's take a look at the places you create and manage user accounts in an Active Directory environment. Locate a domain controller, and then from the Start > Program Files menu, click the Administrative Tools item. From there, select Active Directory Users and Computers. Once inside, right-click the Users item and select New and then User from the menu shown in Figure 4-6. Figure 4-6.[View full size image] 
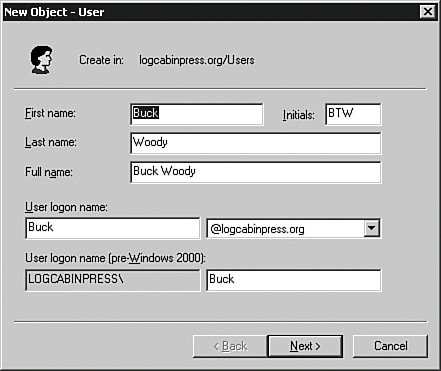
In the panel shown in Figure 4-7, create the user by filling out all of the fields. Certain parts of them are filled out for you automatically. Figure 4-7.
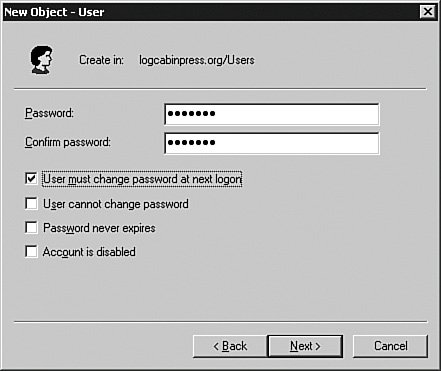
Click the Next button and then enter a password for the user. You can set a few minor policies here, but the policies I have been talking about are controlled by another tool that I show you in a moment. For now, enter the password and click Next to continue to the panel shown in Figure 4-8. Figure 4-8.
When you move on from that panel, you will get a summary of the account information. Click Finish to complete the process. You can place the user in any groups by right-clicking the account name and selecting Properties from the menu that appears. You can also double-click the group name and select multiple users that way. You can use Windows or Active Directory groups in to SQL Server 2005 just as you would an individual user, but I rarely recommend it. Although it is easier to drop a user into a Windows group and manage privileges that way, you lose some tracking and granularity. A different tool sets up more complex account and password policies. From the Administrative Tools item on the Start > Programs menu, access the Active Directory Domain Security Policy program. You'll get a screen similar to Figure 4-9. Figure 4-9.[View full size image] 
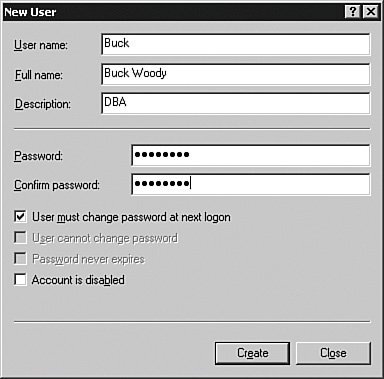
Once inside, you can set up the advanced security settings I explained earlier. If you are not using Active Directory, the SQL Server system will be part of a Windows NTLM domain (from the Windows NT days) or a stand-alone server. In the case of a stand-alone server, right-click the My Computer object and then Manage from the menu that appears to set up your users. Once inside the tool, expand the Local Users and Groups item and then right-click the Users object. Select New User from the menu that appears and enter the information about the user. You can see that in Figure 4-10. Figure 4-10.
When you have set up the user information, access the Local Security Policy item from the Administrative Tools area of the Start menu, as shown in Figure 4-11. This tool provides similar functionality to the Active Directory Domain Security Policy tool but with fewer options. Figure 4-11.[View full size image] 
Connecting Windows Accounts to SQL Server 2005 LoginsAfter you have the account created in Windows, you can use it within SQL Server 2005 by tying it to a SQL Server login account. In this section, I show you the entire process using the SQL Server Management Studio. Using the Management Studio shown in Figure 4-12, expand the server's name in the Object Explorer panel, and then Security. Right-click the Logins object and select New Login from the menu that appears. You can see the results in Figure 4-13. Figure 4-12.[View full size image] 
Figure 4-13.[View full size image] 
In the General section, you either type the account name using the NTLM format (DOMAIN\Username) or click the Search button to locate the account in NTLM domains or Active Directory domains. You can also select a Windows group for the user. I normally recommend against this practice for tracking; if your developers are using application-based security, however, this is an easy way to set up groups of users if they need them. The second selection on this panel sets the default database for the principal. This is an important option to set because anything the principal accesses, creates, or deletes without reference to a database happens in the database set here, and the default database is master. Because you should not change anything in the master database, make sure you set a database for the principal on this screen. You can also change the default language for the principal on this screen. Here it is set to (default), which means the language you installed the server under. If you choose a different language in this selection, make sure the database code page supports the characters in that language. The Server Roles section, shown in Figure 4-14, sets the roles (groups) that this account will belong to. Server roles are called "fixed roles" because you cannot add or delete them. Each of these roles has specific rights and privileges, which I explain in a moment. A principal can belong to as many server roles as you want, but some of them overlap from a permissions standpoint. Figure 4-14.[View full size image] 
In the User Mapping section, shown in Figure 4-15, you can set the databases the principal can access, as well as the default schema they will use in that database. You can also set the database roles the principal belongs to. Database roles are similar to server roles in that they are groups that have assigned permissions and rights, but you can create more database roles in addition to the "fixed" roles on this panel. Figure 4-15.[View full size image] 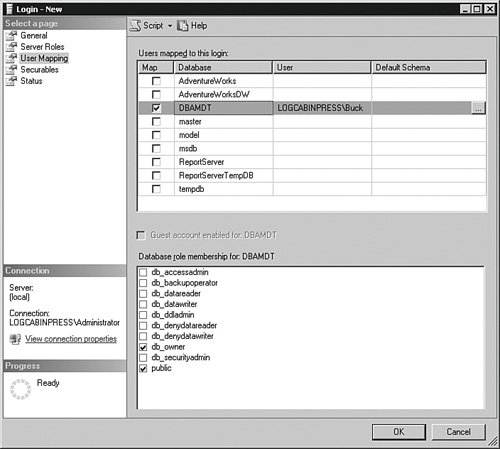
You do not have to assign the principal to a database in this panel. You can skip it entirely and then access the Security item on the Database object and assign the principals from there. Until you assign the principals a database, they will be able to log in to SQL Server but not access any database on the server. If the SQL Server 2005 login is part of the administrative server roles, including sysadmin or serveradmin, they do not need to be granted access to a database or a database role. Those fixed server roles have implicit access to all the databases, so you do not need to add those accounts to any database. In the Securables section, shown in Figure 4-16, you set the endpoints the principal has access to and what level that access has. Figure 4-16.[View full size image] 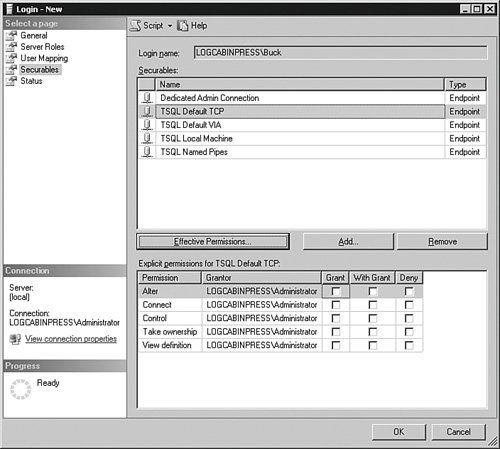
The Status section in Figure 4-17 allows you to grant or deny access to the database engine. Denying access trumps any other permission the login account has, even through a role membership. Figure 4-17.[View full size image] 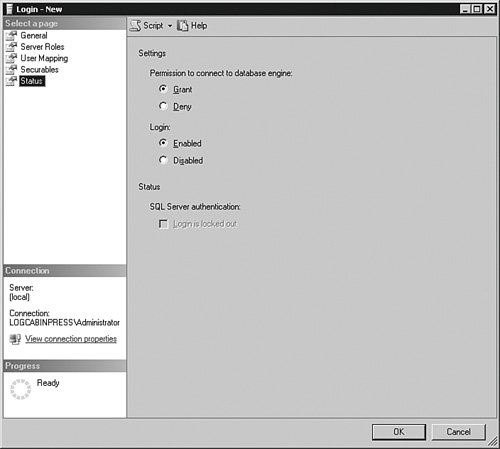
You can also enable or disable the login. Disabling the account is useful if you want to temporarily suspend access to the system but not destroy the account. If a principal will be gone for an extended period of time, you can disable their login until the principal returns. If the login is SQL Server based, and you are using Windows 2003, you can enforce account policies from the operating system onto the SQL Server 2005 login. If the principal violates that policy and locks his or her account, such as trying the incorrect password too many times, you can unlock the account on this panel. You can also script the login using the CREATE LOGIN command in T-SQL. This example script creates the same login account as the previous screens: USE [master] GO CREATE LOGIN [LOGCABINPRESS\Buck] FROM WINDOWS WITH DEFAULT_DATABASE=[DBAMDT] GO EXEC master..sp_addsrvRolemember @loginame = N'LOGCABINPRESS\Buck' , @Rolename = N'sysadmin' GO USE [DBAMDT] GO CREATE PRINCIPAL [LOGCABINPRESS\Buck] FOR LOGIN [LOGCABINPRESS\Buck] GO USE [DBAMDT] GO EXEC sp_addRolemember N'db_owner', N'LOGCABINPRESS\Buck' GO You can also use the sp_addlogin stored procedure, but this method is included for backward compatibility only because it does not set the advanced options available in SQL Server 2005. Here is a sample script using sp_addlogin: EXEC sp_addlogin '[LOGCABINPRESS\Buck]' , 'password' , 'DBAMDT' This script only creates the principal and sets a password and a default database. The only other options on this stored procedure are the default language, an optional SID value, and encryption. You should use either the graphical methods or the newer CREATE LOGIN statement. SQL Server 2005 LoginsIf you selected the ability to create SQL Server logins during your installation, you are able to add accounts that do not exist in the Windows environment at all. These accounts are maintained completely within SQL Server 2005. Although using Windows-based accounts is a more secure practice, it is not always possible. In Web applications, you may have multiple database principals that you do not want to license on the Windows system that houses the application. If you allow SQL Server logins, you can create and manage those principals independent of the operating system, saving that operating system license cost. I explain the process for creating a SQL Server 2005 login but do not repeat the entire graphical process here because there is only one difference between creating a Windows account login and a SQL Server controlled login. The primary difference is here, on the main screen, shown in Figure 4-18. Figure 4-18.[View full size image] 
When you select the SQL Server authentication radio button, you will need to add a password and confirm it. If you are using Windows 2003 or higher as the operating system, you can also have SQL Server 2005 enforce some of the Windows account policies. If you try to create a password for the principal on this screen and it does not follow the policies on the Windows 2003 system, you will get an error, as I did on this test system. You can see the error in Figure 4-19. Figure 4-19.[View full size image] 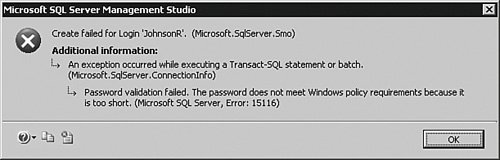
You can also set a certificate for this principal, which "signs" the data the principal sends. Instead of certificates, you can also set up an asymmetric or symmetric key to sign the data. These types of security methods encrypt data and provide some level of guarantee that the application can use to ensure that the sender of the data is really who they say they are. RolesRoles in SQL Server 2005 are similar to groups in an operating system. They serve as a collection object that you can grant rights and privileges and add logins to. Roles simplify security management because you can grant rights to the roles and as logins change the roles do not have to. SQL Server 2005 has roles at both the server and database levels. That means there is one set of server roles, but each database has its own roles. You get several "fixed" or predefined roles as part of the installation, with rights and privileges already associated with them. You can create more database roles but not server roles, although in the section that follows on permissions I explain how you can grant logins and other roles many server-level permissions that fill any gaps you find in the server roles. Let's examine the fixed server roles and what they can do. Fixed Server RolesFor the most part, server roles allow a login to handle the management tasks associated with SQL Server 2005. You can add as many principals as you like to the server roles, but once again you should not add a principal to a role with higher privileges than he or she absolutely needs. If you need to have a principal out at a remote site with the ability to perform only a certain action, do not put that principal in a role that includes that right along with others he or she does not need. You can use a fine-grained approach by applying special permissions I explain later. Most of the role names are self-describing, so I do not focus on the obvious here. Instead, I have developed a chart that will help you understand what rights the server role has and what kind of login is usually placed in it. I start out with the server roles that have the most privileges. If a role already has a privilege, you do not need to include a login in another role that also has that privilege. For instance, if a login is placed in the sysadmin server role, that login does not need any other role.
To add a login to a fixed server role using SQL Server Management Studio, open the Security item in the Object Explorer. Expand Security and then Server Roles, and double-click the role you are interested in. Click the Add button to add logins to the role. You can also add a login to a fixed server role in code by using the sp_addsrvRolemember stored procedure in the master database. The following example places the Windows WoodyB account into the disk-admin fixed server role: EXEC master..sp_addsrvRolemember N'[LOGCABINPRESS\WoodyB]', N'diskadmin' GO Fixed Database RolesFixed database roles work the same as the fixed server roles, with the exception that they manage not only a database but can control access to data as well. In the "Server Role" section, I showed you which type of principal you might want in a role. In this chart, I focus instead on the main rights a database role grants a login account.
To add a login to a fixed database role using SQL Server Management Studio, open the Database and then the Security items in the Object Explorer. Expand Roles and then Database Roles, and double-click the role you are interested in. Click the Add button to add logins to the role. Notice that you can also change the schema that the role owns in this panel, but it is best to leave these settings for the fixed database roles alone. To add a principal in code, use the sp_addRolemember stored procedure. This example adds the WoodyB Login to the db_accessadmin fixed database role in the DBAMDT database: USE [DBAMDT] GO EXEC sp_addRolemember N'db_accessadmin', N'[LOGCABINPRESS\WoodyB]' GO Principal-Defined Database RolesYou can add your own database roles to any database. Using SQL Server Management Studio, open the Database and then the Security items in the Object Explorer. Expand Roles and then right-click Database Roles. Select New Database Role… from the menu that appears. The main panel is shown in Figure 4-20. Figure 4-20.[View full size image] 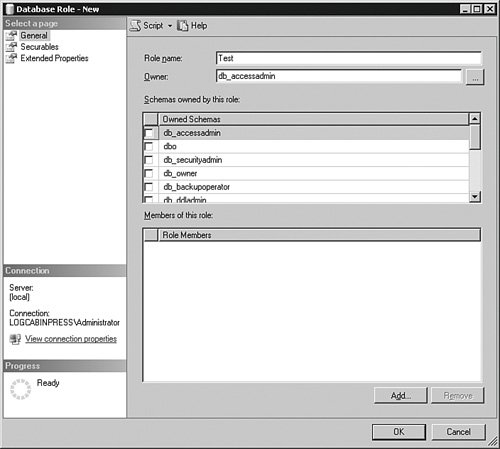
All you need to do to complete a database role is to name it and assign an owner to it. You can also add logins to the role from this panel and assign securables and the permissions and rights this role will have on them. A more common practice is to approach the security for the role from the other direction by accessing the securable's Security section in its Properties panel. From there, you can assign which roles access the securable. To create a database role in code, use the CREATE ROLE command. This example creates a new database role called Test in the DBAMDT database and sets the ownership to the db_accessadmin principal: USE [DBAMDT] GO CREATE ROLE [Test] AUTHORIZATION [db_accessadmin] GO To assign a login to a database role in code, use the sp_addRolemember stored procedure. This example adds the WoodyB Login to the Test group in the DBAMDT database: USE [DBAMDT] GO EXEC sp_addRolemember N'Test', N'[LOGCABINPRESS\WoodyB]' GO To grant the database role rights to an object, treat it just as any other principal. I explain object security further in the next section. Application RolesApplication roles are used by developers to run applications with no principal context. In other words, an application role has no principals assigned to it. You create the application roles the developers need, and assign them a password. You grant the application roles the permissions and rights that the developers need. The developers "call" the application role and provide the password. The developers then do some work and close the connection. The application role is then "dead" while it waits for another call. In this case, no principals are associated with the action, other than the account the developers used to connect to the database and call the application role. Developers can use a few other parameters with the sp_setappRole stored procedure, such as encrypting the password and storing a local cookie on the client machine. You should encourage them to use the highest level of security possible when they use application roles. To create an application role using SQL Server Management Studio, open the Database and then the Security items in the Object Explorer. Expand Roles and then right-click Application Roles. Select New Database Role from the menu that appears. Just as in the principal database role, you name the role and set an owner for it, and you can also assign the rights to securables from this panel. The differences are that you need to set and confirm a password and you do not assign other principals to it. To create an application role in code, use the CREATE APPLICATION ROLE command. Here is an example of a role called Test with a password of password, using the default access of the dbo schema: CREATE APPLICATION ROLE Test WITH PASSWORD = 'password' , DEFAULT_SCHEMA = dbo; GO Here is an example of code being called with the example application role: EXEC sp_setappRole 'Test', 'password'; SELECT * FROM sometable GO For enhanced security, your developers should use the encrypt function on the password. |