Recipe 4.7 Drawing a Triangle
4.7.1 Problem
You want to draw a triangle at runtime.
4.7.2 Solution
Create a custom MovieClip.drawTriangle( ) method using the Drawing API and invoke it on a movie clip.
4.7.3 Discussion
You can determine and plot the vertices of a triangle given the lengths of two sides and the angle between them. This is a better approach than specifying the lengths of the three sides because knowing the lengths of two sides and the angle between them always determines a triangle, whereas three arbitrary sides may not fit together to make a triangle.
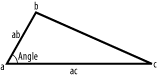
The custom drawTriangle( ) method accepts six parameters:
- ab
-
The length of the side formed between points a and b, as shown in Figure 4-4.
- ac
-
The length of the side formed between points a and c, as shown in Figure 4-4.
- angle
-
The angle (in degrees) between sides ab and ac.
- rotation
-
The rotation of the triangle in degrees. If 0 or undefined, side ac parallels the x axis.
- x
-
The x coordinate of the centroid (the center point) of the triangle.
- y
-
The y coordinate of the centroid of the triangle.
Figure 4-4. The parameters used in the drawTriangle( ) method
Define the custom drawTriangle( ) method on MovieClip.prototype to make it available to all movie clip instances:
// Include the custom Math library from Chapter 5 to access Math.degToRad(  ).
#include "Math.as"

MovieClip.prototype.drawTriangle = function (ab, ac, angle, rotation, x, y) {

  // Convert the angle between the sides from degrees to radians.
  angle = Math.degToRad(angle);

  // Convert the rotation of the triangle from degrees to radians.
  rotation = Math.degToRad(rotation);

  // Calculate the coordinates of points b and c.
  var bx = Math.cos(angle - rotation) * ab;
  var by = Math.sin(angle - rotation) * ab;
  var cx = Math.cos(-rotation) * ac;
  var cy = Math.sin(-rotation) * ac;

  // Calculate the centroid's coordinates.
  var centroidX = (cx + bx)/3 - x;
  var centroidY = (cy + by)/3 - y;

  // Move to point a, then draw line ac, then line cb, and finally ba (ab).
  this.moveTo(-centroidX, -centroidY);
  this.lineTo(cx - centroidX, cy - centroidY);
  this.lineTo(bx - centroidX, by - centroidY);
  this.lineTo(-centroidX, -centroidY);
}
There are a few points about this method that bear further discussion.
Point a will always be the point of rotation, so you don't need to calculate it's coordinates. However, points b and c need to be calculated (using basic trigonometric ratios). We define point b at the end of line ab at an angle of angle in an unrotated triangle. To factor in rotation we subtract rotation from angle. We define point c to be at the end of line ac. In an unrotated triangle, point c is on the same x axis as point a, but to factor in rotation you should subtract rotation from the angle between line ac (and itself, which is, of course, 0). This leads us to:
var bx = Math.cos(angle - rotation) * ab;
var by = Math.sin(angle - rotation) * ab;
var cx = Math.cos(-rotation) * ac;
var cy = Math.sin(-rotation) * ac;
The x coordinate of the centroid of a triangle is calculated by adding together the x coordinates of the vertices and dividing by three. The y coordinate is found in an analogous manner. In our drawTriangle( ) method, the coordinates of point a are always (0, 0), so it doesn't factor into the equation. We subtract the x and y inputs from the centroid coordinates to account for any user-defined offset:
var centroidX = (cx + bx)/3 - x;
var centroidY = (cy + by)/3 - y;
Here is an example of how to use the drawTriangle( ) method. Notice that you still have to define the line style before invoking the drawTriangle( ) method.
// Draw a triangle with sides of 100 and 200 pixels and an angle of 30 degrees.
this.createEmptyMovieClip("triangle_mc", 1);
triangle_mc.lineStyle(1, 0x000000, 100);      // Use a one-pixel, black, solid border
triangle_mc.drawTriangle(100, 200, 30);
4.7.4 See Also
You can draw an isosceles triangle using the drawRegularPolygon( ) method of Recipe 4.8 (and specifying a shape with three sides).


