Running an Access Macro
You have learned quite a bit about macros, but you have not yet learned how to execute them. The macro execution process varies, depending on what you're trying to do. You can run a macro from the Macro design window, from the Macros tab, from a Form or Report event, or by selecting a menu or toolbar option. The following sections cover the first three methods. Hour 24, "Finishing Touches," covers invoking a macro from a menu or toolbar option.
Running a Macro from the Macro Design Window
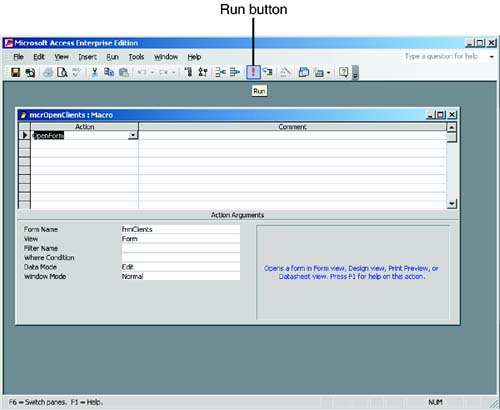
You can easily execute a macro from the Macro design window. It's simple to run a macro without subroutines: You just click Run on the Macro Design toolbar or choose Run | Run. Access executes each line of the macro, unless you have placed conditions on specific macro actions. After you click the Run button of the mcrOpenClients macro (shown in Figure 13.13), Access opens the frmClients form.
Figure 13.13. Running a macro from the Macro design window.
From Design view of the macro, you can run only the first subroutine in a macro. To run a macro with subroutines, you click Run on the Macro Design toolbar to execute the first subroutine in the macro. As soon as Access encounters the second macro name, it terminates the macro execution. The section "Triggering a Macro from a Form or Report Event," later in this hour, explains how to execute subroutines other than the first one in a macro.
Running a Macro from the Macros Tab
To run a macro from the Macros tab of the Database window, follow these two steps:
Click the Macros tab of the Database window.
Double-click the name of the macro you want to execute, or click the name of the macro and then click Run.
If the macro you execute contains macro names, Access executes only the macro actions within the first subroutine. |
Triggering a Macro from a Form or Report Event
You can execute a macro in response to an event. This section explains how to associate a macro with the Click event of a command button.
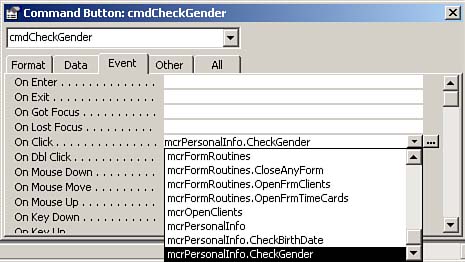
The form in Figure 13.14 illustrates associating a macro with the Click event of a form's command button. You must take four steps to associate a macro with a Form or Report event:
Select the object with which you want to associate the event. In the example, I have selected the cmdCheckGender command button.
Open the Properties window and click the Event tab.
Click the event you want the macro to execute in response to. In the example, I have selected the Click event of the command button.
Use the drop-down list to select the name of the macro you want to execute. If the macro has subroutine macro names, make sure you select the correct macro name subroutine. In the example, I have selected the macro mcrPersonalInfo and the macro name CheckGender. Notice the period between the name of the macro and the name of the macro name subroutine. You use the period to differentiate the macro group (mcrPersonalInfo, in this case) from the macro name (CheckGender, in this example).
Figure 13.14. Associating a macro with a Form or Report event.
Task: Creating a Macro
To practice the techniques you have learned, build the macro shown in Figure 13.12. This macro includes macro names and conditions. To execute the macro, you build a form and associate the Click events of the command buttons on the form with the macro names of the macros you build. This process helps reinforce all the macro techniques that have been covered thus far in this hour. To create a new macro, follow these steps: |
Click the Macros tab of the Database window.
Click New.
Click the Macro Name and Condition buttons on the Macro Design toolbar to show both the Macro Name and Condition columns of the Macro design window.
Enter all the macro names, actions, arguments, and conditions shown in Table 13.1.
Save the macro and name it mcrPersonalInfo.
Build a form.
Add an option group that has two option buttons. Set one of their Text properties to Male and the other to Female, and then set one of their values to 1 and the other to 2. Name the option group optGender.
Add a text box for the birth date. Set the Format and Input Mask properties to Short Date. Name the text box txtBirthDate.
Add two command buttons to the form. Name the first button cmdCheckGender and set its Text property to Check Gender, and name the second button cmdCheckBirthDate and set its Text property to Check Birth Date. Set the Click event of the first command button to mcrPersonalInfo.CheckGender and the second command button to mcrPersonalInfo.CheckBirthDate.
Save the form as frmPersonalInfo.
Test the macros by clicking each of the command buttons after selecting a gender and entering a birth date.
Macro Name | Macro Condition | Macro Action | Argument | Value |
|---|---|---|---|---|
CheckBirthDate | DateDiff("yyyy", [Forms]! [frmPersonalInfo]! [txtBirthDate], Date()) Between 25 And 49 | MsgBox | Message | You Are Over a Quarter Century Old |
Type | Information | |||
.. | StopMacro | |||
|
DateDiff("yyyy", | MsgBox | Message | You Are Over a Half Century Old | |
[Forms]! [frmPersonalInfo]! [txtBirthDate],Date()) Between 50 And 74 | ||||
Type | Information | |||
... | StopMacro | |||
DateDiff("yyyy",[Forms]! [frmPersonalInfo]! [txtBirthDate],Date()) | MsgBox | Message | You Are Over Three Quarters of a Century Old | |
Between 75 And 99 | ||||
Type | Warning | |||
... | StopMacro | |||
DateDiff("yyyy",[Forms]! | MsgBox | Message | You Are Over a Century Old!! | |
[frmPersonalInfo]! [txtBirthDate], Date())>100 | | | |||
Type | Warning | |||
... | StopMacro | |||
CheckGender | [Forms]![frmPersonalInfo]! | MsgBox | Message | You Are Male |
[optGender]=1 | ||||
Type | Information | |||
[Forms]![frmPersonalInfo]! | MsgBox | Message | You Are Female | |
[optGender]=2 | ||||
Type | Information | |||
MsgBox | Message | Thank You for the Information |


